& Construction

Integrated BIM tools, including Revit, AutoCAD, and Civil 3D
& Manufacturing

Professional CAD/CAM tools built on Inventor and AutoCAD
Integrated BIM tools, including Revit, AutoCAD, and Civil 3D
Professional CAD/CAM tools built on Inventor and AutoCAD
Define bidirectional associativity. Work with multiple views. Switch and tile views. Constrain walls to levels.
Type:
Tutorial
Length:
8 min.
Tutorial resources
These downloadable resources will be used to complete this tutorial:
Transcript
00:04
To demonstrate rt's
00:05
bidirectional associativity ability,
00:08
which is a really powerful function within R
00:11
we'll open up two other views,
00:14
tile those views and start editing the walls and see how rivet
00:19
allows us to edit
00:21
in one view while updating the other views.
00:24
So we're currently in the floor plan level one,
00:28
we'll open up our
00:30
south elevation.
00:31
So if you come over to the browser,
00:33
the project browser that is and double click on South
00:36
that now opens that, that up for us.
00:39
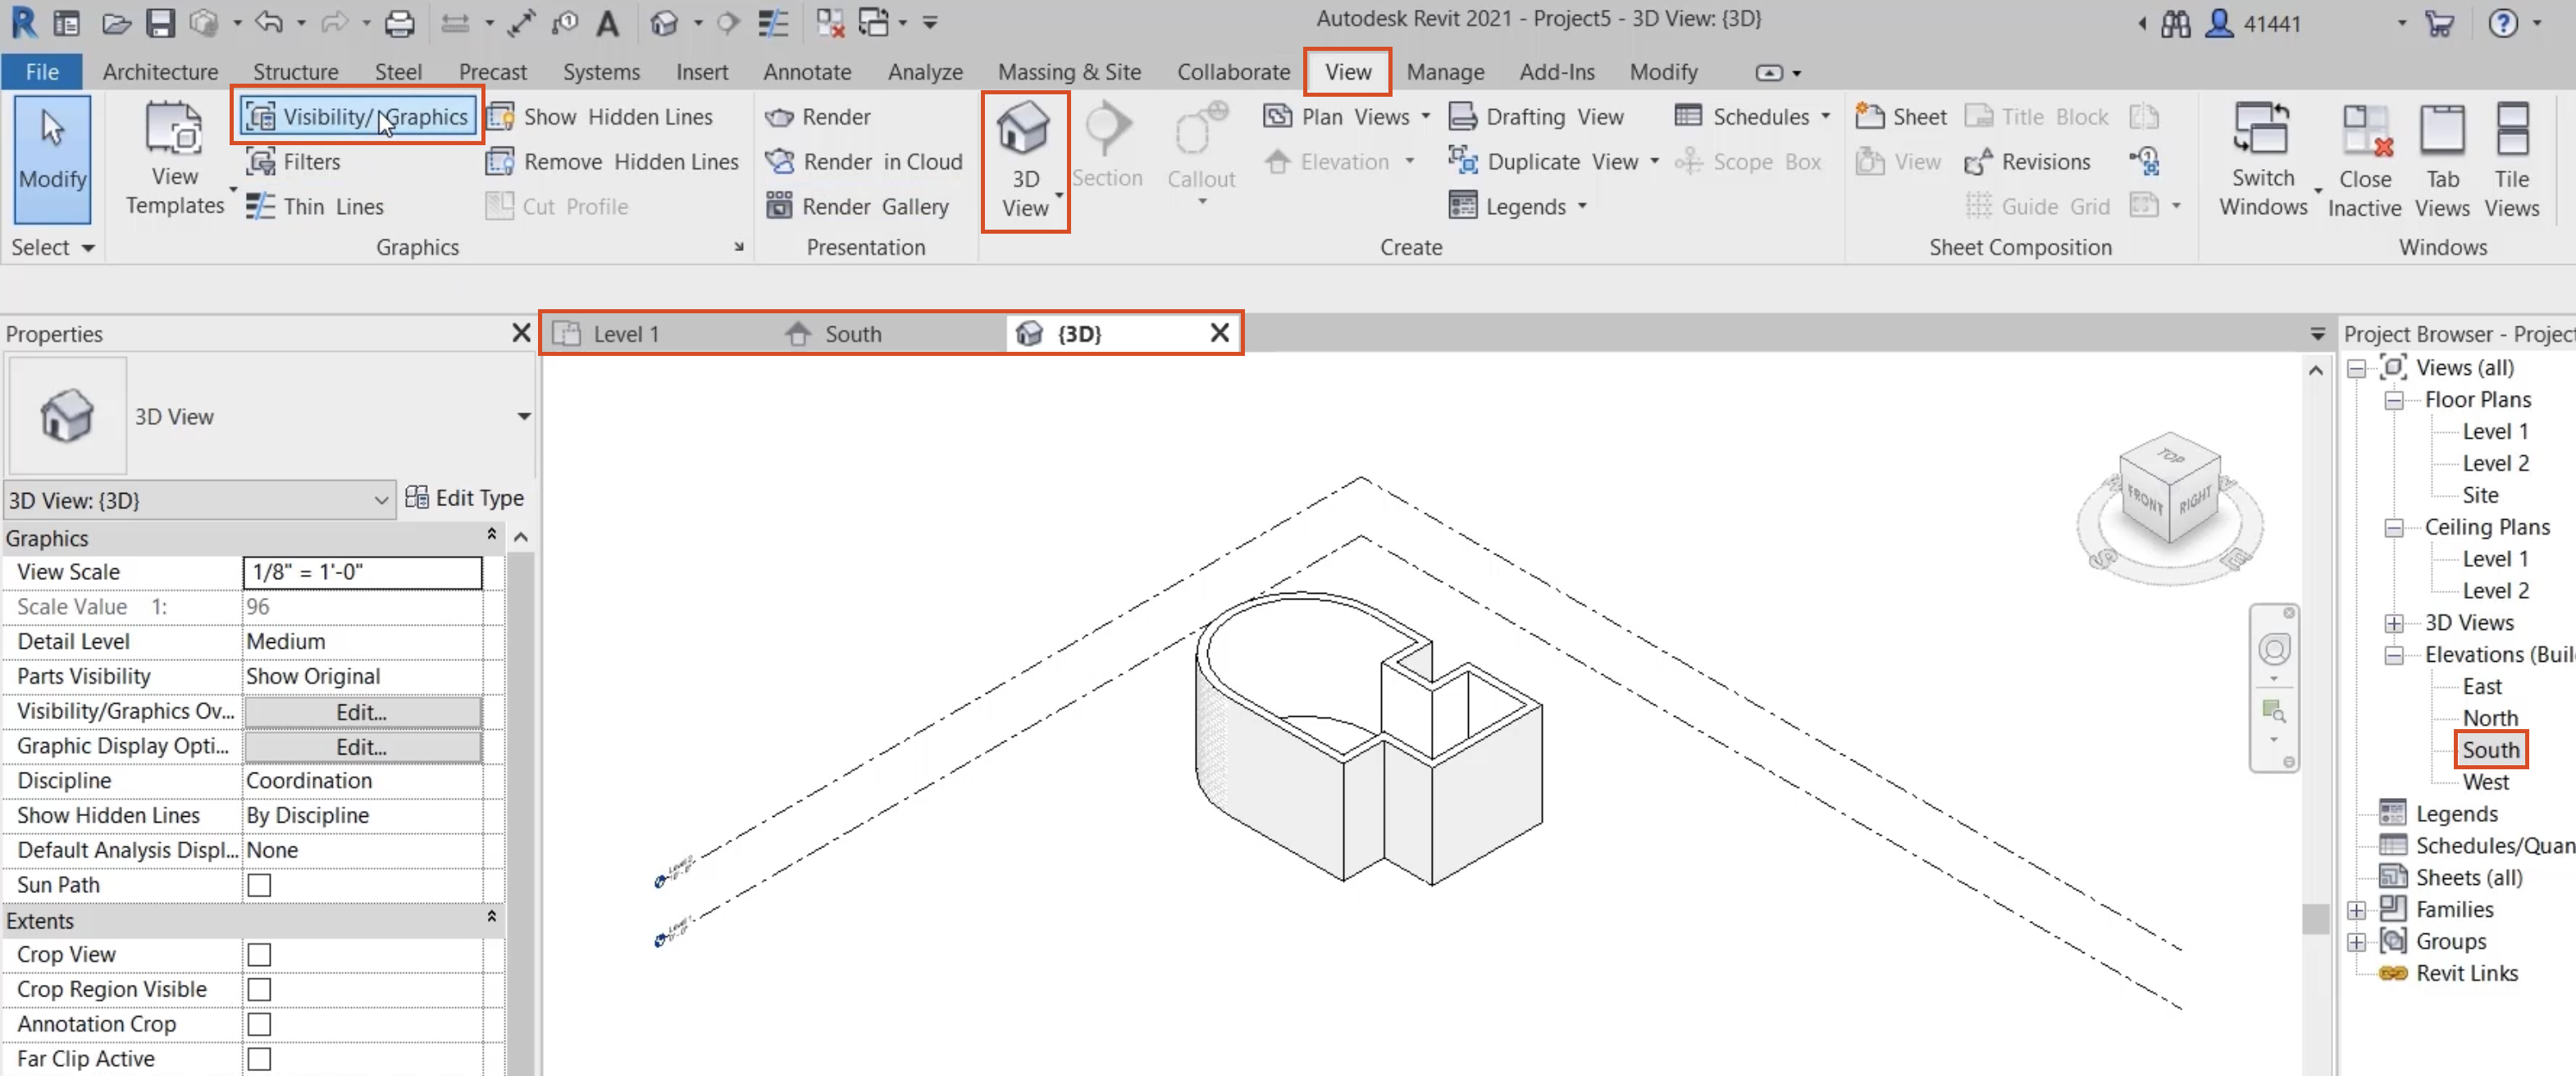
And if we open up the default 3D view, now if we look in our browser that doesn't exist,
00:45
so we need to go up to the view tab
00:48
and within the create panel, single click on the 3D view icon.
00:53
And you can see when I hover on that, it says default 3D view.
00:57
So we now have, we can see at the top of the view here, top of the graphics window
01:01
that we have three views that are currently open
01:05
in here. Now, in my 3d view,
01:08
we're able to see the, the level lines and I, I don't want to see those.
01:12
So we're going to go up to the view tab which is already active.
01:16
And within the graphics panel, we'll click on visibility, graphics
01:20
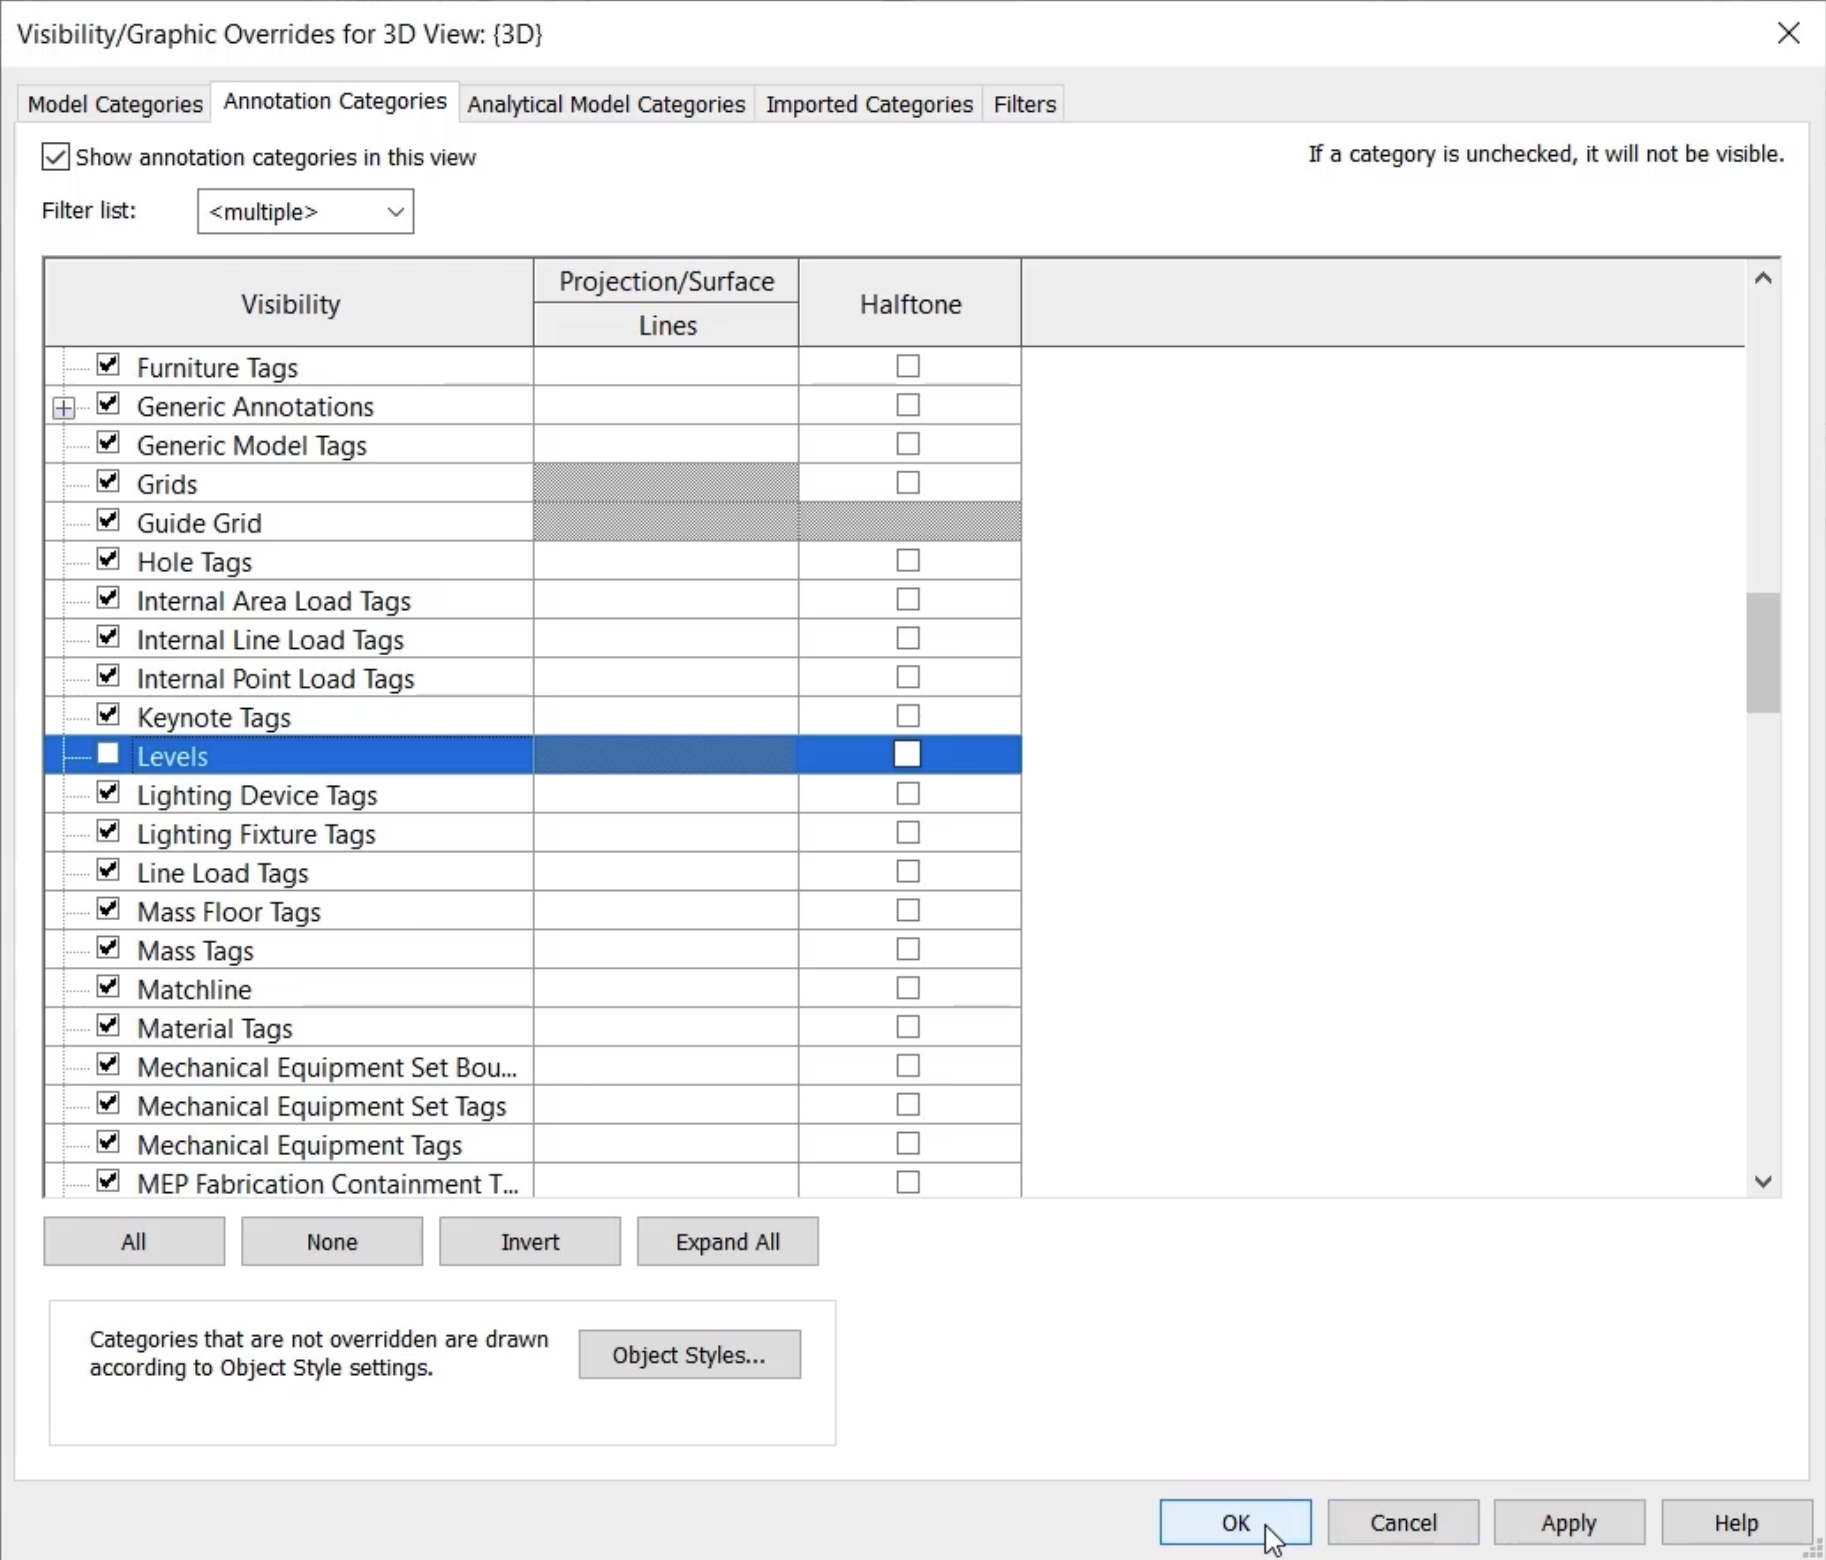
and because levels come under the annotation categories,
01:24
we'll click on annotation categories, scroll down
01:28
and we'll turn off levels. So I'm just rolling the wheel on this occasion.
01:32
So you can use the wheel on your mouse to scroll occasionally.
01:35
And if I uncheck the levels tick box here
01:38
and click, OK,
01:39
we can see that uh those level lines have now been removed.
01:44
Now, if I want to tile those three views, so I want to see those together
01:48
that's also available on the view tab and that's up here in the windows panel.
01:53
And if I click tile views,
01:56
we're now able to see the three views being tiled,
01:59
but I can't see all of what I want to see in each of those views.
02:03
So a useful shortcut to remember here is one called uh zoom
02:08
all to fit. And the shortcut is Z A.
02:11
So simply by typing in Z A without no enter, no return or enter key,
02:16
and we can now see all of those views, all of those walls, I should say quite clearly.
02:22
So if I zoom into here
02:25
and zoom into here,
02:27
we can see
02:28
those elements very, very clearly.
02:30
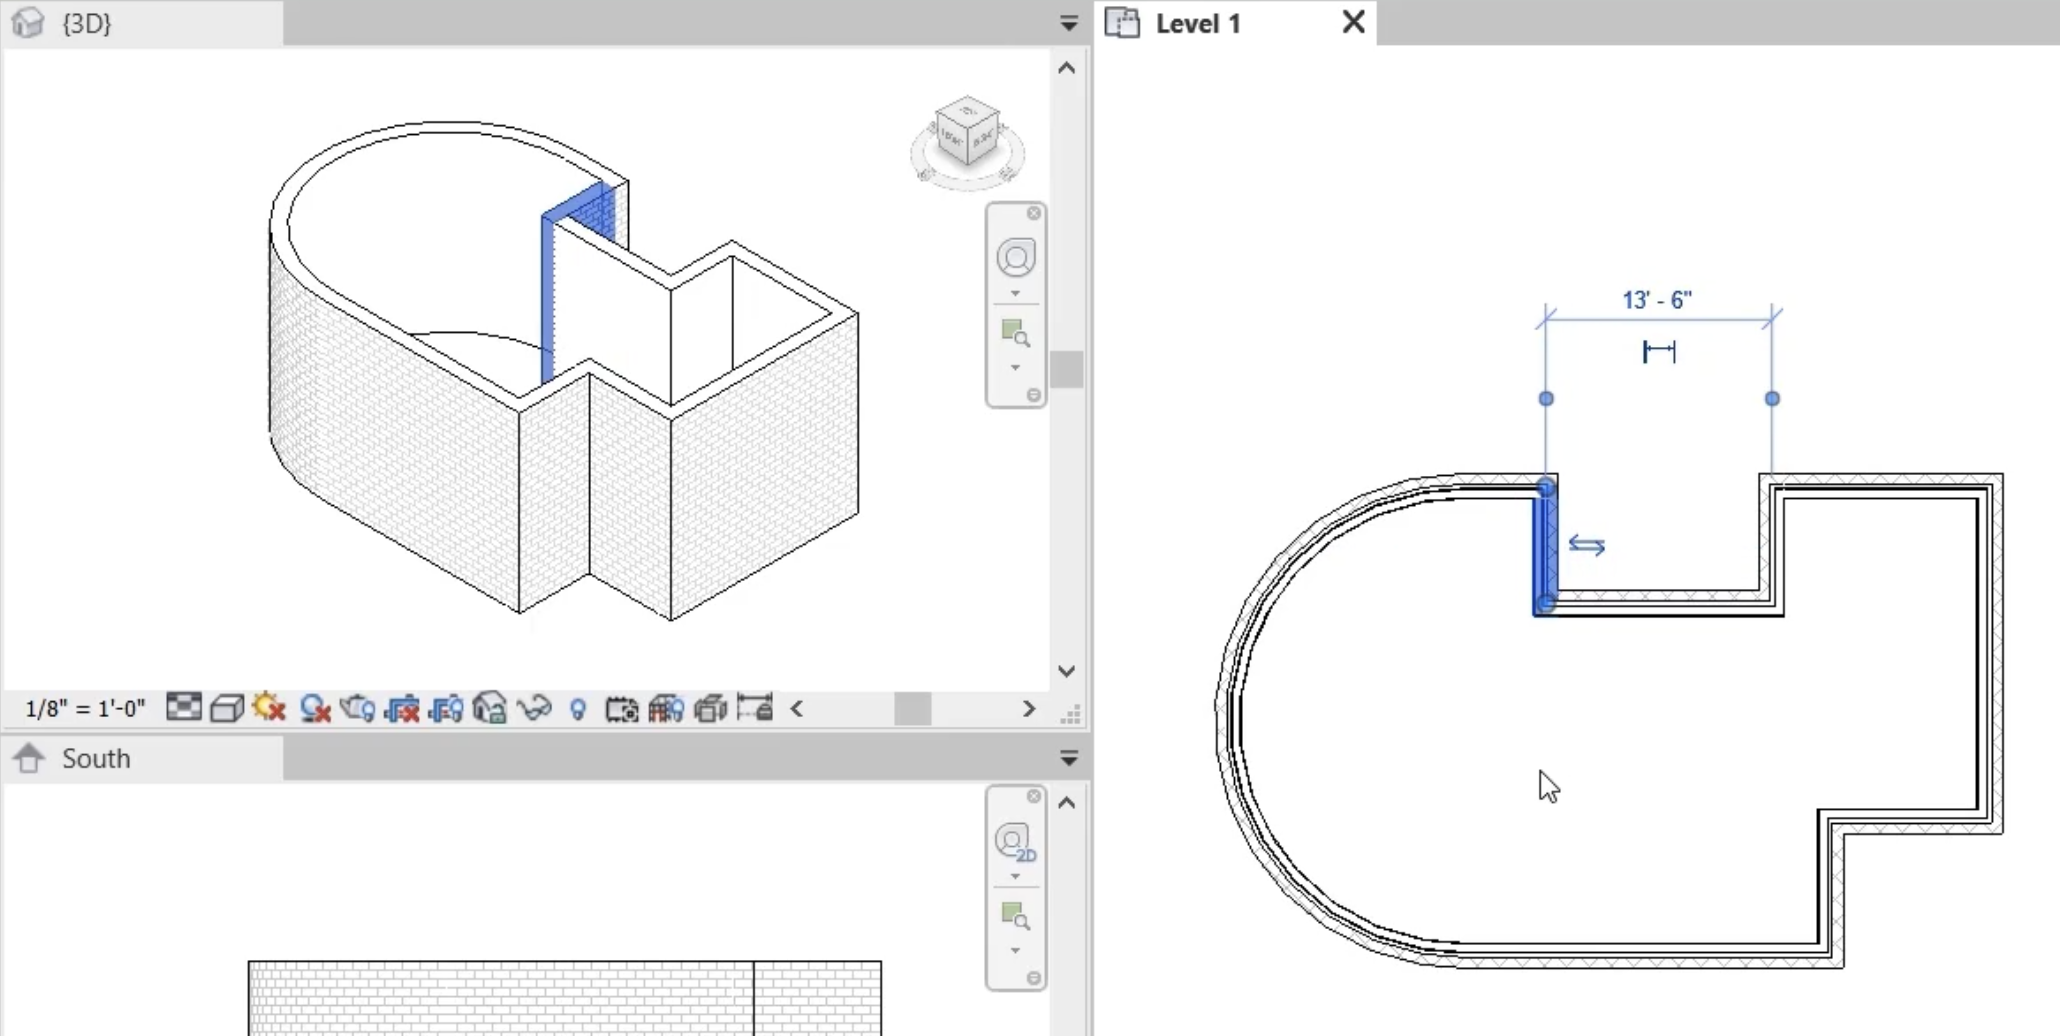
So what I wanted to demonstrate to you was what will happen if I start modifying
02:35
walls in either one view or the other.
02:37
So starting in the plan view, if I click this wall here,
02:41
we can see quite clearly in the 3D view that
02:44
that wall has now become selected as we can see
02:47
like.
02:48
So, so if I edit that, it also updates the the other view,
02:52
and if I click in space that will deselect,
02:55
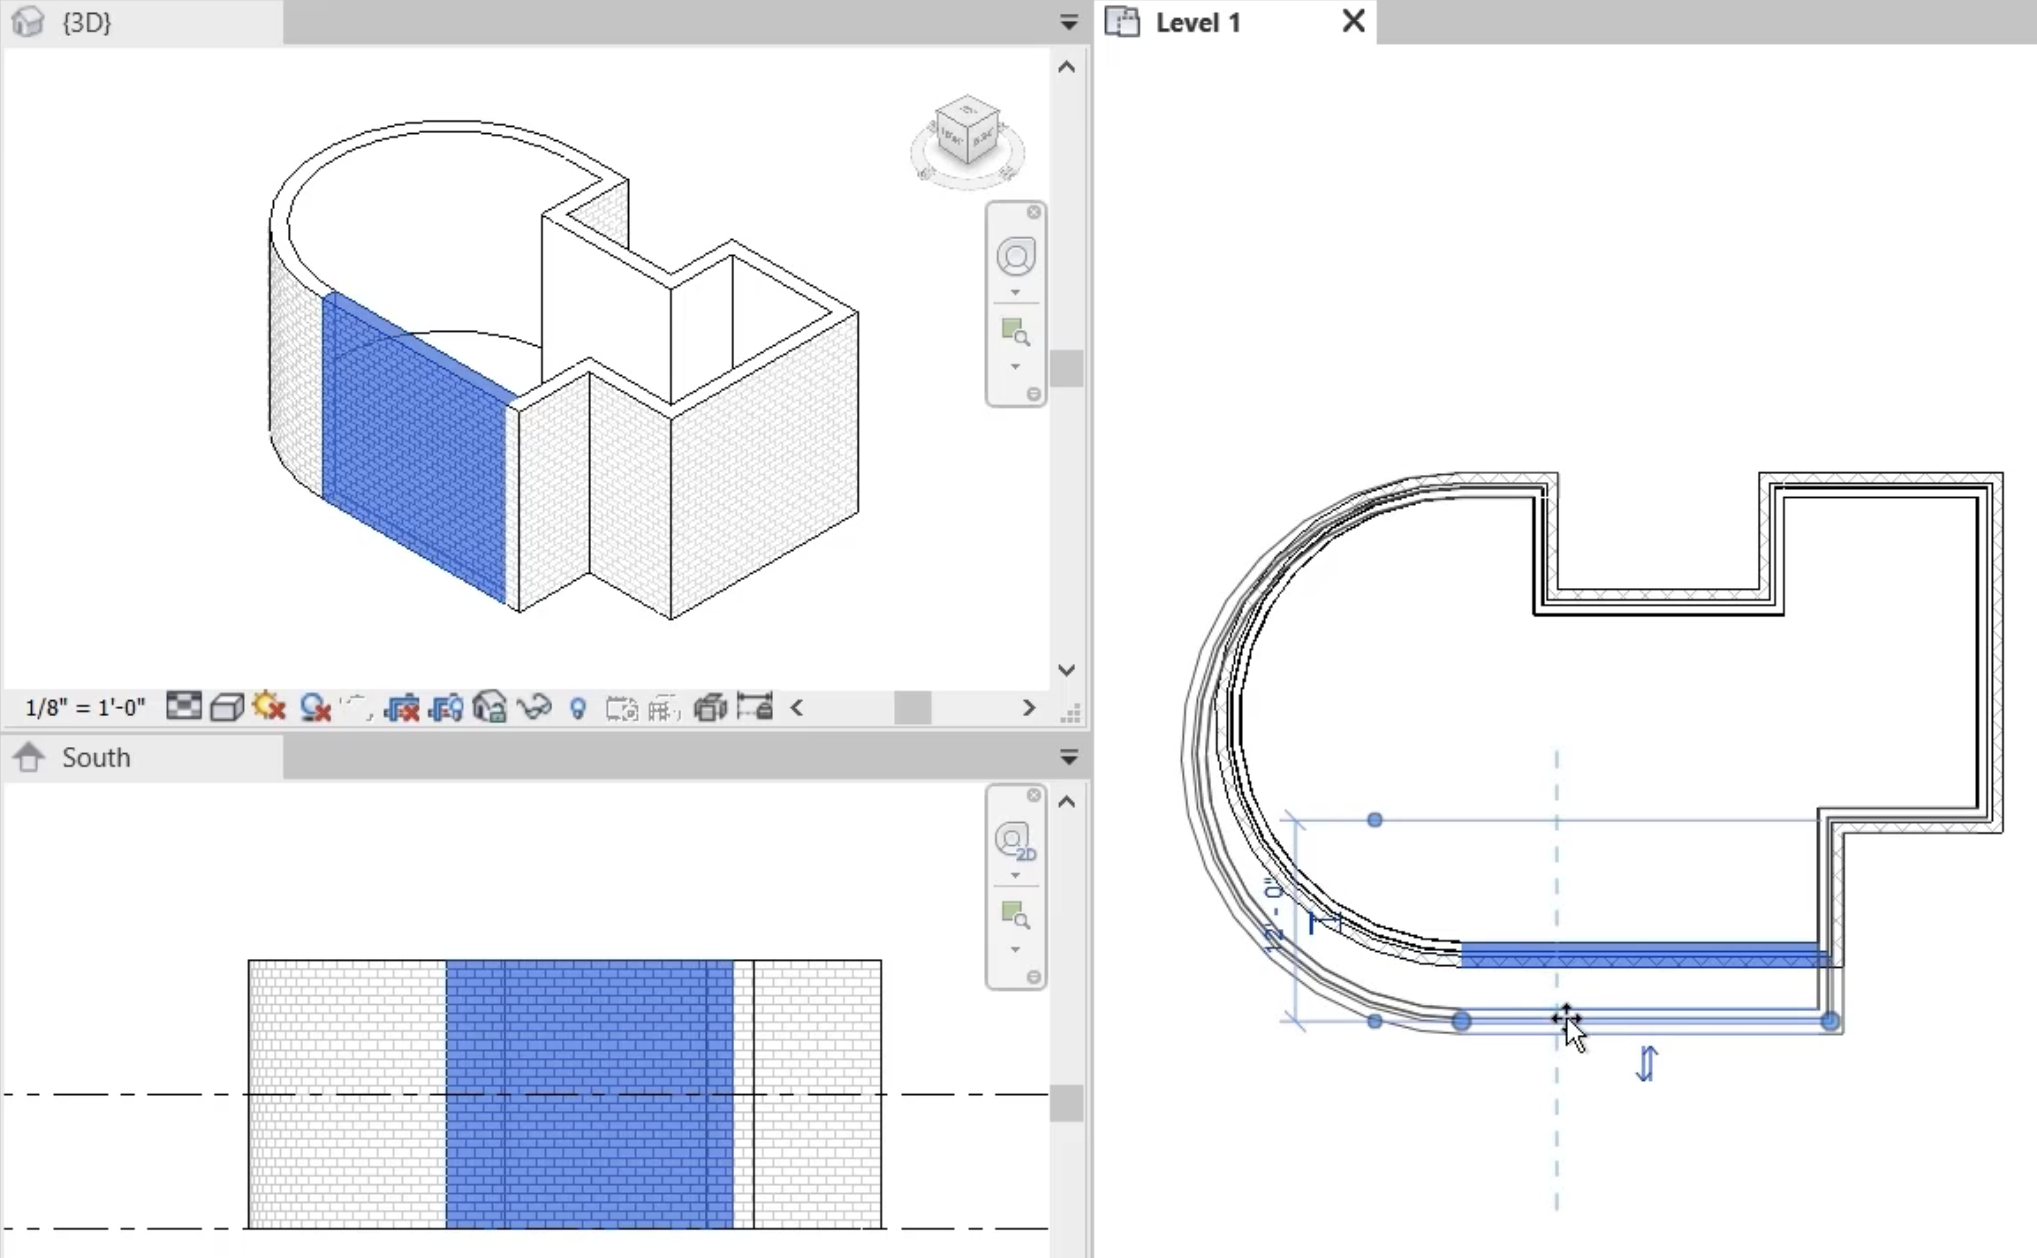
if I in this
02:57
view, click the lower wall,
02:59
we can see in front of us in both the south elevation
03:03
and the 3D view that those two walls are now selected.
03:07
So if I were to move that wall, delete that wall, change it to an alternative wall,
03:11
it will actually edit in all three views.
03:14
So I'll just simply drag it down a little bit
03:17
and we can see that that is updated.
03:20
And did you see the parametric nature of this curved wall that it also
03:24
uh changed as I drew at war as well?
03:29
What we'll also do, I'll do this in the 3D view, I'll select all of the, the walls.
03:34
Now, if you're going to move from view to view, it's important that you left mouse,
03:38
click to activate the view
03:40
and then select the walls that you're about to edit.
03:43
So if I click on that,
03:45
that will show me the parameters again within the properties pallet.
03:49
And this time, what I'm gonna do is instruct R
03:52
to
03:53
don't leave that at um 20 ft. This time, I'll set it to 15 ft.
03:59
And when I move my cursor into the graphics area, we'll see that in the two views,
04:04
both the 3d view and the south elevation of view, that modification was carried out
04:09
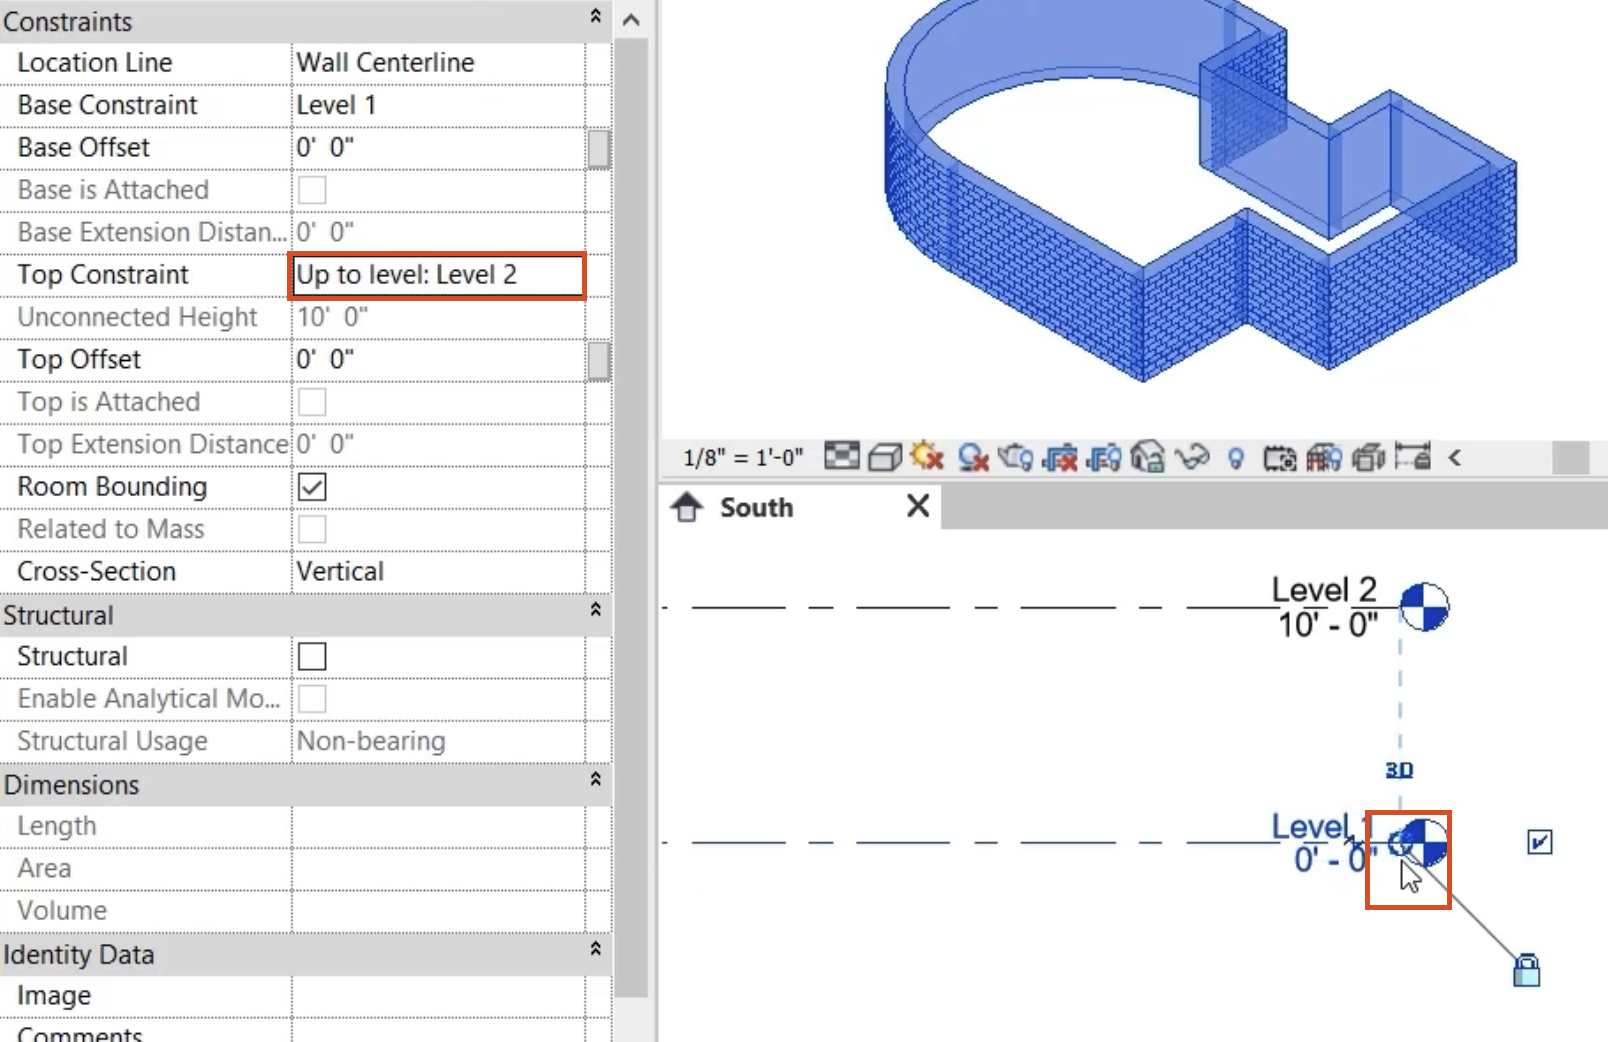
if I associate it to a level this time. So it's currently unconnected.
04:15
So I'll, I'll associate it to level two this time
04:19
and move my cursor in.
04:20
That will mean
04:22
that if I adjust the elevation of that level because
04:28
these walls are now currently constrained to those levels,
04:32
they are forced to move with them.
04:35
So we can see that the wall is not only constrained at the top,
04:40
but it is also constrained at the base.
04:43
So if either of those two were to move any
04:46
walls associated to those levels will actually move as well.
04:50
So I'll demonstrate that again.
04:52
So if I just zoom in a little bit,
04:54
click on the level line using that little control here,
04:57
this little circular control,
04:59
I can drag that up a little bit closer to the wall there.
05:03
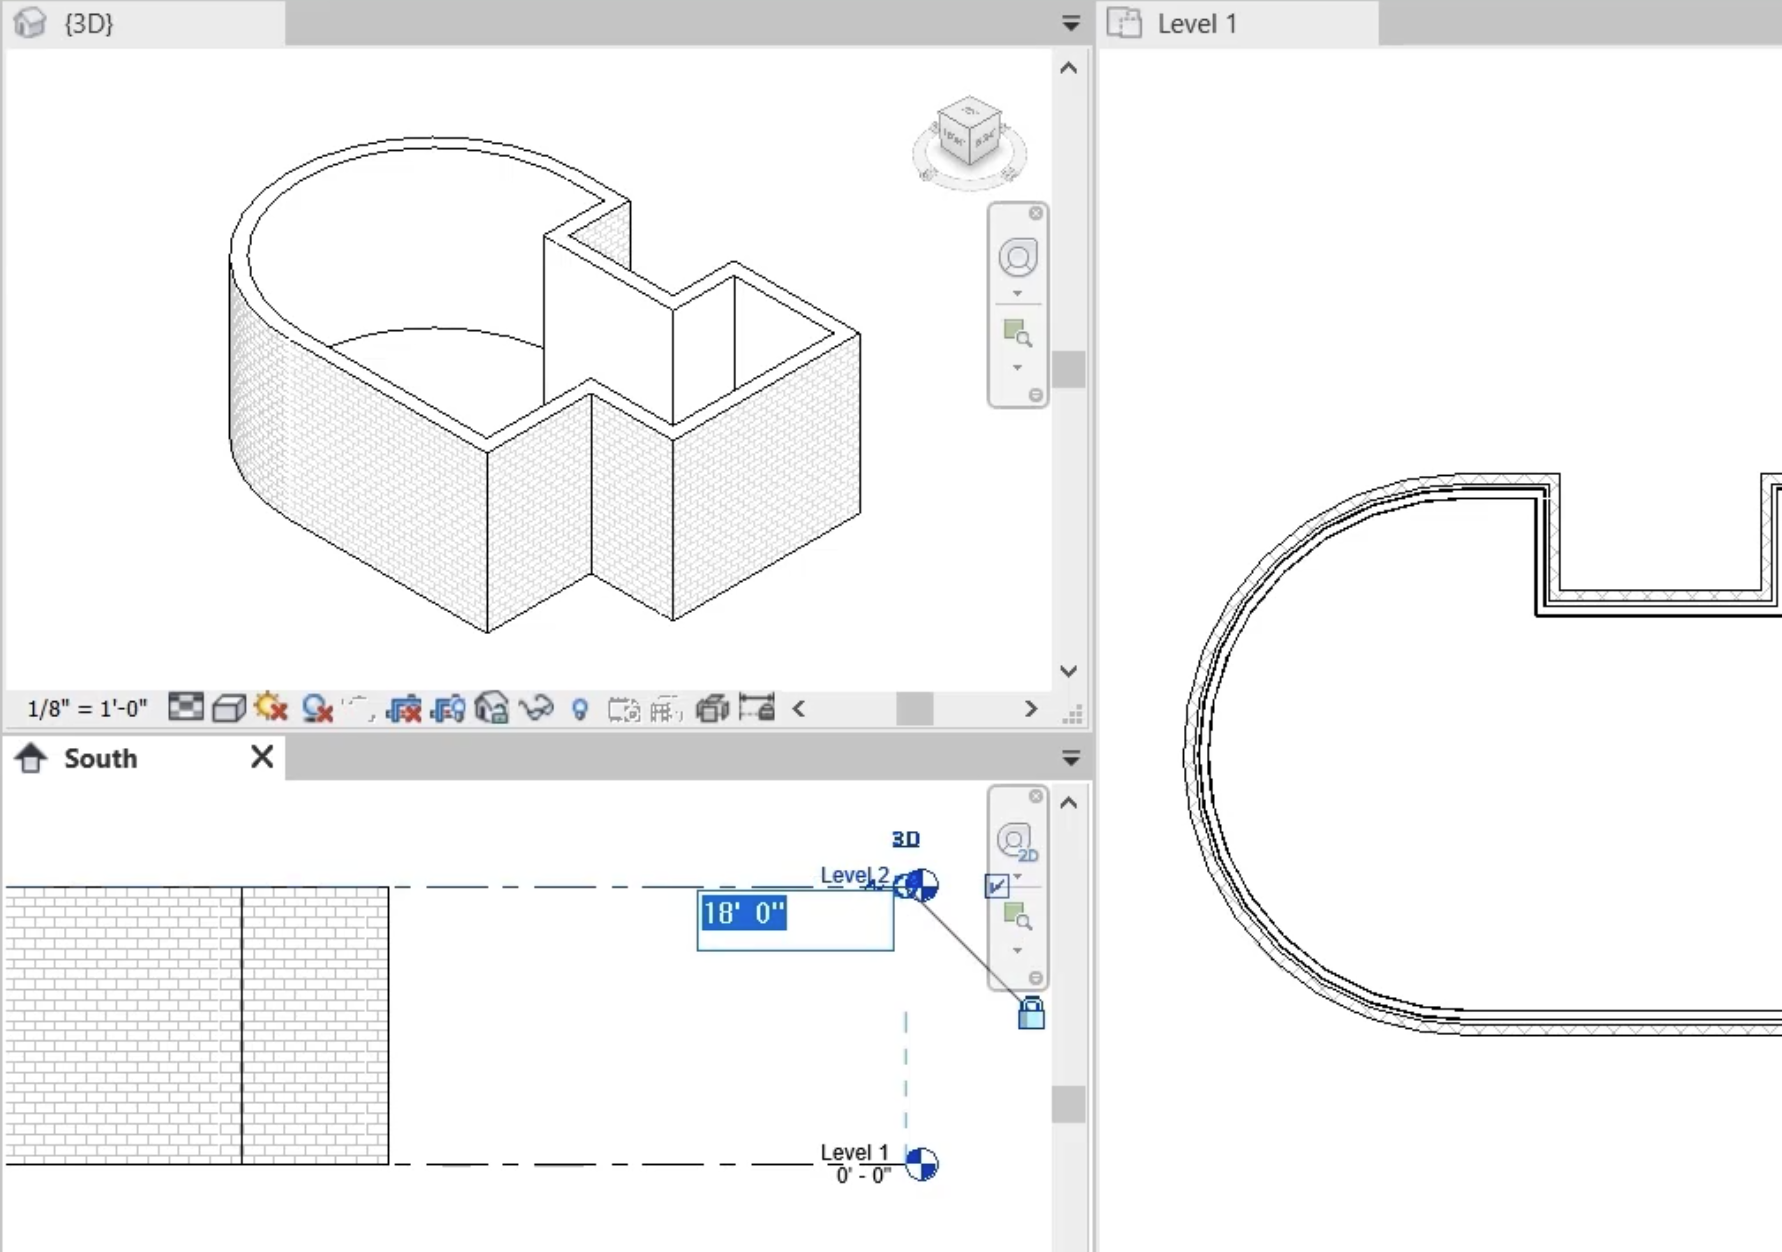
So we can see it quite clearly. So I can drag those look like that.
05:07
There we go.
05:09
If I change that to 18 ft,
05:12
we can see that any walls associated to
05:15
that are automatically forced to go with that.
05:19
So if I click on there again
05:22
and this time change it
05:23
to, let's say eight ft,
05:29
the the level line changes and we can see that the walls
05:33
are forced to respond.
Video transcript
00:04
To demonstrate rt's
00:05
bidirectional associativity ability,
00:08
which is a really powerful function within R
00:11
we'll open up two other views,
00:14
tile those views and start editing the walls and see how rivet
00:19
allows us to edit
00:21
in one view while updating the other views.
00:24
So we're currently in the floor plan level one,
00:28
we'll open up our
00:30
south elevation.
00:31
So if you come over to the browser,
00:33
the project browser that is and double click on South
00:36
that now opens that, that up for us.
00:39
And if we open up the default 3D view, now if we look in our browser that doesn't exist,
00:45
so we need to go up to the view tab
00:48
and within the create panel, single click on the 3D view icon.
00:53
And you can see when I hover on that, it says default 3D view.
00:57
So we now have, we can see at the top of the view here, top of the graphics window
01:01
that we have three views that are currently open
01:05
in here. Now, in my 3d view,
01:08
we're able to see the, the level lines and I, I don't want to see those.
01:12
So we're going to go up to the view tab which is already active.
01:16
And within the graphics panel, we'll click on visibility, graphics
01:20
and because levels come under the annotation categories,
01:24
we'll click on annotation categories, scroll down
01:28
and we'll turn off levels. So I'm just rolling the wheel on this occasion.
01:32
So you can use the wheel on your mouse to scroll occasionally.
01:35
And if I uncheck the levels tick box here
01:38
and click, OK,
01:39
we can see that uh those level lines have now been removed.
01:44
Now, if I want to tile those three views, so I want to see those together
01:48
that's also available on the view tab and that's up here in the windows panel.
01:53
And if I click tile views,
01:56
we're now able to see the three views being tiled,
01:59
but I can't see all of what I want to see in each of those views.
02:03
So a useful shortcut to remember here is one called uh zoom
02:08
all to fit. And the shortcut is Z A.
02:11
So simply by typing in Z A without no enter, no return or enter key,
02:16
and we can now see all of those views, all of those walls, I should say quite clearly.
02:22
So if I zoom into here
02:25
and zoom into here,
02:27
we can see
02:28
those elements very, very clearly.
02:30
So what I wanted to demonstrate to you was what will happen if I start modifying
02:35
walls in either one view or the other.
02:37
So starting in the plan view, if I click this wall here,
02:41
we can see quite clearly in the 3D view that
02:44
that wall has now become selected as we can see
02:47
like.
02:48
So, so if I edit that, it also updates the the other view,
02:52
and if I click in space that will deselect,
02:55
if I in this
02:57
view, click the lower wall,
02:59
we can see in front of us in both the south elevation
03:03
and the 3D view that those two walls are now selected.
03:07
So if I were to move that wall, delete that wall, change it to an alternative wall,
03:11
it will actually edit in all three views.
03:14
So I'll just simply drag it down a little bit
03:17
and we can see that that is updated.
03:20
And did you see the parametric nature of this curved wall that it also
03:24
uh changed as I drew at war as well?
03:29
What we'll also do, I'll do this in the 3D view, I'll select all of the, the walls.
03:34
Now, if you're going to move from view to view, it's important that you left mouse,
03:38
click to activate the view
03:40
and then select the walls that you're about to edit.
03:43
So if I click on that,
03:45
that will show me the parameters again within the properties pallet.
03:49
And this time, what I'm gonna do is instruct R
03:52
to
03:53
don't leave that at um 20 ft. This time, I'll set it to 15 ft.
03:59
And when I move my cursor into the graphics area, we'll see that in the two views,
04:04
both the 3d view and the south elevation of view, that modification was carried out
04:09
if I associate it to a level this time. So it's currently unconnected.
04:15
So I'll, I'll associate it to level two this time
04:19
and move my cursor in.
04:20
That will mean
04:22
that if I adjust the elevation of that level because
04:28
these walls are now currently constrained to those levels,
04:32
they are forced to move with them.
04:35
So we can see that the wall is not only constrained at the top,
04:40
but it is also constrained at the base.
04:43
So if either of those two were to move any
04:46
walls associated to those levels will actually move as well.
04:50
So I'll demonstrate that again.
04:52
So if I just zoom in a little bit,
04:54
click on the level line using that little control here,
04:57
this little circular control,
04:59
I can drag that up a little bit closer to the wall there.
05:03
So we can see it quite clearly. So I can drag those look like that.
05:07
There we go.
05:09
If I change that to 18 ft,
05:12
we can see that any walls associated to
05:15
that are automatically forced to go with that.
05:19
So if I click on there again
05:22
and this time change it
05:23
to, let's say eight ft,
05:29
the the level line changes and we can see that the walls
05:33
are forced to respond.
Define bidirectional associativity. Work with multiple views. Switch and tile views. Constrain walls to levels.
To remove the level lines from the 3D view:
To adjust the display of the 3 open views:
To demonstrate bidirectional associativity, make some edits:
In all 3 views, all the walls connected to Level 2 move with the height of the level.
How to buy
Privacy | Do not sell or share my personal information | Cookie preferences | Report noncompliance | Terms of use | Legal | © 2025 Autodesk Inc. All rights reserved
Sign in for the best experience
Save your progress
Get access to courses
Receive personalized recommendations
May we collect and use your data?
Learn more about the Third Party Services we use and our Privacy Statement.May we collect and use your data to tailor your experience?
Explore the benefits of a customized experience by managing your privacy settings for this site or visit our Privacy Statement to learn more about your options.