& Construction

Integrated BIM tools, including Revit, AutoCAD, and Civil 3D
& Manufacturing

Professional CAD/CAM tools built on Inventor and AutoCAD
Any referenced datasets can be downloaded from "Module downloads" in the module overview.
Transcript
00:07
NARRATOR: When you want to share your work,
00:09
one of the easiest things you can do is print.
00:11
Now you can print from any view in Revit.
00:13
But when you want to control the printing process
00:15
and create professional results, you typically
00:18
want to set up some sheets.
00:19
So let's look at the process by setting up a simple elevation
00:22
sheet.
00:22
So I'm going to start in the South elevation.
00:26
And what you'll notice first of all
00:28
is that this elevation is showing the full extent
00:32
of the topography.
00:33
So what I'd actually like to do is
00:34
crop that down to focus in on just the building.
00:37
So to crop a view, you come over to the Properties palette
00:40
and scroll down.
00:42
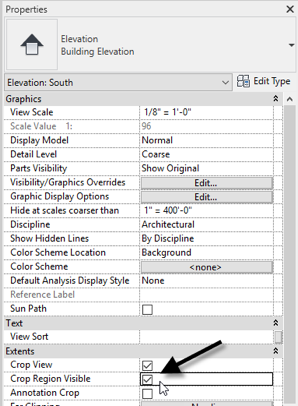
And under the extents grouping, you
00:44
want to check the crop view and crop region visible check
00:47
boxes.
00:48
Now when I apply both of those changes
00:50
and move my mouse back into the view window,
00:52
I'll roll down just a little and pan slightly.
00:55
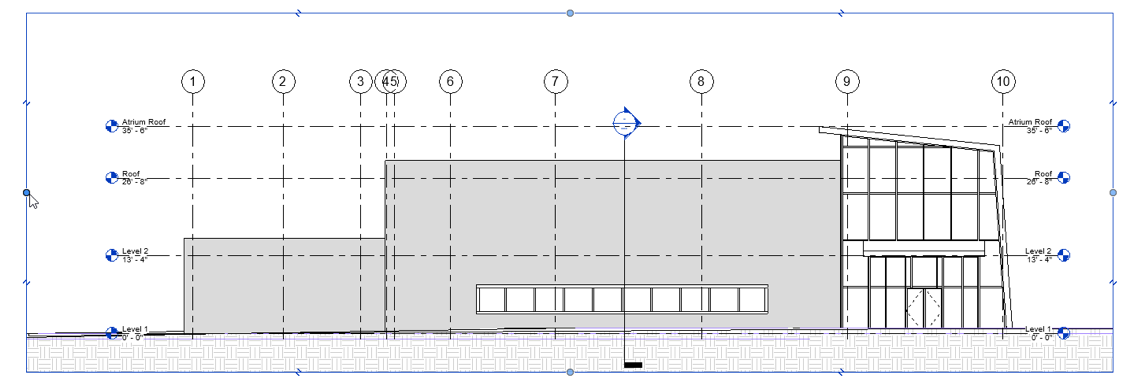
This rectangle here now is the crop region.
00:59
And if we select that crop region,
01:01
notice that there's a small control
01:03
handle on each of the four sides.
01:05
You can use those control handles
01:08
to resize that crop region.
01:10
And notice that it will crop out anything that falls
01:14
outside of that rectangle.
01:16
So to reduce the size of this elevation,
01:19
it's as simple as cropping it down to the desired size.
01:23
Now click anywhere to deselect it,
01:25
and then I'll right click and choose Zoom to fit.
01:28
The crop region can remain visible.
01:30
It's actually one of the few elements in Revit
01:33
that has a non plotting behavior.
01:35
So at the time of printing you can actually
01:37
tell it not to print the crop regions Alternatively,
01:41
you could come back here to properties
01:43
and just simply uncheck crop region visible
01:46
and it will disappear, but notice that the view will still
01:49
remain crop.
01:50
So these two check boxes work independently.
01:53
If you uncheck crop view, it would go back
01:55
to showing the full extent of the model again.
01:57
But if you just check it again to turn it back on,
02:00
notice that it remembers the size and shape of the crop
02:04
region where you previously edited it.
02:06
So you turn it visible when you want to change the size
02:10
and shape, but otherwise it could remain invisible
02:13
and you can toggle it on and off at will.
02:15
Now the other setting I want to change here
02:17
is a visibility setting.
02:19
Notice this purple line down here,
02:21
there's actually the site plan DWG file is still showing
02:26
and I might not want to see that when it comes time to print.
02:29
So I'll go to the View tab and click
02:32
visibility graphics or the keyboard shortcut is VG.
02:35
On the imported categories tab, I
02:38
will uncheck the site plan DWG file and then click OK,
02:42
and it will disappear.
02:44
Now all of those changes are view specific.
02:47
So if I want other elevations to behave similarly,
02:51
I will need to set those up as well.
02:53
So I'm going to go to the North elevation and repeat everything
02:56
that we just did.
02:57
I'll turn on the crop and the crop visible.
02:60
I will select the crop and stretch it down
03:04
to focus in on the building.
03:07
Deselect it, zoom to fit, hide the crop region,
03:10
go to visibility graphics, imported categories
03:13
and hide the site plan and click OK.
03:16
So now that I've prepared my North and South elevations,
03:19
I'm going to now build a sheet for them.
03:22
So I will scroll down on the project browser
03:25
and locate the sheets branch and right click it.
03:28
I'll choose New sheet there's already one title block loaded
03:32
into this project if you don't want
03:34
to use that size or that title block,
03:37
you can click Load and find a different family.
03:40
I'm going to accept the default one.
03:41
And simply click OK.
03:43
So I get a new empty sheet complete with a title block
03:46
border and on the project browser
03:49
if I expand the sheets branch you
03:50
can see that this new sheet that we created
03:53
is called A101 unnamed.
03:55
Now I want to change both the name
03:57
and the number of this sheet, and there's
03:59
a few ways I could do that.
04:00
One way is to right click it right here on the browser
04:03
and choose Rename.
04:04
That would bring up a window where
04:07
I can type in a new number and a name and click OK.
04:11
And you'll see both of those values
04:12
fill in here in the title block.
04:14
Another way that I could make that change
04:16
would be directly in the title block.
04:18
So if you select the title block first and then click
04:20
on the label, that would activate those labels
04:23
and you could type in a new name that way
04:25
and it would also be reflected on the sheets branch.
04:29
So which method you use is entirely up to you.
04:31
So now that my sheet is named and numbered properly,
04:35
I'll scroll back up here on the project browser,
04:37
locate myself the elevation, click, hold down, and drag it.
04:42
From the browser let go and then click to place it
04:46
where I want it to go on the sheet.
04:48
I'll repeat that for the North elevation,
04:50
let go, get the two title bars to line up.
04:53
Click to place it on the Sheet.
04:55
I'll click anywhere to deselect that view port
04:58
and then let's Zoom in on the two title bars right here.
05:03
And notice that this one is detail 1 South elevation.
05:08
This one is detailed
05:11
I'll go ahead and do a previous Zoom here.
05:14
Let's go back to our level 1 floor
05:16
plan, which is still open here in the background.
05:19
And let's Zoom in down here on the elevation tag.
05:22
And notice that it reflects the fact that elevation
05:26
is detail one on sheet A201.
05:30
And if I do previous Zoom and Zoom in at the top here,
05:35
the North elevation is detail to A201.
05:39
So any time you drag a view onto a sheet
05:42
the detail number and the sheet number
05:44
will get filled in automatically and coordinated
05:46
across the entire project everywhere that that view
05:48
tag shows Revit handles this automatically
05:51
and it can't get out of sync.
When you want to share your work, you can print from any Revit view. But to control the printing process and create professional results, set up sheets.
Catch-up file completed to this point: 20_Medical Center_Sheets.rvt
Let’s start by getting views ready for placement on Sheets.
Now that we have the toposurface (from the previous exercise), the elevation extents are larger. Let’s crop the view.
Figure 20–1 Turn on view cropping for the South elevation
Figure 20–2 Crop the elevation view using the crop region control handles
Now let’s add a sheet for the North and South elevations.
Figure 20–3 Create a new sheet and rename and renumber it
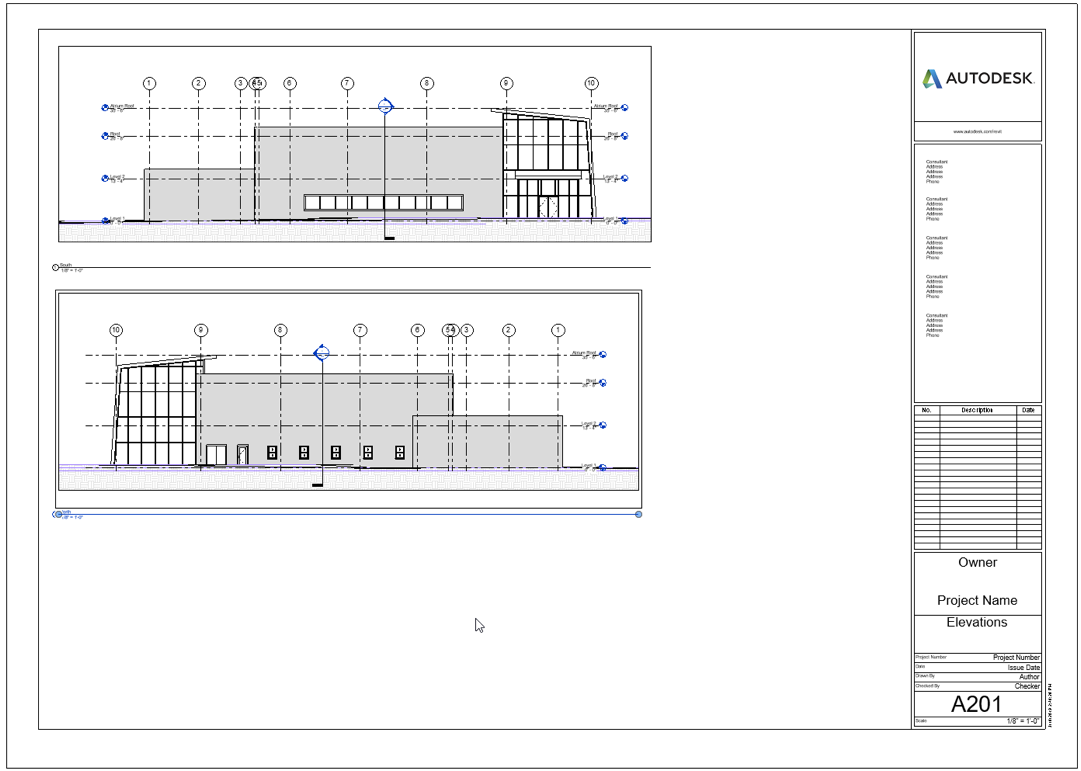
Figure 20–4 Drag views onto the sheet
Notice that the two viewports have been named and numbered automatically.
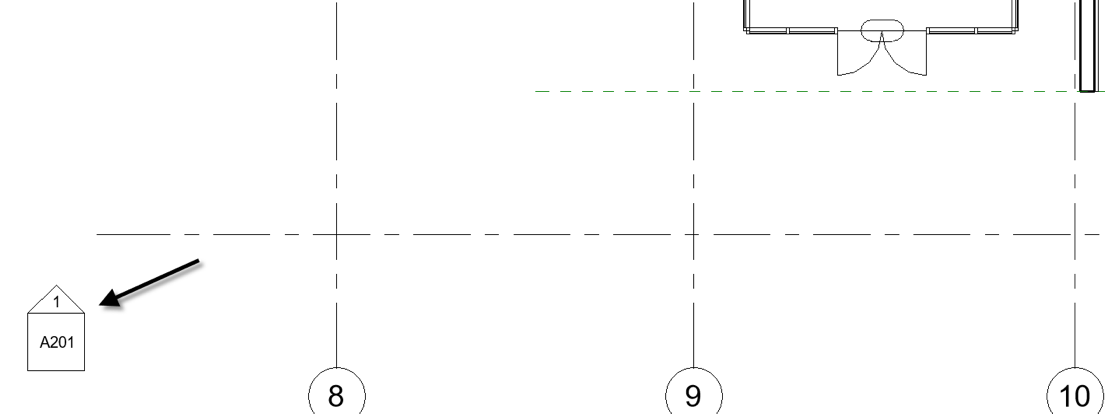
Figure 20–5 When views are added to sheets, their view references automatically update throughout the project
Notice that the sheet number and view number also fill in automatically.
To print the sheet, simple choose print from the File Menu.
Feel free to create additional sheets and print them if you wish.