& Construction

Integrated BIM tools, including Revit, AutoCAD, and Civil 3D
& Manufacturing

Professional CAD/CAM tools built on Inventor and AutoCAD
Integrated BIM tools, including Revit, AutoCAD, and Civil 3D
Professional CAD/CAM tools built on Inventor and AutoCAD
Any referenced datasets can be downloaded from "Module downloads" in the module overview.
Transcript
00:07
PRESENTER: Now that we have walls and grids,
00:09
we can begin adding columns and use those elements
00:12
to help us place them.
00:14
Columns automatically associate with the grids,
00:16
and they even interact with the wall geometry in most cases.
00:20
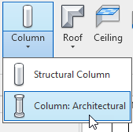
On the Architecture tab, we have a Column button here,
00:22
and there's actually two different types of columns.
00:24
There's structural columns and architectural columns.
00:26
We're going to look at the architectural columns,
00:28
and I welcome you to try the structural columns on your own
00:31
later.
00:32
When I choose the command, if we look at the Properties palette
00:36
next on the type selector, you'll
00:37
see that there's a single rectangular column
00:39
family loaded in this project, and it has three sizes.
00:43
So let's choose the smallest size, 18 by 18 inch.
00:46
Now, notice that I could place this column anywhere
00:48
I want in space, but one of the biggest benefits
00:51
of using columns and column grids
00:53
is that they will automatically associate with the grid.
00:56
So notice here on the Properties palette
00:58
that there is this Moves With Grids checkbox,
01:01
and it's currently checked.
01:02
Let's try to take advantage of that feature
01:05
and make sure that we're snapping to the column grid
01:08
intersection whenever we place a column.
01:10
So I'm going to start down here on grid 6H
01:13
and highlight that intersection and click.
01:16
Now, let me move my mouse away and show you
01:18
another interesting benefit.
01:20
Notice that the column automatically
01:22
merged into the surrounding wall geometry.
01:25
So that's a really nice feature.
01:28
So let's keep going and pick each
01:30
of the grid intersections in the interior of this space here.
01:36
So we're going to work our way methodically through,
01:39
selecting several of these grid intersections.
01:43
And when you're done, you can click
01:44
the Modify tool to finish.
01:47
So you'll see that most of the columns
01:50
had a wall nearby and automatically merged
01:53
into those walls, but notice that a few of the ones
01:55
in the middle did not do that.
01:57
Now, it makes sense for these here along column line F
02:00
because they are free standing in the middle of that space,
02:06
but the ones along grid E are really close to that wall.
02:10
So if you actually wanted to adjust the ones in grid E,
02:14
you might be tempted to select the column
02:16
and do something to it.
02:18
But let's remember that we have that Moves With Grids feature,
02:22
and we really want to take advantage of that.
02:24
So let me show you the way that works.
02:26
If we want to select grid E, and let's
02:28
just sort of grab hold of it and drag it down.
02:30
Notice that all of the columns along grid E
02:33
automatically moved with it.
02:35
That's the benefit of the Moves With Grids feature.
02:38
So let's undo that with Control-Z,
02:40
and let's do that a little bit more deliberately this time.
02:42
So select grid E, and I'll use the temporary dimension
02:47
over here on the right.
02:48
I'll activate the value, and I'm going
02:50
to put in 5 feet and press Enter.
02:53
That moves grid E up a little bit,
02:55
and notice that those columns are now fully engaged
02:58
in the surrounding wall.
02:60
Now, let's also consider the height of these columns.
03:03
They're similar to walls in the sense
03:04
that they can have a bottom level and a top level.
03:07
Now, the best way to show you that's going to be in 3D.
03:09
So let's go to our default 3D view.
03:13
I'm going to hold my Shift key down and drag the wheel to kind
03:16
of tip this down a little bit so that we
03:18
can kind of see into the model.
03:21
And then I'll just roll the wheel a couple clicks
03:23
to zoom in a little closer.
03:24
Let's start out here down into the right, click and hold down,
03:28
and start dragging to the left.
03:31
That will select several items on screen, certainly
03:35
more than just the columns.
03:36
One of the most powerful ways to make selections
03:38
is to start off by selecting too much
03:41
and then use a tool called Filter to remove the items
03:46
we don't want selected from the selection.
03:49
So here's our Filter button right here
03:50
on the Modify ribbon.
03:52
I'll click that, and it shows me all the categories
03:55
that I currently have selected.
03:57
I don't want the walls selected.
03:59
I don't want the level selected.
04:01
So I'll deselect both of those categories and click OK.
04:04
That leaves me with just the 17 columns,
04:07
and now I can come over here to Properties
04:09
and change their height.
04:11
So I'm going to make all of these go up to the roof,
04:14
and you'll see them get taller right here
04:16
in the 3D view, which is a great way to verify that.
Video transcript
00:07
PRESENTER: Now that we have walls and grids,
00:09
we can begin adding columns and use those elements
00:12
to help us place them.
00:14
Columns automatically associate with the grids,
00:16
and they even interact with the wall geometry in most cases.
00:20
On the Architecture tab, we have a Column button here,
00:22
and there's actually two different types of columns.
00:24
There's structural columns and architectural columns.
00:26
We're going to look at the architectural columns,
00:28
and I welcome you to try the structural columns on your own
00:31
later.
00:32
When I choose the command, if we look at the Properties palette
00:36
next on the type selector, you'll
00:37
see that there's a single rectangular column
00:39
family loaded in this project, and it has three sizes.
00:43
So let's choose the smallest size, 18 by 18 inch.
00:46
Now, notice that I could place this column anywhere
00:48
I want in space, but one of the biggest benefits
00:51
of using columns and column grids
00:53
is that they will automatically associate with the grid.
00:56
So notice here on the Properties palette
00:58
that there is this Moves With Grids checkbox,
01:01
and it's currently checked.
01:02
Let's try to take advantage of that feature
01:05
and make sure that we're snapping to the column grid
01:08
intersection whenever we place a column.
01:10
So I'm going to start down here on grid 6H
01:13
and highlight that intersection and click.
01:16
Now, let me move my mouse away and show you
01:18
another interesting benefit.
01:20
Notice that the column automatically
01:22
merged into the surrounding wall geometry.
01:25
So that's a really nice feature.
01:28
So let's keep going and pick each
01:30
of the grid intersections in the interior of this space here.
01:36
So we're going to work our way methodically through,
01:39
selecting several of these grid intersections.
01:43
And when you're done, you can click
01:44
the Modify tool to finish.
01:47
So you'll see that most of the columns
01:50
had a wall nearby and automatically merged
01:53
into those walls, but notice that a few of the ones
01:55
in the middle did not do that.
01:57
Now, it makes sense for these here along column line F
02:00
because they are free standing in the middle of that space,
02:06
but the ones along grid E are really close to that wall.
02:10
So if you actually wanted to adjust the ones in grid E,
02:14
you might be tempted to select the column
02:16
and do something to it.
02:18
But let's remember that we have that Moves With Grids feature,
02:22
and we really want to take advantage of that.
02:24
So let me show you the way that works.
02:26
If we want to select grid E, and let's
02:28
just sort of grab hold of it and drag it down.
02:30
Notice that all of the columns along grid E
02:33
automatically moved with it.
02:35
That's the benefit of the Moves With Grids feature.
02:38
So let's undo that with Control-Z,
02:40
and let's do that a little bit more deliberately this time.
02:42
So select grid E, and I'll use the temporary dimension
02:47
over here on the right.
02:48
I'll activate the value, and I'm going
02:50
to put in 5 feet and press Enter.
02:53
That moves grid E up a little bit,
02:55
and notice that those columns are now fully engaged
02:58
in the surrounding wall.
02:60
Now, let's also consider the height of these columns.
03:03
They're similar to walls in the sense
03:04
that they can have a bottom level and a top level.
03:07
Now, the best way to show you that's going to be in 3D.
03:09
So let's go to our default 3D view.
03:13
I'm going to hold my Shift key down and drag the wheel to kind
03:16
of tip this down a little bit so that we
03:18
can kind of see into the model.
03:21
And then I'll just roll the wheel a couple clicks
03:23
to zoom in a little closer.
03:24
Let's start out here down into the right, click and hold down,
03:28
and start dragging to the left.
03:31
That will select several items on screen, certainly
03:35
more than just the columns.
03:36
One of the most powerful ways to make selections
03:38
is to start off by selecting too much
03:41
and then use a tool called Filter to remove the items
03:46
we don't want selected from the selection.
03:49
So here's our Filter button right here
03:50
on the Modify ribbon.
03:52
I'll click that, and it shows me all the categories
03:55
that I currently have selected.
03:57
I don't want the walls selected.
03:59
I don't want the level selected.
04:01
So I'll deselect both of those categories and click OK.
04:04
That leaves me with just the 17 columns,
04:07
and now I can come over here to Properties
04:09
and change their height.
04:11
So I'm going to make all of these go up to the roof,
04:14
and you'll see them get taller right here
04:16
in the 3D view, which is a great way to verify that.
In this exercise, we will add columns at grid intersections
Catch-up file completed to this point: 07_Medical Center_Columns.rvt
Figure 7–1 The Architectural Column Tool
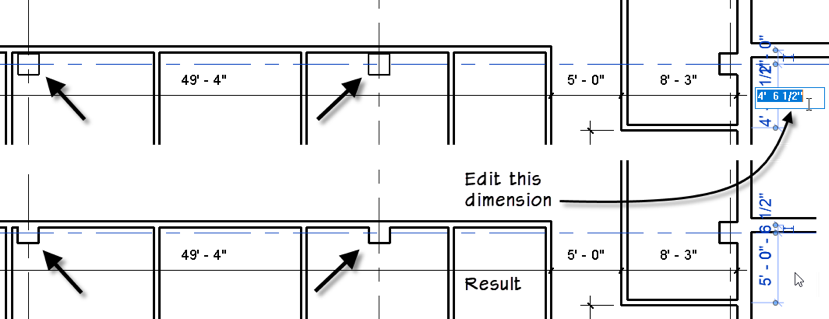
Notice how the architectural columns engage with the architectural walls.
If the column does not touch the wall, it will not merge. For example, some of the columns on Grid E do not merge. If you move either the wall or the Grid line they will merge when they touch.
Figure 7–2 Moving a grid line will move all columns on the grid line
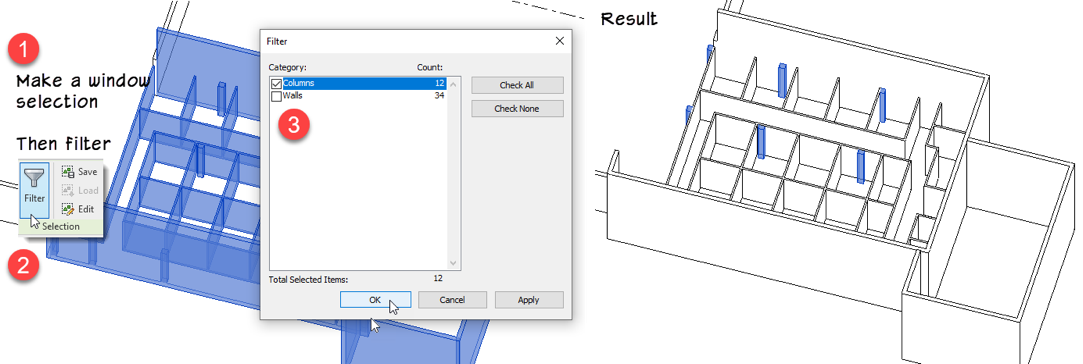
This action will select more than the columns.
The “Filter” dialog appears allowing us to fine-tune the selection by removing categories we don’t need selected.
Figure 7–3 Make a window selection and then Filter to select only the columns
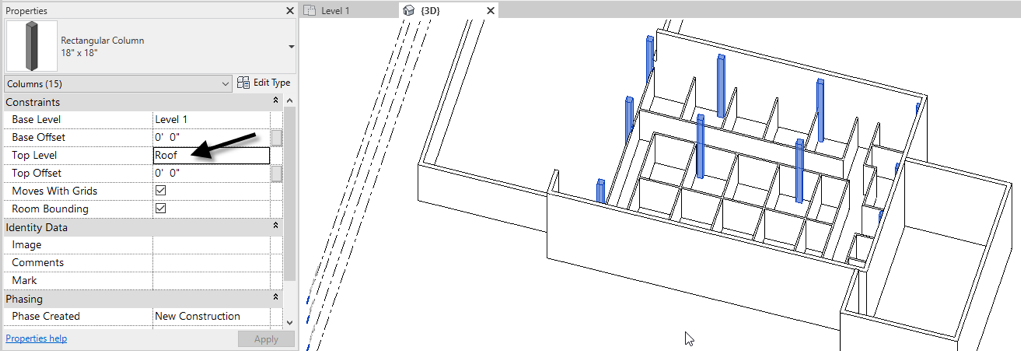
Figure 7–4 Associate the height of the columns with the Roof level
How to buy
Privacy | Do not sell or share my personal information | Cookie preferences | Report noncompliance | Terms of use | Legal | © 2025 Autodesk Inc. All rights reserved
Sign in to start learning
Sign in for unlimited free access to all learning content.Save your progress
Take assessments
Receive personalized recommendations
May we collect and use your data?
Learn more about the Third Party Services we use and our Privacy Statement.May we collect and use your data to tailor your experience?
Explore the benefits of a customized experience by managing your privacy settings for this site or visit our Privacy Statement to learn more about your options.