& Construction

Integrated BIM tools, including Revit, AutoCAD, and Civil 3D
& Manufacturing

Professional CAD/CAM tools built on Inventor and AutoCAD
Integrated BIM tools, including Revit, AutoCAD, and Civil 3D
Professional CAD/CAM tools built on Inventor and AutoCAD
Any referenced datasets can be downloaded from "Module downloads" in the module overview.
Transcript
00:00
DEEPAK MAINI: Our objective in this part of the course
00:03
is to synchronize Autodesk Revit changes with Autodesk Advance
00:06
Steel.
00:10
As we know, design is a pretty fluid state.
00:14
So the engineers and structural designers
00:17
keep changing the design on a regular basis, which
00:20
means that our Autodesk Advance Steel detail model
00:23
and documentation is out of sync.
00:26
And this is where the power of Autodesk Revit and Advance
00:29
Steel interoperability comes into picture.
00:31
So let's see how we can synchronize our Advance Steel
00:34
model with the changes from Autodesk Revit.
00:37
Let's get straight into Revit first.
00:40
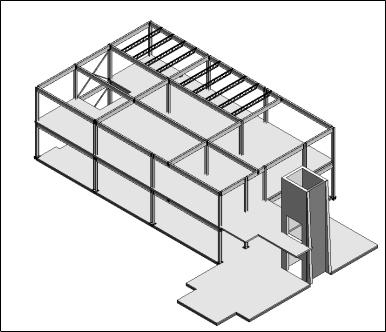
In this model, the structural engineers and designers
00:42
have made some changes.
00:44
So let's start with exporting the structural steel
00:46
data from this Revit model.
00:49
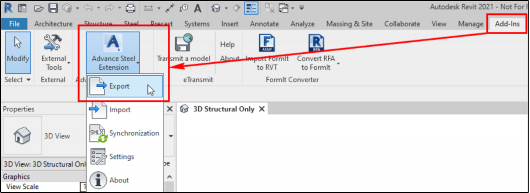
If you remember, we're going to the Add-Ins tab.
00:52
And Under Advance Steel Extension ribbon panel,
00:54
we click on Advance Steel Extension fly out.
00:57
And we are going to click on Export.
01:02
We'll click OK.
01:04
And we can now save this as smlx file.
01:11
Just remember to make sure that nothing
01:13
is selected before you export the smlx file.
01:15
Otherwise, only the selected elements will be exported.
01:19
Let us now switch over to Advance Steel.
01:22
This is our detailed model, and I'm
01:24
going to go into the Export and Import tab.
01:27
And under the Revit ribbon panel,
01:28
I'll click on this option called Synchronize.
01:33
I will load the version two smlx file.
01:37
Now this is a really powerful workflow.
01:40
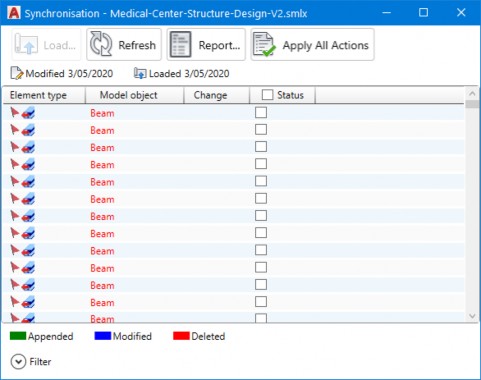
In this workflow we are going to see every single element that
01:44
has been added, deleted, or modified in Revit.
01:48
So before I do anything else, I'm
01:49
going to expand the dialog box by clicking on the Filter
01:52
option A brilliant feature of this dialog
01:56
box is that the elements are displayed color coded.
01:59
So for example, the elements that are deleted
02:02
are displayed in red color, as shown in beams here,
02:06
the elements that are appended are displayed in green color,
02:10
and the elements that are modified
02:12
are displayed in blue color.
02:14
In my case, I'm going to start with clearing all the filters.
02:19
Now the first thing I want to check
02:20
is if the engineers deleted any beams or columns
02:24
from the design model in Revit.
02:25
So I'll select Beam, Column, Deleted, Apply Filter.
02:32
Now it has come up with this massive list of beams
02:35
that were deleted.
02:36
This doesn't make sense because we did not
02:38
see these many sections deleted in the Revit model.
02:42
So what we are going to do is display
02:44
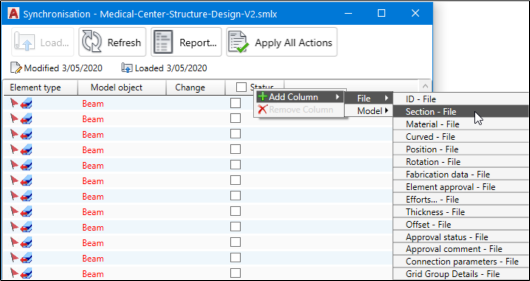
a column from the smlx file, which
02:46
is the section file column.
02:48
The section file column is blank because these
02:50
are the sections that are not available in the smlx file.
02:54
Let's now display the same column
02:55
from the Advance Steel model.
02:58
And we can see that we've got all these sections that
03:00
are available in the model that are not in the smlx file.
03:04
Most of these sections are the sections
03:06
of the joist that we have added, and also
03:08
the vertical briefings.
03:11
So I'm happy with this.
03:12
I don't have to worry about these.
03:14
Next I'm going to look at all the beams and columns that
03:16
have been appended.
03:20
I can see that there are two beams that have been appended.
03:24
And that's why you can see that these beams are available
03:26
in the section file column, which means that they are
03:29
in the smlx file but not in the section column, which means
03:32
that they are not in the model.
03:34
Now this is important for me because I
03:36
want to bring in these beams.
03:38
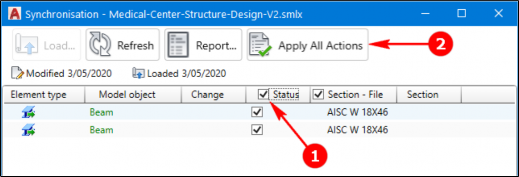
I'm going to select the status of both these beams,
03:41
and I'm going to click on Apply All Actions.
03:44
And I can straight away see that there
03:46
are two beams added to the model and they're
03:49
available right here, one and two.
03:52
Next I want to see all the beams and columns that
03:55
have been modified.
03:59
As you can see nothing is displayed
04:02
in the dialog box, which means that there
04:03
were no beams or columns that were modified in the Revit
04:07
model.
04:08
So you can see this powerful workflow lets us synchronize
04:12
our structural design created in Revit with the detail
04:15
model in Advance Steel.
04:18
Let's now copy some connections.
04:21
I'll start copying this end plate connection.
04:30
And similarly at this location you
04:32
can go and add a double side clip angle joint.
04:37
This is the model in which I've added all the connections
04:39
to the new beams that we synchronized from Revit.
04:43
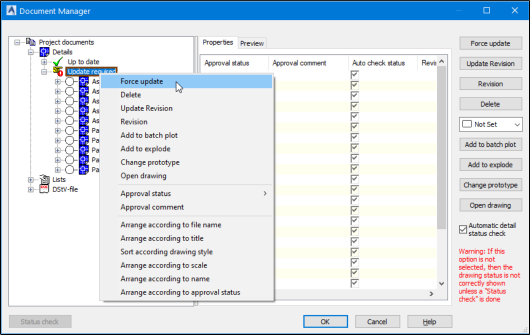
And now if I go into my Document Manager,
04:46
if I expand the Details category and under Up to date category,
04:51
we've got these files that are up to date.
04:54
However, there are some drawings available in the Update
04:57
required category.
04:58
These are the drawings that would
04:60
have changed because of us synchronizing the new beams.
05:04
So if I right-click on any of these files
05:07
I've got this option called Force Update.
05:09
This option is used when the drawings have not
05:12
been released for fabrication so I can update these drawings.
05:15
We also have an option called Update Revision.
05:18
This option is used when the files are released
05:20
for fabrication and we need to update them with that revision.
05:25
In our case, I'm going to force update
05:28
the update required category.
05:29
So it'll update all the drawings in that category.
05:37
What you saw in this course was a really powerful workflow
05:41
where we were able to synchronize changes
05:43
from the design model in Revit with our detail
05:46
model in Advance Steel.
05:48
And then we also were able to quickly update
05:50
all our documentation.
Video transcript
00:00
DEEPAK MAINI: Our objective in this part of the course
00:03
is to synchronize Autodesk Revit changes with Autodesk Advance
00:06
Steel.
00:10
As we know, design is a pretty fluid state.
00:14
So the engineers and structural designers
00:17
keep changing the design on a regular basis, which
00:20
means that our Autodesk Advance Steel detail model
00:23
and documentation is out of sync.
00:26
And this is where the power of Autodesk Revit and Advance
00:29
Steel interoperability comes into picture.
00:31
So let's see how we can synchronize our Advance Steel
00:34
model with the changes from Autodesk Revit.
00:37
Let's get straight into Revit first.
00:40
In this model, the structural engineers and designers
00:42
have made some changes.
00:44
So let's start with exporting the structural steel
00:46
data from this Revit model.
00:49
If you remember, we're going to the Add-Ins tab.
00:52
And Under Advance Steel Extension ribbon panel,
00:54
we click on Advance Steel Extension fly out.
00:57
And we are going to click on Export.
01:02
We'll click OK.
01:04
And we can now save this as smlx file.
01:11
Just remember to make sure that nothing
01:13
is selected before you export the smlx file.
01:15
Otherwise, only the selected elements will be exported.
01:19
Let us now switch over to Advance Steel.
01:22
This is our detailed model, and I'm
01:24
going to go into the Export and Import tab.
01:27
And under the Revit ribbon panel,
01:28
I'll click on this option called Synchronize.
01:33
I will load the version two smlx file.
01:37
Now this is a really powerful workflow.
01:40
In this workflow we are going to see every single element that
01:44
has been added, deleted, or modified in Revit.
01:48
So before I do anything else, I'm
01:49
going to expand the dialog box by clicking on the Filter
01:52
option A brilliant feature of this dialog
01:56
box is that the elements are displayed color coded.
01:59
So for example, the elements that are deleted
02:02
are displayed in red color, as shown in beams here,
02:06
the elements that are appended are displayed in green color,
02:10
and the elements that are modified
02:12
are displayed in blue color.
02:14
In my case, I'm going to start with clearing all the filters.
02:19
Now the first thing I want to check
02:20
is if the engineers deleted any beams or columns
02:24
from the design model in Revit.
02:25
So I'll select Beam, Column, Deleted, Apply Filter.
02:32
Now it has come up with this massive list of beams
02:35
that were deleted.
02:36
This doesn't make sense because we did not
02:38
see these many sections deleted in the Revit model.
02:42
So what we are going to do is display
02:44
a column from the smlx file, which
02:46
is the section file column.
02:48
The section file column is blank because these
02:50
are the sections that are not available in the smlx file.
02:54
Let's now display the same column
02:55
from the Advance Steel model.
02:58
And we can see that we've got all these sections that
03:00
are available in the model that are not in the smlx file.
03:04
Most of these sections are the sections
03:06
of the joist that we have added, and also
03:08
the vertical briefings.
03:11
So I'm happy with this.
03:12
I don't have to worry about these.
03:14
Next I'm going to look at all the beams and columns that
03:16
have been appended.
03:20
I can see that there are two beams that have been appended.
03:24
And that's why you can see that these beams are available
03:26
in the section file column, which means that they are
03:29
in the smlx file but not in the section column, which means
03:32
that they are not in the model.
03:34
Now this is important for me because I
03:36
want to bring in these beams.
03:38
I'm going to select the status of both these beams,
03:41
and I'm going to click on Apply All Actions.
03:44
And I can straight away see that there
03:46
are two beams added to the model and they're
03:49
available right here, one and two.
03:52
Next I want to see all the beams and columns that
03:55
have been modified.
03:59
As you can see nothing is displayed
04:02
in the dialog box, which means that there
04:03
were no beams or columns that were modified in the Revit
04:07
model.
04:08
So you can see this powerful workflow lets us synchronize
04:12
our structural design created in Revit with the detail
04:15
model in Advance Steel.
04:18
Let's now copy some connections.
04:21
I'll start copying this end plate connection.
04:30
And similarly at this location you
04:32
can go and add a double side clip angle joint.
04:37
This is the model in which I've added all the connections
04:39
to the new beams that we synchronized from Revit.
04:43
And now if I go into my Document Manager,
04:46
if I expand the Details category and under Up to date category,
04:51
we've got these files that are up to date.
04:54
However, there are some drawings available in the Update
04:57
required category.
04:58
These are the drawings that would
04:60
have changed because of us synchronizing the new beams.
05:04
So if I right-click on any of these files
05:07
I've got this option called Force Update.
05:09
This option is used when the drawings have not
05:12
been released for fabrication so I can update these drawings.
05:15
We also have an option called Update Revision.
05:18
This option is used when the files are released
05:20
for fabrication and we need to update them with that revision.
05:25
In our case, I'm going to force update
05:28
the update required category.
05:29
So it'll update all the drawings in that category.
05:37
What you saw in this course was a really powerful workflow
05:41
where we were able to synchronize changes
05:43
from the design model in Revit with our detail
05:46
model in Advance Steel.
05:48
And then we also were able to quickly update
05:50
all our documentation.
Try it: Synchronize Revit with Advance Steel
How to buy
Privacy | Do not sell or share my personal information | Cookie preferences | Report noncompliance | Terms of use | Legal | © 2025 Autodesk Inc. All rights reserved
Sign in to start learning
Sign in for unlimited free access to all learning content.Save your progress
Take assessments
Receive personalized recommendations
May we collect and use your data?
Learn more about the Third Party Services we use and our Privacy Statement.May we collect and use your data to tailor your experience?
Explore the benefits of a customized experience by managing your privacy settings for this site or visit our Privacy Statement to learn more about your options.