• InfoWater Pro

Creating GIS Exchange Clusters to Map Parameters

Update an existing model from GIS using exchange clusters to map changed parameters.


Tutorial resources

These downloadable resources will be used to complete this tutorial:


00:04

Updating an existing model from GIS is common practice

00:08

if a model is constructed, well,

00:10

initially updating it becomes a straightforward process.

00:14

This is due to the use of a common ID in the GIS and the hydraulic model.

00:20

In this case,

00:21

you can use the GIS gateway with the tabular joint feature

00:24

to either create new features or update changes to existing features

00:29

to begin.

00:30

Double click the desired project dot APR

00:32

file to open

00:34

Agis Pro.

00:35

Once the project starts,

00:37

click the info water pro tab to open the info water pro ribbon

00:41

in the project panel, click initialize

00:46

in the model explorer from the scenario, drop down select base base data scenario.

00:52

Well, not specifically required.

00:54

It is often good practice to update a model while

00:56

in the base scenario where all elements are active,

01:00

being able to see all elements that are in the database is helpful to the modeler

01:05

on the

01:06

Agis

01:06

Pro ribbon map tab

01:08

layer panel. Click add data

01:11

for this example, double click the dot GDB sample file,

01:16

select the water mains feature class and click. OK.

01:21

This is the updated water main GIS file you will use to update the model

01:25

it is different from the one used to initially build the model.

01:29

The water mains feature class is added to the

01:31

Agis Pro contents panel.

01:34

Locate the water mains layer in the contents panel

01:38

in the toolbar. Make sure list by drawing order is selected

01:42

then click and drag the water main layer to bring it below the pipe layer.

01:49

You can change the appearance of the water mains objects to make them easier to see.

01:54

Click the symbol under water mains to open the symbology panel

01:59

on the properties tab increase the line width to two point and click apply

02:07

close the symbology panel

02:10

on the info water pro ribbon

02:12

in the edit panel,

02:14

click G I S gateway

02:17

in the GIS gateway, click add

02:21

then in the pop-up, enter an id of pipe underscore update,

02:25

comma GS pipe update and then click OK.

02:30

The GIS exchange cluster dialogue opens where you

02:33

can create or edit the GIS exchange clusters.

02:37

A GIS exchange cluster defines a set of data exchange parameters that

02:41

control how data is loaded from GIS data to info Water pro

02:45

and saved data from info Water Pro to GEO databases

02:50

in the GIS

02:51

data source group.

02:52

Click the file selector to browse two and select

02:54

the GIS feature class used in the exchange cluster.

02:58

For this example, double click the dot GDB sample file,

03:03

select the water means feature class and click OK.

03:08

Back in the GIS exchange cluster dialogue

03:10

in the network data source group, expand the type drop down and select pipe tables.

03:16

This tells info water pro which database to import data into

03:21

next on the tabular joint tab expand the GIS

03:24

ID mapping field dropdown and select fac

03:27

underscore ID as the field containing the unique facility IDS.

03:32

Now you can begin mapping the fields,

03:35

click the field mapping tab

03:37

in the GIS data fields. List select install yr

03:43

in the network slash GIS data field mapping list, select pipe yr inst

03:49

click the map arrow.

03:51

The GIS field install yr is mapped to the info water pro field pipe yr

03:57

inst

03:59

during the import process, the data from this field and the GIS

04:02

will be transferred into the info water Pro database.

04:06

Repeat this process to map the GIS data field.

04:09

Comment to the info water pro description field pipe descript.

04:18

Now click auto map between the fields to auto map the

04:21

remaining GIS fields with the same name and data type,

04:25

scroll in the network slash GIS

04:27

data field mapping list.

04:29

And you can see that the material

04:31

length and diameter fields were automatically mapped

04:36

in the GIS data source group. Enter aware clause of status equals one.

04:41

This ware clause will restrict the import to pipes that exist in the system.

04:45

As identified using the field status

04:49

in the exchange options group,

04:51

select update existing records and update geometry data.

04:56

These two options ensure that any existing pipes with a matching ID and the G I S

05:01

that have any changes in their attributes and geometry

05:04

will be updated when this cluster is run.

05:07

Click, OK to save your changes to this exchange cluster,

05:11

click close to exit the GIS gateway.

Video transcript

00:04

Updating an existing model from GIS is common practice

00:08

if a model is constructed, well,

00:10

initially updating it becomes a straightforward process.

00:14

This is due to the use of a common ID in the GIS and the hydraulic model.

00:20

In this case,

00:21

you can use the GIS gateway with the tabular joint feature

00:24

to either create new features or update changes to existing features

00:29

to begin.

00:30

Double click the desired project dot APR

00:32

file to open

00:34

Agis Pro.

00:35

Once the project starts,

00:37

click the info water pro tab to open the info water pro ribbon

00:41

in the project panel, click initialize

00:46

in the model explorer from the scenario, drop down select base base data scenario.

00:52

Well, not specifically required.

00:54

It is often good practice to update a model while

00:56

in the base scenario where all elements are active,

01:00

being able to see all elements that are in the database is helpful to the modeler

01:05

on the

01:06

Agis

01:06

Pro ribbon map tab

01:08

layer panel. Click add data

01:11

for this example, double click the dot GDB sample file,

01:16

select the water mains feature class and click. OK.

01:21

This is the updated water main GIS file you will use to update the model

01:25

it is different from the one used to initially build the model.

01:29

The water mains feature class is added to the

01:31

Agis Pro contents panel.

01:34

Locate the water mains layer in the contents panel

01:38

in the toolbar. Make sure list by drawing order is selected

01:42

then click and drag the water main layer to bring it below the pipe layer.

01:49

You can change the appearance of the water mains objects to make them easier to see.

01:54

Click the symbol under water mains to open the symbology panel

01:59

on the properties tab increase the line width to two point and click apply

02:07

close the symbology panel

02:10

on the info water pro ribbon

02:12

in the edit panel,

02:14

click G I S gateway

02:17

in the GIS gateway, click add

02:21

then in the pop-up, enter an id of pipe underscore update,

02:25

comma GS pipe update and then click OK.

02:30

The GIS exchange cluster dialogue opens where you

02:33

can create or edit the GIS exchange clusters.

02:37

A GIS exchange cluster defines a set of data exchange parameters that

02:41

control how data is loaded from GIS data to info Water pro

02:45

and saved data from info Water Pro to GEO databases

02:50

in the GIS

02:51

data source group.

02:52

Click the file selector to browse two and select

02:54

the GIS feature class used in the exchange cluster.

02:58

For this example, double click the dot GDB sample file,

03:03

select the water means feature class and click OK.

03:08

Back in the GIS exchange cluster dialogue

03:10

in the network data source group, expand the type drop down and select pipe tables.

03:16

This tells info water pro which database to import data into

03:21

next on the tabular joint tab expand the GIS

03:24

ID mapping field dropdown and select fac

03:27

underscore ID as the field containing the unique facility IDS.

03:32

Now you can begin mapping the fields,

03:35

click the field mapping tab

03:37

in the GIS data fields. List select install yr

03:43

in the network slash GIS data field mapping list, select pipe yr inst

03:49

click the map arrow.

03:51

The GIS field install yr is mapped to the info water pro field pipe yr

03:57

inst

03:59

during the import process, the data from this field and the GIS

04:02

will be transferred into the info water Pro database.

04:06

Repeat this process to map the GIS data field.

04:09

Comment to the info water pro description field pipe descript.

04:18

Now click auto map between the fields to auto map the

04:21

remaining GIS fields with the same name and data type,

04:25

scroll in the network slash GIS

04:27

data field mapping list.

04:29

And you can see that the material

04:31

length and diameter fields were automatically mapped

04:36

in the GIS data source group. Enter aware clause of status equals one.

04:41

This ware clause will restrict the import to pipes that exist in the system.

04:45

As identified using the field status

04:49

in the exchange options group,

04:51

select update existing records and update geometry data.

04:56

These two options ensure that any existing pipes with a matching ID and the G I S

05:01

that have any changes in their attributes and geometry

05:04

will be updated when this cluster is run.

05:07

Click, OK to save your changes to this exchange cluster,

05:11

click close to exit the GIS gateway.

Step-by-step:

Updating an existing model from GIS is common practice. If a model is constructed well initially, updating it becomes a straightforward process. This is due to the use of a common ID in the GIS and the hydraulic model. In this case, you can use the GIS gateway with the Tabular Join feature to either create new features or update changes to existing features.

  1. Open the appropriate .aprx file in ArcGIS Pro.
  2. From the ribbon, InfoWater Pro tab, Project panel, click Initialize.
  3. In the Model Explorer, expand Scenario.
  4. Select BASE, Base Data Scenario.
    The Model Explorer Scenario menu with BASE< Base Data Scenario highlighted.
  5. On the ArcGIS Pro ribbon, Map tab, Layer panel, click Add Data.
    The ArcGIS ribbon, Map tab, Layer panel, with Add Data called out for selection.
  6. From the file browser, open the .gbd sample file.
  7. Select Watermains.
  8. Click OK.
  9. In the Contents panel, locate the Watermains layer.
  10. In the toolbar, select List By Drawing Order.
  11. Click and drag the Watermains layer to bring it below the Pipe layer.

To change the Watermains objects to increase visibility:

  1. Click the symbol under Watermains.
    The Contents panel, Watermains layer moved under the Pipe layer, with the List By Drawing Order highlighted and the symbol under Watermains highlighted.
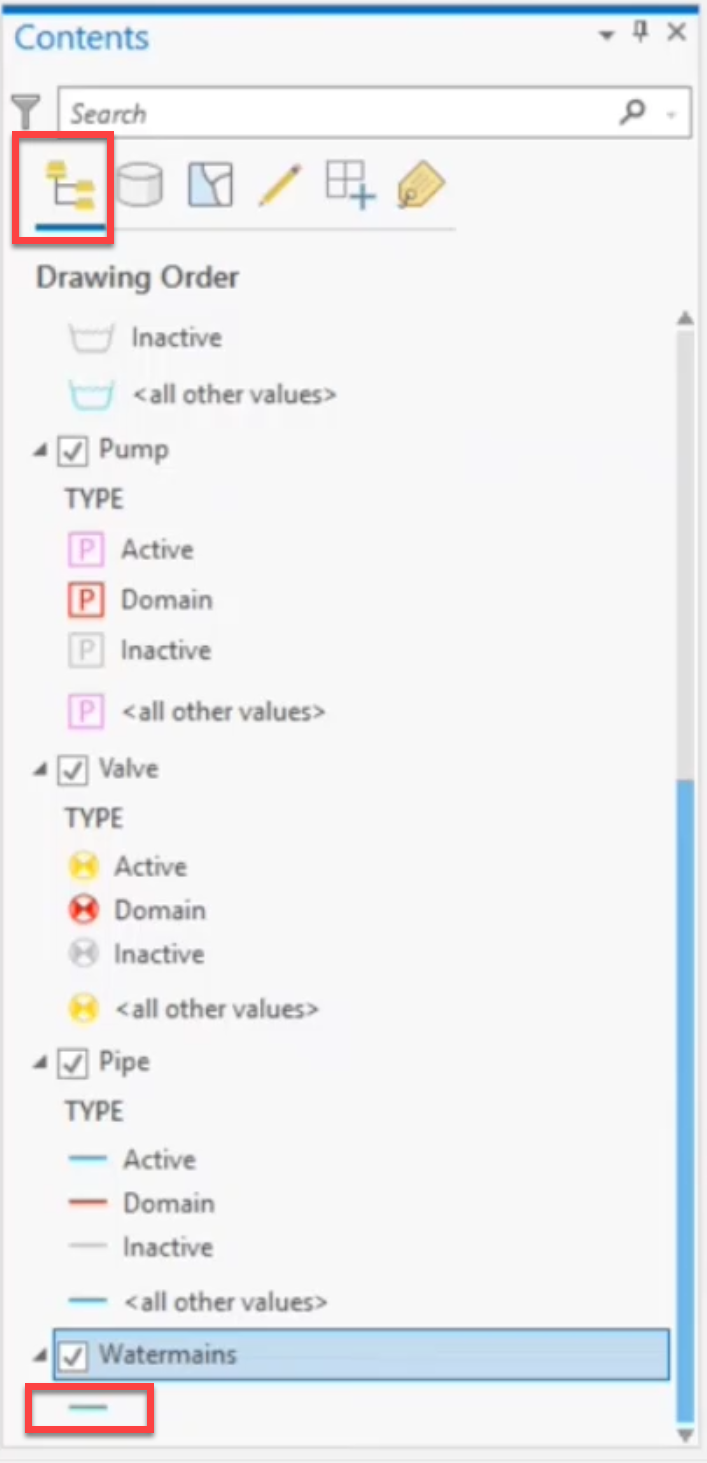
  2. On the Symbology panel, Properties tab, set the Line width to 2 pt.
  3. Click Apply.
  4. Close the Symbology panel.
    The Symbology panel with the Line width value highlighted.

To add a new GIS exchange cluster:

  1. On the ribbon, InfoWater Pro tab, Edit panel, click GIS Gateway.
    The InfoWater Pro ribbon, Edit panel, with the GIS Gateway command called out.
  2. In the GIS Gateway dialog, click Add.
    The GIS Gateway dialog with Add called out.
  3. In the Identification dialog, ID field, type “PIPE_UPDATE, GIS Pipe Update”.
  4. Click OK.

Now, to create or edit the GIS exchange clusters:

  1. In the GIS Exchange Cluster dialog, GIS Data Source, click the file selector ().
  2. Navigate to and select the GIS feature class used in the exchange cluster. In this case, open the .gbd sample file and select the Watermains feature class.
  3. Click OK.
  4. Back in the GIS Exchange Cluster dialog, Network Data Source group, set the Type to Pipe Tables. This tells InfoWater Pro which database to import data into.
  5. From the Tabular Join tab, set GIS ID Mapping Field to FAC_ID.
    The GIS Exchange Cluster dialog with the GIS Data Source selected and settings highlighted and configured.

To begin mapping the fields:

  1. Open the Field Mapping tab.
  2. In GIS Data Fields, select INSTALL_YR.
  3. In the Network/GIS Data Field Mapping, select PIPE->YR_INST.
  4. Click Map (>).
    The GIS Exchange Cluster dialog, Field Mapping tab with the fields selected and highlighted and the Map button highlighted.

The GIS field INSTALL_YR is mapped to the InfoWater Pro field PIPE->YR_INST. During the import process, the data from this field in the GIS will be transferred into the InfoWater Pro database.

  1. Repeat steps 25 through 28 to map the GIS Data Field COMMENT to the InfoWater Pro description field, Pipe->DESCRIPT.
  2. Click Auto Map (>>) between the fields to auto-map the remaining GIS fields with the same name and data type.
  3. In the Network/GIS Data Field Mapping list, locate the automatically mapped MATERIAL, LENGTH, and DIAMETER fields.
  4. In the GIS Data Source group, in the WHERE Clause field, enter “STATUS = 1”. This WHERE clause will restrict the import to pipes that exist in the system, as identified using the field STATUS.
  5. In the Exchange Options group, select Update Existing Records.
  6. Select Update Geometry Data.

These two options ensure that any existing pipes with a matching ID in the GIS that have any changes in their attributes and geometry will be updated when this cluster is run.

  1. Save your changes to this exchange cluster by clicking OK.
    The GIS Exchange Cluster with the automatically mapped fields highlighted and other settings highlighted and configured.
  2. Close the GIS Gateway.
Was this information helpful?