& Construction
Integrated BIM tools, including Revit, AutoCAD, and Civil 3D
& Manufacturing
Professional CAD/CAM tools built on Inventor and AutoCAD
Integrated BIM tools, including Revit, AutoCAD, and Civil 3D
Professional CAD/CAM tools built on Inventor and AutoCAD
Explore fundamental concepts such as objects, blocks, and layers.
Type:
Tutorial
Length:
10 min.
AutoCAD LT is computer-aided design (CAD) software that designers, architects, engineers, and construction professionals rely on to create and modify 2D drawings and documentation.
A drawing file is the file type used with AutoCAD LT to save your drawing data. AutoCAD LT drawing files end in the .dwg extension.
When working on a drawing, you should save it frequently. Saving protects you from losing work in the event of a power failure or other unexpected event.
By default, AutoCAD LT creates a backup file of the previous version of your drawing every time you save. Backup files end in the .bak extension.
Lines are the most basic and common object in AutoCAD LT drawings. To draw a line, click the Line tool. You can create a circle by specifying a center point and a radius.
A polyline is a connected sequence of line or arc segments that is created as a single object. Polylines can have a constant width, or they can have different starting and ending widths.
A hatch is a single object that covers a specified area with a pattern of lines, dots, shapes, a solid fill color, or a gradient fill.
You can use RECTANG to create a rectangle by clicking two diagonal points. This will create a closed polyline in a rectangular shape, with the specified points as diagonally opposite corners.
You can use DLINE to create a double line, which is a handy way to draw walls in floor plans. You can draw double lines as straight segments or as arcs.
In AutoCAD LT, symbols and details that you insert into drawings are called blocks. A block is a collection of objects that are combined into a single object and given a name. Here are some examples of a variety of blocks at different scales:
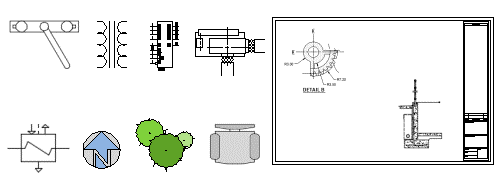
Using blocks, you can create a library of frequently used symbols or parts.
Transcript
00:00
Blocks have been available since the earliest versions of AutoCAD and AutoCAD Lt.
00:09
A block is a collection of objects that are combined into a single object and given a name.
00:15
Using blocks, you can create a library of frequently used symbols or parts.
00:21
In addition to being able to treat these combined objects as a single object,
00:26
other advantages of using blocks include providing consistency from drawing to drawing and a reduction in file size.
00:34
Instead of having a number of individual objects, once a block has been created,
00:39
multiple copies of that block within a drawing do not require multiple copies of each individual object.
00:44
Rather, they require only another instance of the block itself.
Video transcript
00:00
Blocks have been available since the earliest versions of AutoCAD and AutoCAD Lt.
00:09
A block is a collection of objects that are combined into a single object and given a name.
00:15
Using blocks, you can create a library of frequently used symbols or parts.
00:21
In addition to being able to treat these combined objects as a single object,
00:26
other advantages of using blocks include providing consistency from drawing to drawing and a reduction in file size.
00:34
Instead of having a number of individual objects, once a block has been created,
00:39
multiple copies of that block within a drawing do not require multiple copies of each individual object.
00:44
Rather, they require only another instance of the block itself.
Create layers to organize the objects in your drawing. Objects are always assigned to layers, and all new objects are drawn on the current layer.
When a drawing becomes visually complex, you can use layers to hide the objects that you currently do not need to see. It may be helpful to think of layers as clear plastic sheets:
With layers, you can:
Layers are used to group objects in a drawing by function and to enforce standards for color, linetype, lineweight, and other properties. Watch this video to learn more about layer concepts.
Transcript
00:03
Layers are used to group objects in a drawing by function and to enforce standards for color, line type, line weight, and other properties.
00:13
Layers are the equivalent of the overlays once used in paper-based drafting.
00:18
By creating layers, you can associate similar types of objects by assigning them to the same layer.
00:25
For example, you can put construction lines, text dimensions, and title blocks on separate layers.
00:33
You can also organize objects by function, and you can assign default object properties using color, line type, and line weight to each layer.
00:44
For example, you might create a layer for the foundation of the building, a layer for the walls, and yet another layer for the doors.
00:53
Then you might have separate layers for electrical, plumbing, fixtures, cabinets, and so on.
00:60
This way, the entire building can be saved in a single drawing file,
01:04
and you can use layers to control what you want to see at any particular time.
01:09
Layers are an important organizational tool and can reduce the visual complexity of a drawing
01:15
and improve display performance by controlling how objects are displayed or plotted.
01:20
With layers, you can control whether the objects on a layer are visible or hidden;
01:26
whether objects use the default properties such as color, line type, or line weight for the layer;
01:33
or whether object properties are assigned individually to each object,
01:37
whether and how objects on a layer are plotted,
01:41
whether the objects on a layer are locked and cannot be modified,
01:46
and whether objects display with different layer properties.
01:52
In individual layout viewports, each drawing includes a layer named 0.
01:56
Layer 0 cannot be deleted or renamed to ensure that every drawing includes at least one layer.
02:02
In general, you should always create several new layers with which to organize your drawing,
02:08
rather than create your entire drawing on layer 0.
02:12
These layers can be saved in a drawing template (a file with a .dwt file extension)
02:18
to make them available automatically in a new drawing.
02:21
Each drawing can have as many layers as you want.
02:25
A layer name can be up to 256 characters long and can include letters, numbers, spaces, and several special characters.
02:35
Layer lists are sorted alphabetically.
02:39
To organize all of those layers, you should choose names carefully.
02:43
Use common prefixes to name layers with related drawing components, to make it easier to manipulate groups of layers.
02:51
You may be required to name layers based on corporate, industry, or client standards,
02:57
and many professional organizations publish layering standards that you can use to name the various layers in the drawing.
03:04
Once you have created objects on specific layers, you can use those layers to control the visibility of objects.
03:11
When you do not need to see the objects on a particular layer, you can turn the layer off.
03:17
When you need to see the objects again, you can turn that layer on.
03:22
Once visible, you can usually modify the geometry on any layer at any time, as long as the layer is not locked.
03:30
But you can only create geometry on the top or current layer.
03:34
So, when you are using a command to draw lines, arcs, or circles, or to place text or dimensions,
03:41
the geometry you create is placed on the current layer.
03:44
So, in order to create or place an object on the proper layer,
03:49
you must first make sure that the layer on which the object should be created is the current layer.
Video transcript
00:03
Layers are used to group objects in a drawing by function and to enforce standards for color, line type, line weight, and other properties.
00:13
Layers are the equivalent of the overlays once used in paper-based drafting.
00:18
By creating layers, you can associate similar types of objects by assigning them to the same layer.
00:25
For example, you can put construction lines, text dimensions, and title blocks on separate layers.
00:33
You can also organize objects by function, and you can assign default object properties using color, line type, and line weight to each layer.
00:44
For example, you might create a layer for the foundation of the building, a layer for the walls, and yet another layer for the doors.
00:53
Then you might have separate layers for electrical, plumbing, fixtures, cabinets, and so on.
00:60
This way, the entire building can be saved in a single drawing file,
01:04
and you can use layers to control what you want to see at any particular time.
01:09
Layers are an important organizational tool and can reduce the visual complexity of a drawing
01:15
and improve display performance by controlling how objects are displayed or plotted.
01:20
With layers, you can control whether the objects on a layer are visible or hidden;
01:26
whether objects use the default properties such as color, line type, or line weight for the layer;
01:33
or whether object properties are assigned individually to each object,
01:37
whether and how objects on a layer are plotted,
01:41
whether the objects on a layer are locked and cannot be modified,
01:46
and whether objects display with different layer properties.
01:52
In individual layout viewports, each drawing includes a layer named 0.
01:56
Layer 0 cannot be deleted or renamed to ensure that every drawing includes at least one layer.
02:02
In general, you should always create several new layers with which to organize your drawing,
02:08
rather than create your entire drawing on layer 0.
02:12
These layers can be saved in a drawing template (a file with a .dwt file extension)
02:18
to make them available automatically in a new drawing.
02:21
Each drawing can have as many layers as you want.
02:25
A layer name can be up to 256 characters long and can include letters, numbers, spaces, and several special characters.
02:35
Layer lists are sorted alphabetically.
02:39
To organize all of those layers, you should choose names carefully.
02:43
Use common prefixes to name layers with related drawing components, to make it easier to manipulate groups of layers.
02:51
You may be required to name layers based on corporate, industry, or client standards,
02:57
and many professional organizations publish layering standards that you can use to name the various layers in the drawing.
03:04
Once you have created objects on specific layers, you can use those layers to control the visibility of objects.
03:11
When you do not need to see the objects on a particular layer, you can turn the layer off.
03:17
When you need to see the objects again, you can turn that layer on.
03:22
Once visible, you can usually modify the geometry on any layer at any time, as long as the layer is not locked.
03:30
But you can only create geometry on the top or current layer.
03:34
So, when you are using a command to draw lines, arcs, or circles, or to place text or dimensions,
03:41
the geometry you create is placed on the current layer.
03:44
So, in order to create or place an object on the proper layer,
03:49
you must first make sure that the layer on which the object should be created is the current layer.
AutoCAD is similar to AutoCAD LT, but also includes:
How to buy
Privacy | Do not sell or share my personal information | Cookie preferences | Report noncompliance | Terms of use | Legal | © 2025 Autodesk Inc. All rights reserved
Sign in for the best experience
Save your progress
Get access to courses
Receive personalized recommendations
May we collect and use your data?
Learn more about the Third Party Services we use and our Privacy Statement.May we collect and use your data to tailor your experience?
Explore the benefits of a customized experience by managing your privacy settings for this site or visit our Privacy Statement to learn more about your options.