& Construction

Integrated BIM tools, including Revit, AutoCAD, and Civil 3D
& Manufacturing

Professional CAD/CAM tools built on Inventor and AutoCAD

Integrated BIM tools, including Revit, AutoCAD, and Civil 3D

Professional CAD/CAM tools built on Inventor and AutoCAD
In this unit, you will learn how to import existing data into Fusion Manage from another system, such as an enterprise resource planning (ERP) system or another product lifecycle management (PLM) system.
Any referenced datasets can be downloaded from "Module downloads" in the module overview.
Transcript
00:03
This is the workflow overview for the module.
00:06
The first task is about importing data into Fusion 360 Manage
00:10
before we learn about creating standard reports and advanced print views.
00:16
Importing or migrating your data from a previous PLM system is typically part of a Fusion 360 Manage implementation plan.
00:24
Another possible task is setting up Fusion 360 Manage to integrate with another system,
00:30
such as an enterprise resource planning or ERP system.
00:35
Shown here is the default tenants change order workspace workflow that shows how pushing the data to ERP can be set up.
00:43
It is also possible to have the ERP system pushing data into Fusion 360 Manage initiated by a specific trigger.
00:52
Project for accomplishing this typically starts with the planning phase
00:56
and establishing what data is owned by the PLM system and what is owned by the ERP system.
01:02
You would then determine trigger points of when,
01:05
how and the conditions for pushing the data between systems and define the validation requirements
01:11
to ensure that the data creation or updates were done successfully.
01:15
After this planning is the preparing of your workspaces, mapping the data and then building the actual integration.
01:23
More information on how to integrate systems can be provided by your Fusion 360 Manage implementation partner.
01:34
The steps to manually import a data file from another system.
01:38
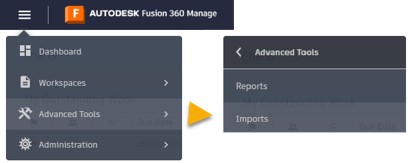
Using the Imports tool starts with selecting Advanced Tools > Imports.
01:43
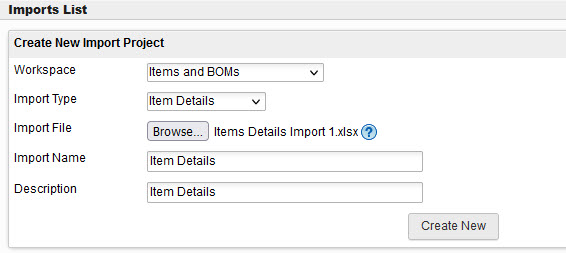
Next select or enter values for Workspace, Import Type, Import File, Import Name and Description.
01:50
We'll be looking at an example using the item details import type that uses the number field as the unique identifier.
01:59
The level BOM import type can be used for BOM with unique level numbers that determine the relationships.
02:06
When all has been entered, click the Create New button.
02:10
Other import types shown in the bottom image include parent child BOM
02:15
Where you specify the parent and child relationships before importing the BOM.
02:19
Hierarchy BOM, import a BOM with unique level numbers that determine the relationships and level BOM as mentioned.
02:29
The next step is to Establish field mappings between the Excel file and the fields in Fusion 360 Manage.
02:35
Note that the system uses the first tab in the spreadsheet.
02:39
Assumes the first row are the column headers and will automatically match field names if the values are the same.
02:46
If needed, you can manually match field names.
02:50
Now select Configurations for your import project(For example,
02:55
select Match on/Primary Key Column, Import Settings, etc). As shown in the top image.
03:04
And then click Save.
03:05
If any problems are encountered, they will display in the problems tab.
03:10
Next step is to click Run to schedule the import and once successful,
03:15
click Cancel to return to see the status, it will show done when completed.
03:19
As a final note, to be able to import data, the appropriate role permissions are required.
03:25
Shown in the bottom image is the default role called Items and BOM[Import].
03:31
The user needs to belong to a group with this role such as the importer group.
03:37
A demonstration of the imports tool will be shown next. As an introduction.
03:41
The spreadsheet on the left will be imported first with its 10 records.
03:46
Note the unique numbers.
03:48
After that files data has been imported into Fusion 360 Manage, the second spreadsheets data will be imported.
03:56
The second spreadsheet is used to update the existing data in cell rows 6 through 11 and new records from cell rows 12 through 17.
04:08
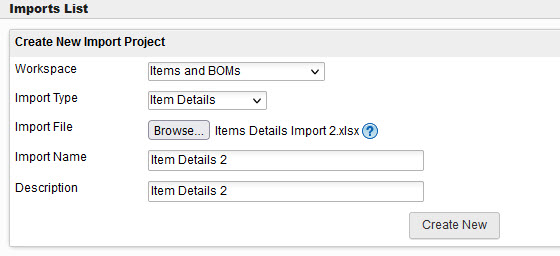
In this demonstration we'll set up an import project for importing item details into a workspace.
04:14
After selecting Advanced Tools,
04:17
then Imports, select the Workspace which in this case is the Items and BOMs workspace.
04:24
The Import Type is Item Details.
04:29
The Import File is Items Details import1.xlsx.
04:39
And next we'll give it a Name and Description,
04:43
then click Create New.
04:46
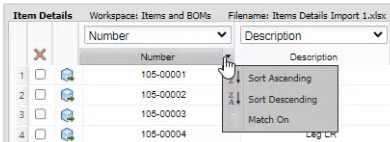
No changes are required for field mapping but we do see a problem indicating an error that no column was selected to match on.
04:54
This case, let's select the Number column as the unique primary key to match on.
04:59
This is the column that represents the primary key or a unique identifier.
05:05
Now we select the Import Settings, For new records to Add to the Workspace
05:11
and for existing or matching records we select to Update the Workspace.
05:17
For picklist values, since this import doesn't have any, let's select Error but any of them would have worked.
05:26
Now click Save.
05:29
We now see there are problems listed but these are just warnings
05:33
indicating that the number is read only and cannot be edited after import.
05:38
Warnings don't prevent you from running the import but errors do.
05:42
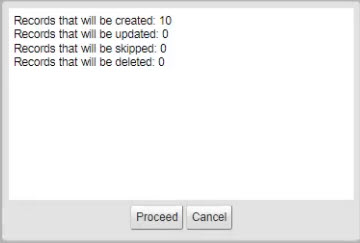
Here we see 10 records are to be created, click Proceed to continue,
05:48
then click OK.
05:50
We see here that the status of the import is done.
05:54
Now we'll search for the 10 newly imported records.
05:57
They started with 105-0000 and we see here the 10 records.
06:09
Next, we're going to create another import project and import another Excel spreadsheet
06:19
and update changes to existing records and also add additional records,
06:25
we'll go through the same process with the same Import Settings.
06:28
But this time it's the
06:32
Items Details import2.xlsx spreadsheet.
06:40
We'll now give it a Name and Description,
06:47
then click Create New
06:51
and also set Number to be Match On.
06:60
After defining the Import Settings as we did before,
07:05
we'll Save the import project
07:09
and then Run the import project.
07:12
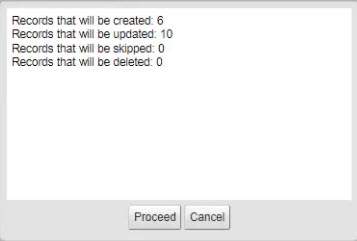
And you'll see that six records will be created and 10 records will be updated.
07:29
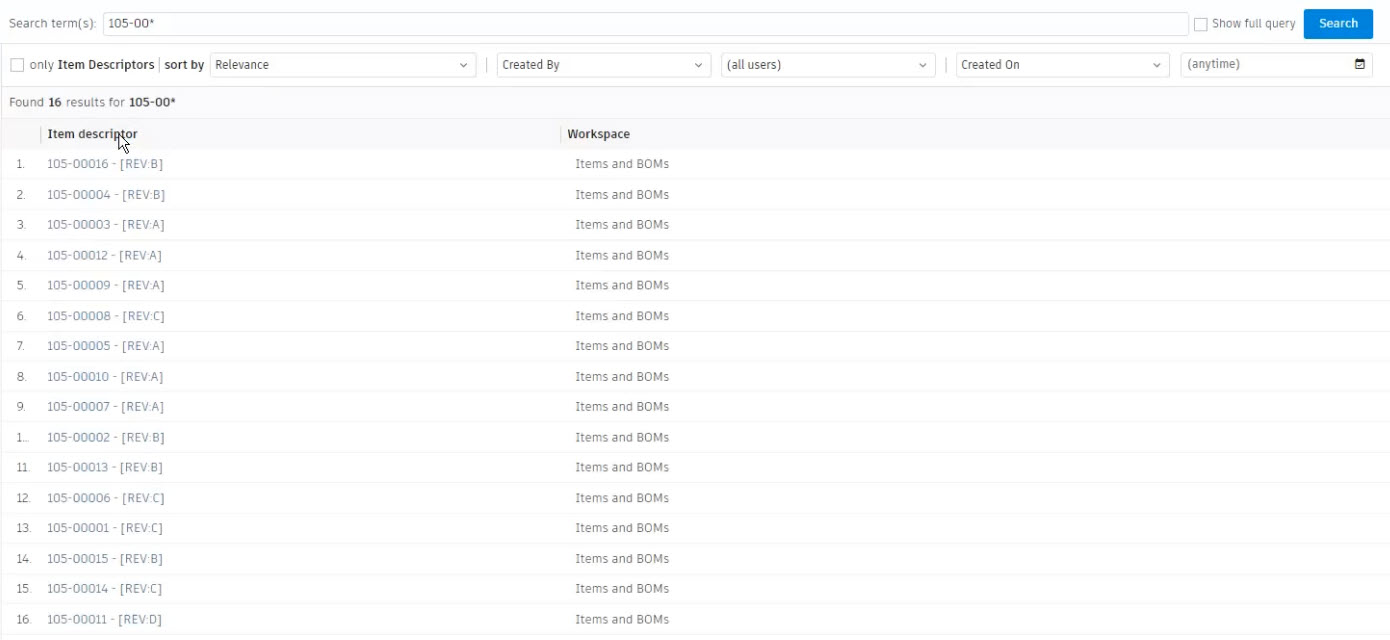
Now we'll do another search on the records and see that the additions and updates were made successfully.
07:36
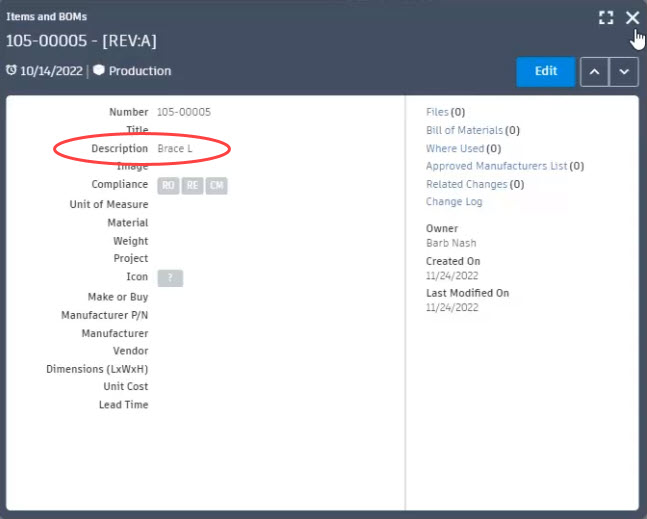
Note that the description changes in the 105-00005 and 105-00006 Item records as examples.
Video transcript
00:03
This is the workflow overview for the module.
00:06
The first task is about importing data into Fusion 360 Manage
00:10
before we learn about creating standard reports and advanced print views.
00:16
Importing or migrating your data from a previous PLM system is typically part of a Fusion 360 Manage implementation plan.
00:24
Another possible task is setting up Fusion 360 Manage to integrate with another system,
00:30
such as an enterprise resource planning or ERP system.
00:35
Shown here is the default tenants change order workspace workflow that shows how pushing the data to ERP can be set up.
00:43
It is also possible to have the ERP system pushing data into Fusion 360 Manage initiated by a specific trigger.
00:52
Project for accomplishing this typically starts with the planning phase
00:56
and establishing what data is owned by the PLM system and what is owned by the ERP system.
01:02
You would then determine trigger points of when,
01:05
how and the conditions for pushing the data between systems and define the validation requirements
01:11
to ensure that the data creation or updates were done successfully.
01:15
After this planning is the preparing of your workspaces, mapping the data and then building the actual integration.
01:23
More information on how to integrate systems can be provided by your Fusion 360 Manage implementation partner.
01:34
The steps to manually import a data file from another system.
01:38
Using the Imports tool starts with selecting Advanced Tools > Imports.
01:43
Next select or enter values for Workspace, Import Type, Import File, Import Name and Description.
01:50
We'll be looking at an example using the item details import type that uses the number field as the unique identifier.
01:59
The level BOM import type can be used for BOM with unique level numbers that determine the relationships.
02:06
When all has been entered, click the Create New button.
02:10
Other import types shown in the bottom image include parent child BOM
02:15
Where you specify the parent and child relationships before importing the BOM.
02:19
Hierarchy BOM, import a BOM with unique level numbers that determine the relationships and level BOM as mentioned.
02:29
The next step is to Establish field mappings between the Excel file and the fields in Fusion 360 Manage.
02:35
Note that the system uses the first tab in the spreadsheet.
02:39
Assumes the first row are the column headers and will automatically match field names if the values are the same.
02:46
If needed, you can manually match field names.
02:50
Now select Configurations for your import project(For example,
02:55
select Match on/Primary Key Column, Import Settings, etc). As shown in the top image.
03:04
And then click Save.
03:05
If any problems are encountered, they will display in the problems tab.
03:10
Next step is to click Run to schedule the import and once successful,
03:15
click Cancel to return to see the status, it will show done when completed.
03:19
As a final note, to be able to import data, the appropriate role permissions are required.
03:25
Shown in the bottom image is the default role called Items and BOM[Import].
03:31
The user needs to belong to a group with this role such as the importer group.
03:37
A demonstration of the imports tool will be shown next. As an introduction.
03:41
The spreadsheet on the left will be imported first with its 10 records.
03:46
Note the unique numbers.
03:48
After that files data has been imported into Fusion 360 Manage, the second spreadsheets data will be imported.
03:56
The second spreadsheet is used to update the existing data in cell rows 6 through 11 and new records from cell rows 12 through 17.
04:08
In this demonstration we'll set up an import project for importing item details into a workspace.
04:14
After selecting Advanced Tools,
04:17
then Imports, select the Workspace which in this case is the Items and BOMs workspace.
04:24
The Import Type is Item Details.
04:29
The Import File is Items Details import1.xlsx.
04:39
And next we'll give it a Name and Description,
04:43
then click Create New.
04:46
No changes are required for field mapping but we do see a problem indicating an error that no column was selected to match on.
04:54
This case, let's select the Number column as the unique primary key to match on.
04:59
This is the column that represents the primary key or a unique identifier.
05:05
Now we select the Import Settings, For new records to Add to the Workspace
05:11
and for existing or matching records we select to Update the Workspace.
05:17
For picklist values, since this import doesn't have any, let's select Error but any of them would have worked.
05:26
Now click Save.
05:29
We now see there are problems listed but these are just warnings
05:33
indicating that the number is read only and cannot be edited after import.
05:38
Warnings don't prevent you from running the import but errors do.
05:42
Here we see 10 records are to be created, click Proceed to continue,
05:48
then click OK.
05:50
We see here that the status of the import is done.
05:54
Now we'll search for the 10 newly imported records.
05:57
They started with 105-0000 and we see here the 10 records.
06:09
Next, we're going to create another import project and import another Excel spreadsheet
06:19
and update changes to existing records and also add additional records,
06:25
we'll go through the same process with the same Import Settings.
06:28
But this time it's the
06:32
Items Details import2.xlsx spreadsheet.
06:40
We'll now give it a Name and Description,
06:47
then click Create New
06:51
and also set Number to be Match On.
06:60
After defining the Import Settings as we did before,
07:05
we'll Save the import project
07:09
and then Run the import project.
07:12
And you'll see that six records will be created and 10 records will be updated.
07:29
Now we'll do another search on the records and see that the additions and updates were made successfully.
07:36
Note that the description changes in the 105-00005 and 105-00006 Item records as examples.
In this exercise, you will set up an import project for importing item details into a workspace. The .xlsx files for this exercise are available to be downloaded using the Download Resources button on the Module Overview page.




In this task, you will create another import project to import data to update existing records and add new ones. The image below shows the difference between the first imported spreadsheet and the updated one.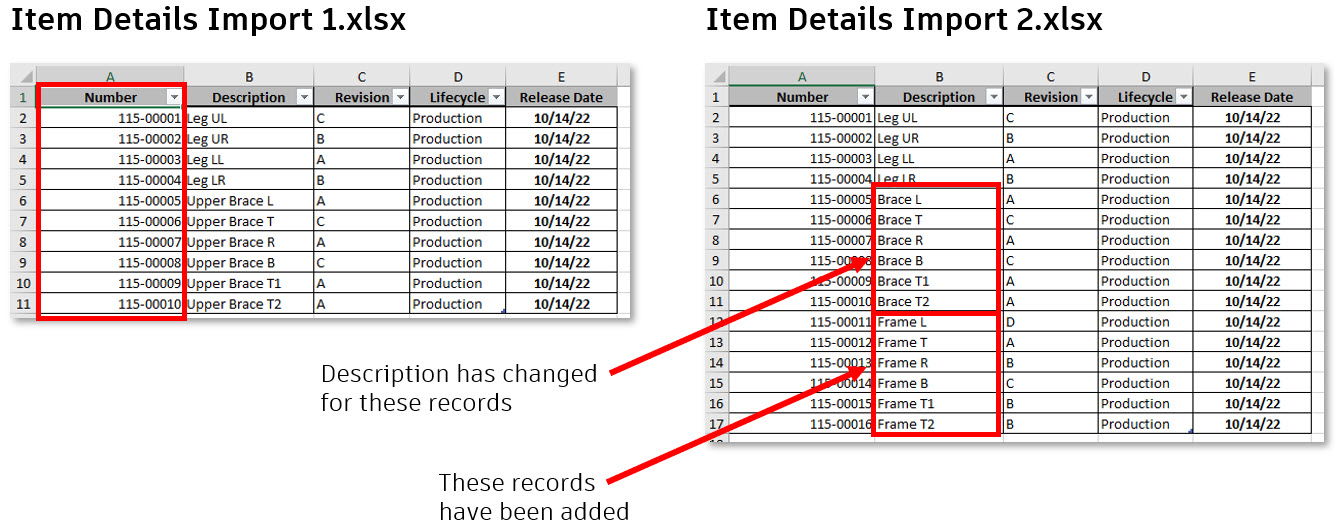
How to buy
Privacy | Do not sell or share my personal information | Cookie preferences | Report noncompliance | Terms of use | Legal | © 2025 Autodesk Inc. All rights reserved
Sign in to start learning
Sign in for unlimited free access to all learning content.Save your progress
Take assessments
Receive personalized recommendations
May we collect and use your data?
Learn more about the Third Party Services we use and our Privacy Statement.May we collect and use your data to tailor your experience?
Explore the benefits of a customized experience by managing your privacy settings for this site or visit our Privacy Statement to learn more about your options.