Setting up a lighting fixture family base file

00:00

MARTHA HOLLOWELL ORCUTT: Setting up a lighting fixture family

00:03

base file.

00:04

In this video, we're going to create a base file which

00:07

is like a template that can be used

00:09

to create multiple lighting fixture families.

00:14

I'm working in Revit and I'm on the File tab,

00:17

clicking New and then Family.

00:20

And first of all, I want you to see

00:22

that there are several lighting fixture templates

00:25

but there are all either designed

00:27

to be standalone, ceiling-based, or a wall-based.

00:34

When you're working in linked files,

00:36

you need to use a face-based family

00:41

because face-based families can be placed

00:44

on any surface, ceilings, walls, structural members, and roofs

00:49

for example.

00:52

So I'm selecting the generic model face-based.rft template

00:58

file and clicking Open.

01:05

Since this is generic, I need to go into the properties

01:09

and click on the family category and parameters button

01:13

as you can see here.

01:15

And then I'm going to change this to a lighting fixture.

01:19

I want to go ahead and select light source

01:23

so I have a light source in here but I also

01:26

need to have an electrical connector.

01:28

So on the Create tab, I'm selecting Electrical connector,

01:33

placing it on the work plane in this case, which

01:36

is the ref level is where I want to put it to the first place

01:40

and click OK.

01:45

Now when I open up the elevations front view,

01:48

you can see that the light source displays

01:50

with the face on the ref level.

01:53

This is typical of face-based families

01:55

you actually create them upside down when you're

01:58

working on lighting fixtures.

02:00

The location and shape of the light source

02:02

will be modified to fit the specific fixture later.

02:07

At this point, we need to review the parameters.

02:11

In the Create tab, properties panel,

02:13

I'm clicking family types.

02:17

Because this is a lighting fixture family,

02:20

some of the built in parameters are

02:21

included in the family from the beginning

02:25

but they are not the only parameters that you need.

02:28

So we're going to add parameters to make

02:30

this a more useful family.

02:36

In the family types dialog box, I'm

02:38

going to click on New parameter.

02:41

At this point, we could use a family parameter

02:44

but it's better to use a shared parameter

02:47

because we're creating a base file that

02:49

will be used for multiple projects

02:51

and we want those parameters to appear in schedules and tags.

02:56

So I'm going to click the Select button

02:59

and I have a shared parameter file right now already

03:02

available that has a couple of parameters in it.

03:05

I'm going to click Edit so you can see where those are,

03:09

I've actually got this now in my data sets,

03:12

it's a small Medical Center shared parameters.

03:15

And I have two parameters that are in here

03:18

so I'm going to click OK that was just

03:19

to show you where it was.

03:21

I want to use a parameter now, I'm

03:23

going to select Load classification and click OK.

03:27

It's going to be a tight parameter

03:30

and I want to group that parameter under Electrical

03:33

as you can see here, click OK.

03:37

So pretty easy if you already have a shared file.

03:40

You click New parameter, you click Shared parameter,

03:45

select, choose the one you want, in this case ballast voltage,

03:50

click OK.

03:52

Assigned where you how you want it to be grouped and click OK

03:56

again.

03:59

Now, if I want to create a new shared parameter,

04:01

it's actually pretty easy.

04:03

I go into new parameter, click Shared parameter again, select.

04:07

I'm going to put it in the same shared parameter file

04:11

so I'm going to click Edit.

04:14

And here it is, there's the parameter file

04:16

I had before that I showed.

04:17

You could also create a new one if you needed to.

04:20

And I have already a parameter group called Electrical shared

04:24

parameters and I'm going to come over and click New parameter.

04:29

This one I'm going to name, ballast number of poles.

04:34

The discipline is going to be Electrical and in this case,

04:38

it's pretty easy.

04:39

The type of parameter is also number of poles.

04:42

You can see here I have that option

04:44

and I'm going to click OK.

04:46

I could, by the way, put a tooltip in.

04:48

This one's pretty self-explanatory so I click OK.

04:52

To use it, I now select that new parameter and I click OK.

05:00

Make sure it's in here again, click OK.

05:04

And then once again select where I want to group

05:07

it In this particular family.

05:11

So now I have my additional parameters

05:14

and I'm ready to go ahead and start building a new family

05:18

using this template as a base.

05:20

So I've got my light source, I've

05:22

got my Electrical connector, I've got my parameters,

05:26

I'm going to click Save and I'm going to name this one,

05:29

lighting fixture surface template

05:32

because this is a template file for what

05:35

I'm working on right now.

05:37

And I'll save that and it will be

05:40

available for the next project I work on.

Video transcript

00:00

MARTHA HOLLOWELL ORCUTT: Setting up a lighting fixture family

00:03

base file.

00:04

In this video, we're going to create a base file which

00:07

is like a template that can be used

00:09

to create multiple lighting fixture families.

00:14

I'm working in Revit and I'm on the File tab,

00:17

clicking New and then Family.

00:20

And first of all, I want you to see

00:22

that there are several lighting fixture templates

00:25

but there are all either designed

00:27

to be standalone, ceiling-based, or a wall-based.

00:34

When you're working in linked files,

00:36

you need to use a face-based family

00:41

because face-based families can be placed

00:44

on any surface, ceilings, walls, structural members, and roofs

00:49

for example.

00:52

So I'm selecting the generic model face-based.rft template

00:58

file and clicking Open.

01:05

Since this is generic, I need to go into the properties

01:09

and click on the family category and parameters button

01:13

as you can see here.

01:15

And then I'm going to change this to a lighting fixture.

01:19

I want to go ahead and select light source

01:23

so I have a light source in here but I also

01:26

need to have an electrical connector.

01:28

So on the Create tab, I'm selecting Electrical connector,

01:33

placing it on the work plane in this case, which

01:36

is the ref level is where I want to put it to the first place

01:40

and click OK.

01:45

Now when I open up the elevations front view,

01:48

you can see that the light source displays

01:50

with the face on the ref level.

01:53

This is typical of face-based families

01:55

you actually create them upside down when you're

01:58

working on lighting fixtures.

02:00

The location and shape of the light source

02:02

will be modified to fit the specific fixture later.

02:07

At this point, we need to review the parameters.

02:11

In the Create tab, properties panel,

02:13

I'm clicking family types.

02:17

Because this is a lighting fixture family,

02:20

some of the built in parameters are

02:21

included in the family from the beginning

02:25

but they are not the only parameters that you need.

02:28

So we're going to add parameters to make

02:30

this a more useful family.

02:36

In the family types dialog box, I'm

02:38

going to click on New parameter.

02:41

At this point, we could use a family parameter

02:44

but it's better to use a shared parameter

02:47

because we're creating a base file that

02:49

will be used for multiple projects

02:51

and we want those parameters to appear in schedules and tags.

02:56

So I'm going to click the Select button

02:59

and I have a shared parameter file right now already

03:02

available that has a couple of parameters in it.

03:05

I'm going to click Edit so you can see where those are,

03:09

I've actually got this now in my data sets,

03:12

it's a small Medical Center shared parameters.

03:15

And I have two parameters that are in here

03:18

so I'm going to click OK that was just

03:19

to show you where it was.

03:21

I want to use a parameter now, I'm

03:23

going to select Load classification and click OK.

03:27

It's going to be a tight parameter

03:30

and I want to group that parameter under Electrical

03:33

as you can see here, click OK.

03:37

So pretty easy if you already have a shared file.

03:40

You click New parameter, you click Shared parameter,

03:45

select, choose the one you want, in this case ballast voltage,

03:50

click OK.

03:52

Assigned where you how you want it to be grouped and click OK

03:56

again.

03:59

Now, if I want to create a new shared parameter,

04:01

it's actually pretty easy.

04:03

I go into new parameter, click Shared parameter again, select.

04:07

I'm going to put it in the same shared parameter file

04:11

so I'm going to click Edit.

04:14

And here it is, there's the parameter file

04:16

I had before that I showed.

04:17

You could also create a new one if you needed to.

04:20

And I have already a parameter group called Electrical shared

04:24

parameters and I'm going to come over and click New parameter.

04:29

This one I'm going to name, ballast number of poles.

04:34

The discipline is going to be Electrical and in this case,

04:38

it's pretty easy.

04:39

The type of parameter is also number of poles.

04:42

You can see here I have that option

04:44

and I'm going to click OK.

04:46

I could, by the way, put a tooltip in.

04:48

This one's pretty self-explanatory so I click OK.

04:52

To use it, I now select that new parameter and I click OK.

05:00

Make sure it's in here again, click OK.

05:04

And then once again select where I want to group

05:07

it In this particular family.

05:11

So now I have my additional parameters

05:14

and I'm ready to go ahead and start building a new family

05:18

using this template as a base.

05:20

So I've got my light source, I've

05:22

got my Electrical connector, I've got my parameters,

05:26

I'm going to click Save and I'm going to name this one,

05:29

lighting fixture surface template

05:32

because this is a template file for what

05:35

I'm working on right now.

05:37

And I'll save that and it will be

05:40

available for the next project I work on.

Setting up a lighting fixture family base file - Exercise

  1. In Revit, in the File tab, expand New > Family.
  2. Review the lighting fixture templates. Notice that they are designed to be either stand-alone, ceiling based, or wall based, as shown below.

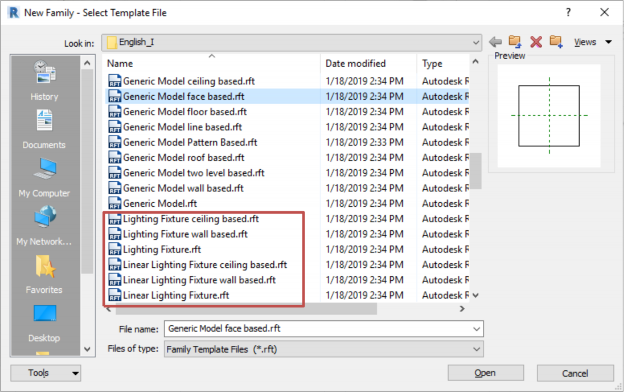
  3. In the New Family, select Template File, select Generic Model face based.rft, and click Open.
    • When you are working in linked files, you need to use a face-based family. Face-based families can be placed on any surface: ceilings, walls, structural members, and roofs, for example.
  4. In the Create tab, Properties panel, click Family Category and Parameters.
  5. In the dialog box, in the Family Category section, select Lighting Fixtures.
  6. In the Family Parameters section, select Light Source, as shown below, and click OK.

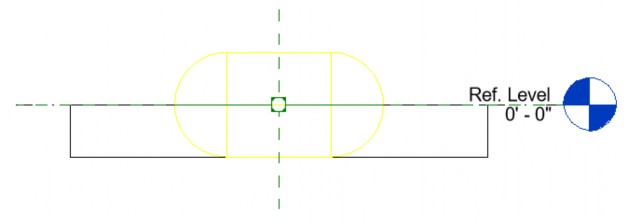
  7. In the Create tab > Connectors panel, click Electrical Connector and place the connector on the Work Plane Ref. Level, as shown below.

  8. Open the Elevations > Front view. The light source displays with the face on the Ref. Level, as shown below. This is typical of face-based families – you will create them upside down for lighting fixtures. The location and shape of the light source will be modified to fit the specific fixture later.

  9. In the Create tab > Properties panel, click Family Types.
  10. In the Family Types dialog box, at the bottom, click New Parameter.
  11. In the Parameter Properties dialog box, in the Parameter Types area, select Shared parameter and click Select….
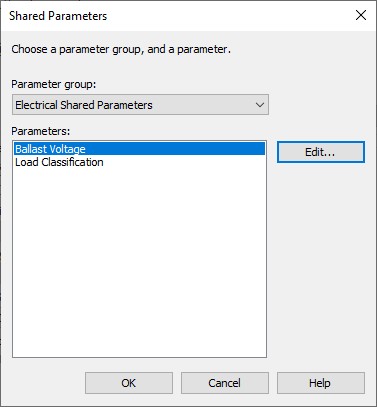
  12. In the Shared Parameters dialog box, two parameters are already available, as shown below.


    • If a shared parameter file is not available, you will be prompted to locate or create one. If you need to load the shared parameter file, navigate to the folder with the datasets for this practice and load Small Medical Center Shared Parameters.txt.
  13. Select Load Classification and click OK.
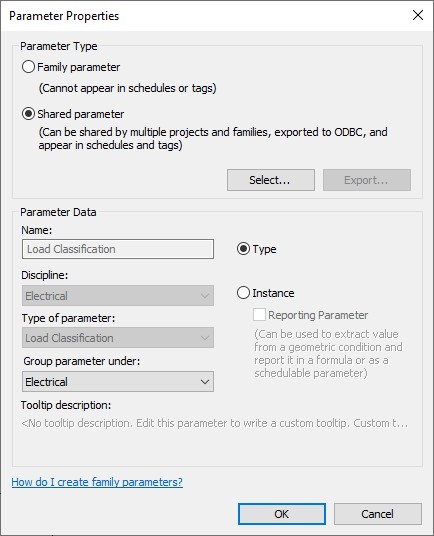
  14. In the Parameter Properties dialog box, in the Parameter Data area, select Type, and in the group parameter under, select the Electrical group as shown below. Click OK.

  15. Repeat the process for adding the Ballast Voltage parameter.
  16. Start the New parameter command again and select Shared parameter and Select….
  17. In the Shared Parameters dialog box, click Edit….
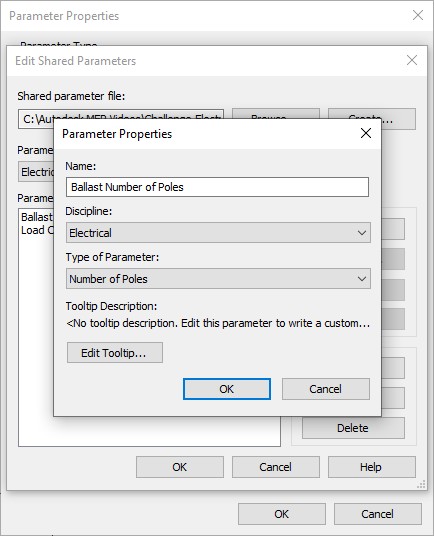
  18. In the Edit Shared Parameters dialog box, in the Parameters area, click New….
  19. Name the new parameter and assign the Discipline and Type of Parameter as shown below. Click OK.

  20. Click OK again, make sure the new parameter is selected, and click OK again.
  21. Group the new parameter in the Electrical group and click OK. The new parameters are added to the family as shown below.

  22. Save the family as Lighting Fixture-Surface Template.rfa.
Was this information helpful?