& Construction

Integrated BIM tools, including Revit, AutoCAD, and Civil 3D
& Manufacturing

Professional CAD/CAM tools built on Inventor and AutoCAD
Integrated BIM tools, including Revit, AutoCAD, and Civil 3D
Professional CAD/CAM tools built on Inventor and AutoCAD
Any referenced datasets can be downloaded from "Module downloads" in the module overview.
Transcript
00:06
Info works.
00:07
Ws Pro's auto labels are simple read only labels that can be
00:11
shown or hidden for all or selected objects in a GEO plan.
00:14
Making it easy to review model data.
00:18
Because auto labels are created with user defined text.
00:21
They can be configured to meet your unique needs
00:26
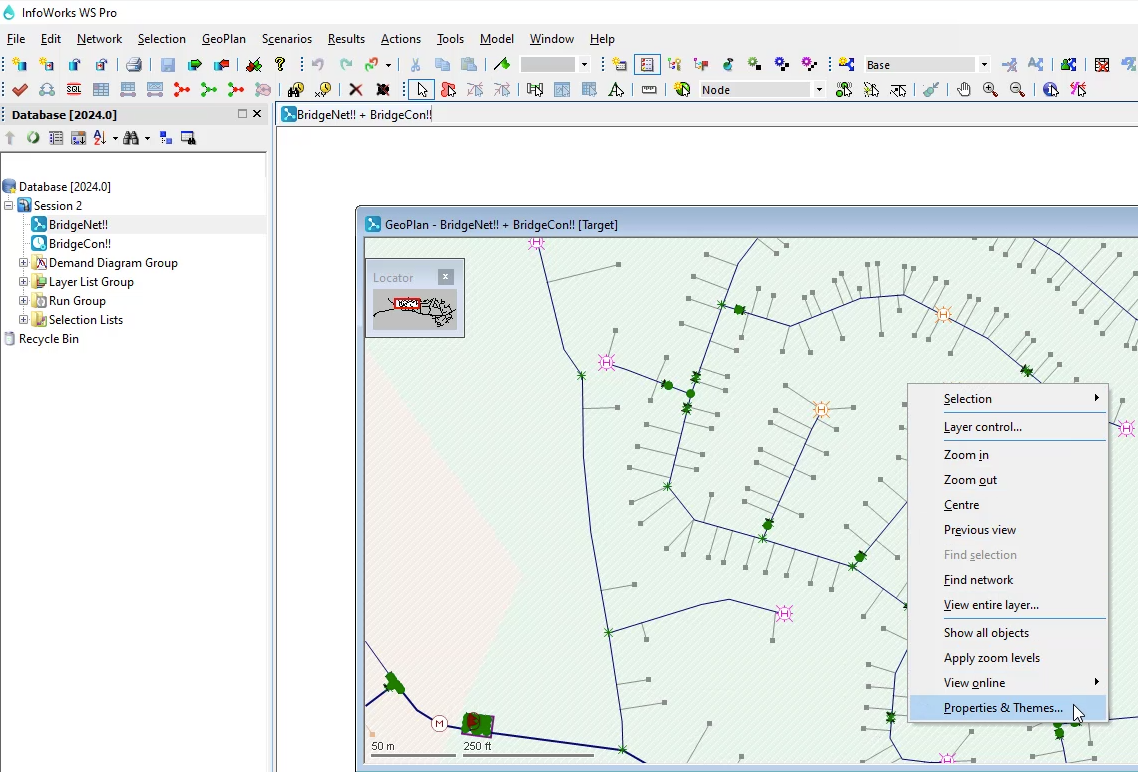
to configure auto labels begin by opening session,
00:29
two's GEO plan and zoom into the network.
00:33
Then right, click on the GEO plan and from the shortcut menu,
00:36
select properties and themes
00:40
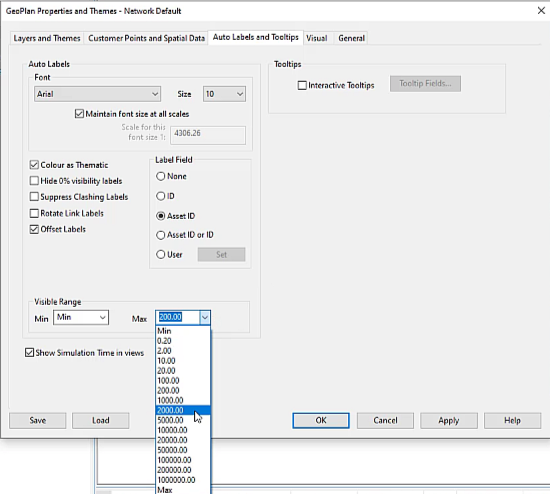
from the properties and themes, dialogue, open the auto labels and tool tis tab.
00:45
From here,
00:46
you can set how the auto labels on the
00:47
GEO plan window are displayed including configuring which font
00:51
is used the size of auto labels and how
00:54
the labels are assigned colors among other options.
00:58
One extremely useful way to configure auto labels is by
01:02
setting the visible range over which auto labels are applied
01:06
from the visible range section.
01:08
Expand the max drop down and select a maximum scale such as 2000,
01:15
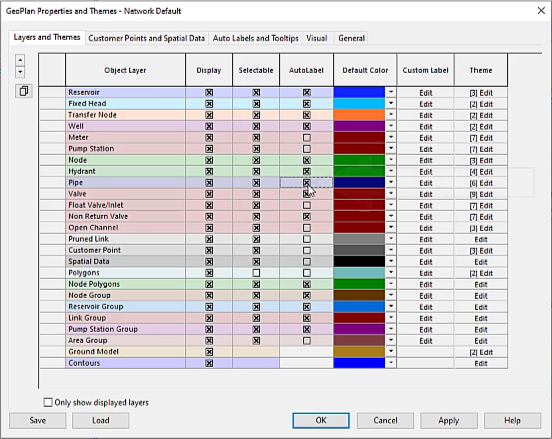
then return to the layers in themes tab and
01:18
enable auto label for the pipe object layer.
01:22
Click apply
01:25
labels now display in the GEO plan
01:27
although notice that the labels are misaligned with the plan
01:32
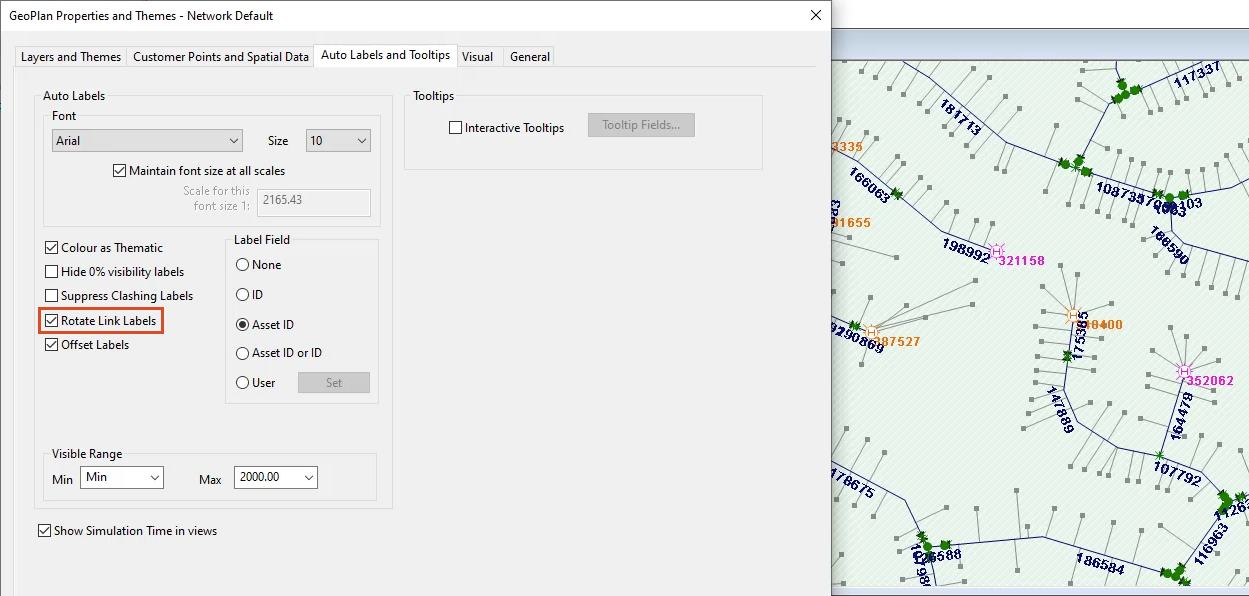
to streamline the way labels display, you can further configure their appearance
01:37
back in the properties and themes, dialogue,
01:39
open the auto labels and tool tips tab again
01:44
from the auto label section, select rotate link labels and then click apply
01:50
in the GEO plan. The label's aligned with the network display.
01:54
You can also set user defined label fields to control
01:57
the type of object information that is displayed on the label
02:00
such as a pipe's diameter and material.
02:04
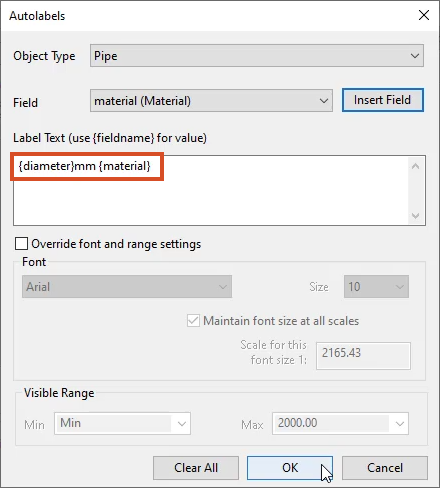
Back in the dialogue under label field, select user
02:08
and then click set.
02:11
Please be aware that when the label field is defined by the user,
02:14
the program will automatically use default info works I DS.
02:18
For all object types
02:21
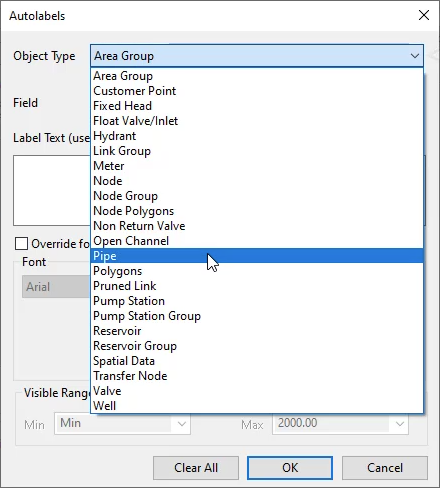
from the auto label dialogue begin by assigning the type
02:24
of object for which you wish labels to be configured
02:28
to do so expand the object type dropdown and select pipe.
02:34
Next expand the field dropdown.
02:37
This list contains all the fields that are relevant to the selected object type,
02:43
select diameter
02:46
and then click insert field
02:49
in the label text box, the field name diameter displays
02:55
next to the field name.
02:56
Enter the measurement unit you wish to display on the label such as millimeters.
03:01
Then from your keyboard press space,
03:05
add a material field to the text
03:07
box by expanding the dropdown and selecting material
03:11
and then click insert field,
03:13
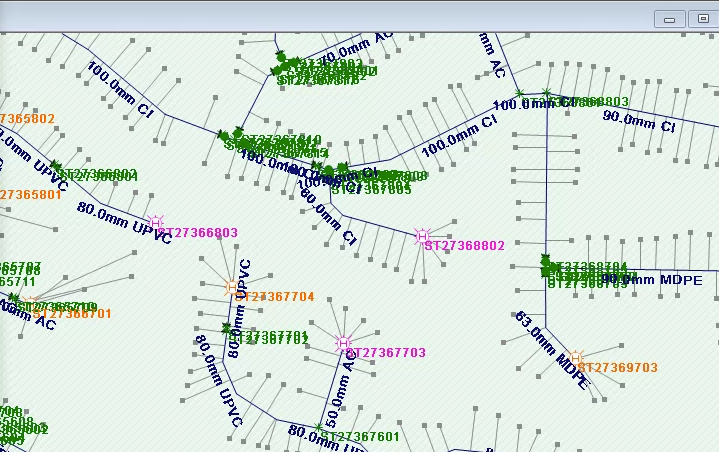
click OK. And then back in the properties and themes, dialogue, click apply
03:19
the label's update in the GEO plan.
03:22
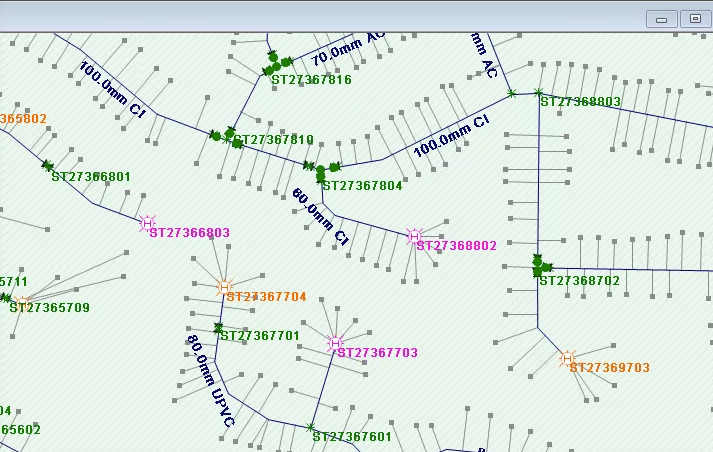
With more information displayed on the GEO plan, it can become difficult to read
03:27
back in the auto labels and tool tis dialogue under auto labels,
03:31
select suppress clashing labels and then click apply,
03:36
then click. OK.
03:39
Settings are used only for the current GEO plan view.
03:43
If the current GEO plan window is closed without saving the labels,
03:46
the settings will be lost.
03:50
Auto labels are a powerful tool you can use to customize
03:53
and optimize the visibility of information right on your GEO plan.
Video transcript
00:06
Info works.
00:07
Ws Pro's auto labels are simple read only labels that can be
00:11
shown or hidden for all or selected objects in a GEO plan.
00:14
Making it easy to review model data.
00:18
Because auto labels are created with user defined text.
00:21
They can be configured to meet your unique needs
00:26
to configure auto labels begin by opening session,
00:29
two's GEO plan and zoom into the network.
00:33
Then right, click on the GEO plan and from the shortcut menu,
00:36
select properties and themes
00:40
from the properties and themes, dialogue, open the auto labels and tool tis tab.
00:45
From here,
00:46
you can set how the auto labels on the
00:47
GEO plan window are displayed including configuring which font
00:51
is used the size of auto labels and how
00:54
the labels are assigned colors among other options.
00:58
One extremely useful way to configure auto labels is by
01:02
setting the visible range over which auto labels are applied
01:06
from the visible range section.
01:08
Expand the max drop down and select a maximum scale such as 2000,
01:15
then return to the layers in themes tab and
01:18
enable auto label for the pipe object layer.
01:22
Click apply
01:25
labels now display in the GEO plan
01:27
although notice that the labels are misaligned with the plan
01:32
to streamline the way labels display, you can further configure their appearance
01:37
back in the properties and themes, dialogue,
01:39
open the auto labels and tool tips tab again
01:44
from the auto label section, select rotate link labels and then click apply
01:50
in the GEO plan. The label's aligned with the network display.
01:54
You can also set user defined label fields to control
01:57
the type of object information that is displayed on the label
02:00
such as a pipe's diameter and material.
02:04
Back in the dialogue under label field, select user
02:08
and then click set.
02:11
Please be aware that when the label field is defined by the user,
02:14
the program will automatically use default info works I DS.
02:18
For all object types
02:21
from the auto label dialogue begin by assigning the type
02:24
of object for which you wish labels to be configured
02:28
to do so expand the object type dropdown and select pipe.
02:34
Next expand the field dropdown.
02:37
This list contains all the fields that are relevant to the selected object type,
02:43
select diameter
02:46
and then click insert field
02:49
in the label text box, the field name diameter displays
02:55
next to the field name.
02:56
Enter the measurement unit you wish to display on the label such as millimeters.
03:01
Then from your keyboard press space,
03:05
add a material field to the text
03:07
box by expanding the dropdown and selecting material
03:11
and then click insert field,
03:13
click OK. And then back in the properties and themes, dialogue, click apply
03:19
the label's update in the GEO plan.
03:22
With more information displayed on the GEO plan, it can become difficult to read
03:27
back in the auto labels and tool tis dialogue under auto labels,
03:31
select suppress clashing labels and then click apply,
03:36
then click. OK.
03:39
Settings are used only for the current GEO plan view.
03:43
If the current GEO plan window is closed without saving the labels,
03:46
the settings will be lost.
03:50
Auto labels are a powerful tool you can use to customize
03:53
and optimize the visibility of information right on your GEO plan.
InfoWorks WS Pro’s auto labels are simple, read-only labels that can be shown or hidden for all or selected objects in a GeoPlan, making it easy to review model data. Because auto labels are created with user-defined text, they can be configured to meet the unique needs of any user.
To configure auto labels:
To set the visible range over which auto labels are applied:
Labels now display in the GeoPlan.
To further configure how labels display:
In the GeoPlan, the labels align with the network display.
To set user-defined label fields:
With more information displayed on the GeoPlan, it can become difficult to read. To remove visual clutter:
How to buy
Privacy | Do not sell or share my personal information | Cookie preferences | Report noncompliance | Terms of use | Legal | © 2025 Autodesk Inc. All rights reserved
Sign in to start learning
Sign in for unlimited free access to all learning content.Save your progress
Take assessments
Receive personalized recommendations
May we collect and use your data?
Learn more about the Third Party Services we use and our Privacy Statement.May we collect and use your data to tailor your experience?
Explore the benefits of a customized experience by managing your privacy settings for this site or visit our Privacy Statement to learn more about your options.