• 0
    • ASEAN (English)
    • Australia
    • België
    • Belgique
    • Brasil
    • Canada (English)
    • Canada (Français)
    • Česko
    • Danmark
    • Deutschland
    • España
    • Europe (English)
    • France
    • Hong Kong (English)
    • India (English)
    • Italia
    • Latinoamérica
    • Magyarország
    • México
    • Middle East (English)
    • Nederland
    • New Zealand
    • Norge
    • Österreich
    • Polska
    • Portugal
    • Singapore (English)
    • Suomi
    • Sverige
    • Schweiz
    • South Africa (English)
    • Suisse
    • Svizzera
    • Türkiye
    • United Kingdom
    • United States
    • 中国大陆地区
    • 台灣地區
    • 日本
    • 한국­
  • Architecture, Engineering
    & Construction
    architecture engineering and construction collection logo

    Integrated BIM tools, including Revit, AutoCAD, and Civil 3D

    Top products
    • AutoCAD
    • Revit
    • Civil 3D
    • AutoCAD LT
    • BIM Collaborate Pro
    Product Design
    & Manufacturing
    product design manufacturing collection logo

    Professional CAD/CAM tools built on Inventor and AutoCAD

    Top products
    • Inventor
    • AutoCAD
    • Fusion
    • Fusion extensions
    • Navisworks
    Media
    & Entertainment
    media and entertainment collection logo

    Entertainment content creation tools, including 3ds Max and Maya

    Top products
    • 3ds Max
    • Maya
    • Arnold
    • Flow Capture
    • Flow Production Tracking
    View all products
    Start a trial Download your software Download file viewers
    Discover
    • Industry solutions
    • Autodesk Industry Cloud
    • Educational access
    How to buy
    • Buying with Autodesk
    • Pay as you go with Flex
    • Special offers
    • Help with buying
    • Product support
    • System requirements
    • Installation
    • Account management support
    • Educational support
    • Partner Finder
    • Autodesk consulting
    • Contact support
    • Learning
    • Certification
    • Training
    • Autodesk University
    • Conferences and events
    • Success planning
    • Expert Coaching
    • Autodesk Community
    • Groups
    • Blogs
    • Developer Network
    • Autodesk Customer Value
  • Education

    Learning

    Home

    Catalog

    Certification

    Certification overview

    Architecture, Engineering & Construction

    Design & Manufacturing

    Media & Entertainment

    Support & Policies

    My dashboard

    Learning

    Home

    Catalog

    Certification

    My dashboard

    • Previous unit


    • Next unit

    Modifying the demands in a scenario

    Any referenced datasets can be downloaded from "Module downloads" in the module overview.

    Transcript

    00:03

    A new scenario has been created based on existing settings

    00:08

    to set up the conditions for analysis of this scenario.

    00:11

    You can modify the demands within it

    00:14

    to begin.

    00:15

    Double click the desired project dot APR

    00:18

    file to open

    00:19

    Agis Pro.

    00:21

    Once the project starts,

    00:22

    click the info water pro tab to open the info water pro ribbon

    00:27

    in the project panel, click initialize

    00:31

    in the model explorer on the attribute tab use the drop down list to select the E

    00:36

    max day scenario

    00:39

    at the prompt click. OK to confirm switching to this scenario,

    00:44

    the

    00:44

    max day scenario is activated.

    00:47

    Keep in mind that any edits you make with this

    00:49

    scenario active will impact the data sets associated with it

    00:54

    to further confirm that the correct scenario is active, open scenario explorer.

    00:60

    Here you can see that

    01:01

    max day is selected

    01:04

    exit the scenario explorer

    01:07

    on the info water pro ribbon in the edit panel, click DB editor

    01:13

    in the DB editor window. Notice that the current demand set is displayed as active

    01:18

    max day

    01:20

    in the data table.

    01:21

    Expand the element hydraulic data folder

    01:23

    and select junction demand modeling data.

    01:27

    Then under data scope, select entire table and then click, OK.

    01:33

    The DB editor opens,

    01:36

    click the header of the demand one GPM column to select the column.

    01:40

    And then in the toolbar, click block editing.

    01:43

    Alternatively you can right click the column

    01:46

    header and choose block editing from there.

    01:48

    Either method opens the block edit window

    01:52

    here. Set the operation to multiply by and the value to 1.2

    01:58

    click. OK?

    02:00

    All demands in the

    02:02

    max day database are increased by 20 per cent

    02:06

    click.

    02:07

    Save to save the changes to the database table and then exit to close the DB editor.

    02:13

    Now the existing conditions of this scenario

    02:15

    reflect the maximum demands for this network.

    Video transcript

    00:03

    A new scenario has been created based on existing settings

    00:08

    to set up the conditions for analysis of this scenario.

    00:11

    You can modify the demands within it

    00:14

    to begin.

    00:15

    Double click the desired project dot APR

    00:18

    file to open

    00:19

    Agis Pro.

    00:21

    Once the project starts,

    00:22

    click the info water pro tab to open the info water pro ribbon

    00:27

    in the project panel, click initialize

    00:31

    in the model explorer on the attribute tab use the drop down list to select the E

    00:36

    max day scenario

    00:39

    at the prompt click. OK to confirm switching to this scenario,

    00:44

    the

    00:44

    max day scenario is activated.

    00:47

    Keep in mind that any edits you make with this

    00:49

    scenario active will impact the data sets associated with it

    00:54

    to further confirm that the correct scenario is active, open scenario explorer.

    00:60

    Here you can see that

    01:01

    max day is selected

    01:04

    exit the scenario explorer

    01:07

    on the info water pro ribbon in the edit panel, click DB editor

    01:13

    in the DB editor window. Notice that the current demand set is displayed as active

    01:18

    max day

    01:20

    in the data table.

    01:21

    Expand the element hydraulic data folder

    01:23

    and select junction demand modeling data.

    01:27

    Then under data scope, select entire table and then click, OK.

    01:33

    The DB editor opens,

    01:36

    click the header of the demand one GPM column to select the column.

    01:40

    And then in the toolbar, click block editing.

    01:43

    Alternatively you can right click the column

    01:46

    header and choose block editing from there.

    01:48

    Either method opens the block edit window

    01:52

    here. Set the operation to multiply by and the value to 1.2

    01:58

    click. OK?

    02:00

    All demands in the

    02:02

    max day database are increased by 20 per cent

    02:06

    click.

    02:07

    Save to save the changes to the database table and then exit to close the DB editor.

    02:13

    Now the existing conditions of this scenario

    02:15

    reflect the maximum demands for this network.

    Sign in to take the quiz.

    Video quiz

    Required for course completion

    Which of the following is one way to confirm that you have the correct scenario active that you want to work on?

    (Select one)
    Select an answer

    1/1 questions left unanswered

    Step-by-step:

    A new scenario has been created, based on existing settings. Modify the demands within it to set up the conditions for analysis of this scenario.

    1. Open the appropriate .aprx file in ArcGIS Pro.
    2. From the ribbon, InfoWater Pro tab, Project panel, click Initialize.
    3. In the Model Explorer, select the EX_MAXDAY scenario.Model Explorer with EX_MAXDAY scenario selected
    1. At the prompt, click OK to confirm switching to this scenario.

    The EX_MAXDAY scenario is activated. Keep in mind that any edits you make with this scenario active will impact the datasets associated with it.

    1. To further confirm that the correct scenario is active, open Scenario Explorer.
      Model Explorer with Scenario Explorer icon highlighted
    1. In the Scenario Explorer, you can see that EX_MAXDAY is selected. Exit the Scenario Explorer.
    2. To modify the demands in the EX_MAXDAY scenario, on the InfoWater Pro ribbon, in the Edit panel, click DB Editor.

    In the DB Editor window, notice that the current Demand Set is displayed as *ACTIVE* (EX_MAXDAY).

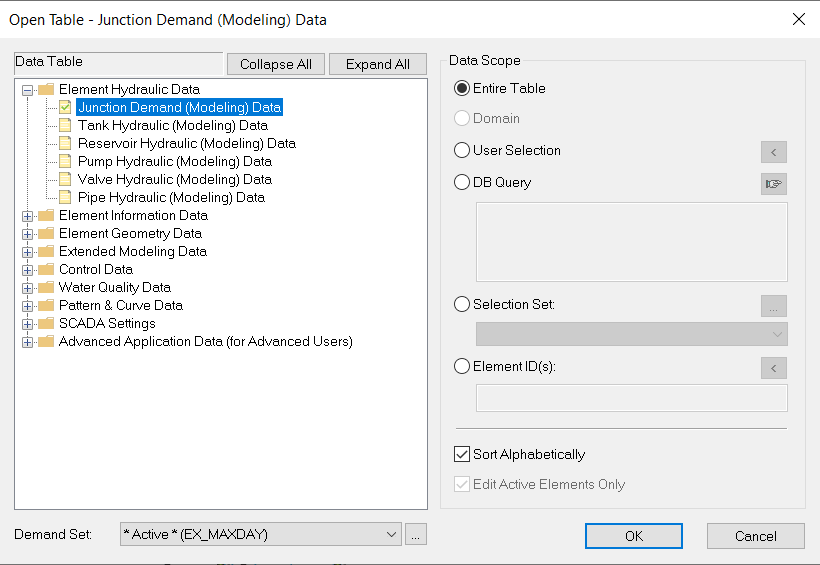
    1. In the Data Table, expand the Element Hydraulic Data folder and select Junction Demand (Modeling) Data.
    2. Under Data Scope, select Entire Table.
    3. Click OK.
      Open Table window with settings for this tutorial
    1. In the DB Editor, click the header of the Demand 1 (gpm) column to select the column.
    2. In the toolbar, click Block Editing.
      The DB Editor, with the Demand 1 (gpm) column selected and the Block Editing icon highlighted
    1. In the Block Edit popup, set the Operation to Multiply By (*).
    2. For the Value, type 1.2.
      The Block Edit popup, with settings configured
    1. Click OK.

    All demands in the EX_MAXDAY database are increased by 20%:
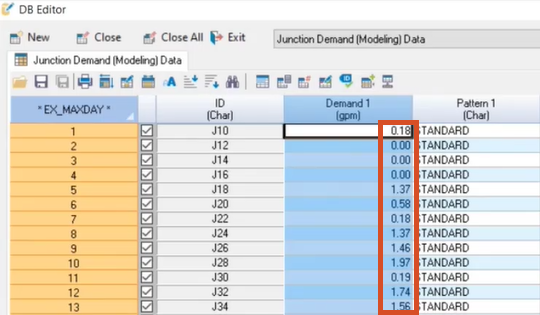
    The DB Editor displaying the 20% increased Demand 1 fields

    1. Click Save to save the changes to the database table.
    2. Exit to close the DB Editor.

    Now, the existing conditions of this scenario reflect the maximum demands for this network.

    Was this information helpful?

    Autodesk

    Company overview
    Careers
    Investor relations
    Autodesk Trust Center
    Newsroom
    Global Belonging at Autodesk
    LA28 Games

    Autodesk Foundation
    Sustainability
    Contact us
    Students and educators
    Affiliate program
    Autodesk Research
    Design & Make with Autodesk

    How to buy

    View all products
    Buying with Autodesk
    Renewal options
    Find a partner
    Sales and refunds
    Choose your subscription plan
    Pay as you go with Flex

    Support

    Manage your account
    Download and install software
    Autodesk Product Status
    Autodesk Community
    Education support
    Contact support

    Privacy | Do not sell or share my personal information | Cookie preferences | Report noncompliance | Terms of use | Legal | © 2025 Autodesk Inc. All rights reserved

    Sign in to start learning

    Sign in for unlimited free access to all learning content.

    Save your progress

    Take assessments

    Receive personalized recommendations

    Go to overview