Changing Lifecycles and States

00:06

In this video

00:07

we will see how we can change lifecycle

00:09

definitions and lifecycle states of files in Vault,

00:15

change the lifecycle definition,

00:17

or to change the lifecycle state.

00:22

Browse to the file.

00:27

Select the file

00:30

and click on Change State button

00:32

from the bar.

00:35

or click on actions

00:38

Drop down,

00:41

and click on change state.

00:49

Change the lifecycle

00:51

definition.

00:52

Click on the 3 ellipses button here.

00:56

And in the Change lifecycle definition

00:60

dialogue,

01:03

choose an appropriate life cycle definition.

01:07

As per the configuration

01:10

available by the administrator.

01:14

Note that

01:15

the available lifecycle numbers

01:17

may differ because

01:20

the availability of

01:22

lifecycles here

01:24

depends on the category

01:25

in which the current document is.

01:31

Select Inventor list process,

01:33

click OK.

01:34

You can see that

01:36

lifecycle definition

01:38

has been

01:40

changed here as per the selection.

01:43

Change the state,

01:44

you can click on the dropdown here.

01:46

We'll continue with the WIP state for now

01:49

and click OK

01:51

to continue with changing the lifecycle definition.

01:55

You can see that the life cycle definition has

01:58

changed from simple release process to Inventor release process.

02:02

Change the state of a file

02:04

from one state to another.

02:06

Select the file

02:07

and click on change state.

02:09

Since I have selected the assembly here,

02:11

all the child parts are getting listed

02:14

based on the

02:15

selections here.

02:16

If you tiggle the include dependents,

02:18

all the files will be available for

02:21

lifecycle state change.

02:23

You can choose to exclude the dependents

02:26

by toggling the interdependence option on.

02:36

There is also another option

02:37

to include parents.

02:40

When toggled,

02:41

if any parents are available,

02:42

that will be listed as well.

02:49

Let's toggle the dependence on

02:52

for this purpose because

02:54

it is always a recommended practice.

02:57

Go about changing the state of an assembly

02:60

along with the dependents.

03:01

Let's assume we are going to send these files for review from work in progress.

03:06

Click on the drop down here.

03:08

Select the reduced date.

03:12

See that the review state

03:15

is going to be applied

03:17

as the next date for all the selected files.

03:21

You can input any comment here.

03:24

I will retain the default one.

03:28

If you want to exclude any particular file from this operation

03:33

and check

03:34

the check box in front of that file

03:38

to exclude it.

03:40

Once you're done,

03:40

click OK.

03:44

You can see that

03:45

the lifecycle state for these selected files have

03:48

been changed from work in progress to review state.

03:51

This is how

03:51

we can change the lifecycle definition or lifecycle state

03:55

for files in Vault.

Video transcript

00:06

In this video

00:07

we will see how we can change lifecycle

00:09

definitions and lifecycle states of files in Vault,

00:15

change the lifecycle definition,

00:17

or to change the lifecycle state.

00:22

Browse to the file.

00:27

Select the file

00:30

and click on Change State button

00:32

from the bar.

00:35

or click on actions

00:38

Drop down,

00:41

and click on change state.

00:49

Change the lifecycle

00:51

definition.

00:52

Click on the 3 ellipses button here.

00:56

And in the Change lifecycle definition

00:60

dialogue,

01:03

choose an appropriate life cycle definition.

01:07

As per the configuration

01:10

available by the administrator.

01:14

Note that

01:15

the available lifecycle numbers

01:17

may differ because

01:20

the availability of

01:22

lifecycles here

01:24

depends on the category

01:25

in which the current document is.

01:31

Select Inventor list process,

01:33

click OK.

01:34

You can see that

01:36

lifecycle definition

01:38

has been

01:40

changed here as per the selection.

01:43

Change the state,

01:44

you can click on the dropdown here.

01:46

We'll continue with the WIP state for now

01:49

and click OK

01:51

to continue with changing the lifecycle definition.

01:55

You can see that the life cycle definition has

01:58

changed from simple release process to Inventor release process.

02:02

Change the state of a file

02:04

from one state to another.

02:06

Select the file

02:07

and click on change state.

02:09

Since I have selected the assembly here,

02:11

all the child parts are getting listed

02:14

based on the

02:15

selections here.

02:16

If you tiggle the include dependents,

02:18

all the files will be available for

02:21

lifecycle state change.

02:23

You can choose to exclude the dependents

02:26

by toggling the interdependence option on.

02:36

There is also another option

02:37

to include parents.

02:40

When toggled,

02:41

if any parents are available,

02:42

that will be listed as well.

02:49

Let's toggle the dependence on

02:52

for this purpose because

02:54

it is always a recommended practice.

02:57

Go about changing the state of an assembly

02:60

along with the dependents.

03:01

Let's assume we are going to send these files for review from work in progress.

03:06

Click on the drop down here.

03:08

Select the reduced date.

03:12

See that the review state

03:15

is going to be applied

03:17

as the next date for all the selected files.

03:21

You can input any comment here.

03:24

I will retain the default one.

03:28

If you want to exclude any particular file from this operation

03:33

and check

03:34

the check box in front of that file

03:38

to exclude it.

03:40

Once you're done,

03:40

click OK.

03:44

You can see that

03:45

the lifecycle state for these selected files have

03:48

been changed from work in progress to review state.

03:51

This is how

03:51

we can change the lifecycle definition or lifecycle state

03:55

for files in Vault.

Change Lifecycle and State - Exercise

Change the lifecycle definition for a Vault object with the Vault client

You can change the lifecycle definition assigned to a Vault object by using the Change State command.

  1. Select one or more objects for lifecycle definition reassignment. To select multiple objects, hold down SHIFT while selecting files, folders, items, or custom objects.
  2. Do one of the following based on the view in which you are working:
    1. From the Autodesk Vault menu bar, click Actions > Change State.
    2. From the Lifecycle Management toolbar, click Change State.
    3. Right-click the selected Vault objects, and then click Change State.
    4. In the Change State dialog box, click (...).
    5. In the Change Lifecycle Definition dialog box, select the new definition and then click OK. All checked in the Change Lifecycle dialog box show the new lifecycle definition.

Note: The lifecycle definition name is highlighted in bold for Vault objects that will be changed to the newly selected definition. If any of the selected Vault objects were already assigned to the selected definition, the lifecycle definition name is listed but not highlighted.

Change a lifecycle state

  1. Select one or more Vault objects for lifecycle state reassignment. To select multiple objects, hold down SHIFT while selecting objects from the main grid.
  2. Do one of the following:
    • Click Actions > Change State.
    • From the Lifecycle Management toolbar, click Change State.
    • From the selected objects, right-click and then click Change State.
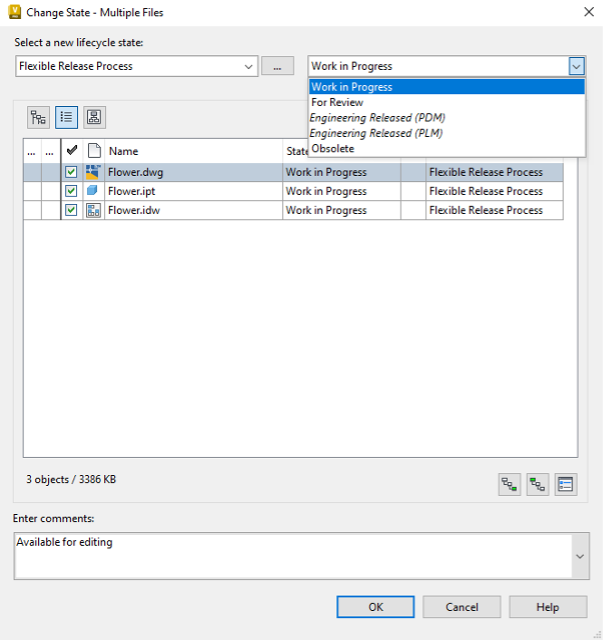


    • In the Change State dialog box, select the new state from the Select new lifecycle state list. The new state is highlighted in bold in the State column. When related objects are displayed in the table, the new state also applies to those them. Non-released biased revision relationships determine which children are affected. If a file is not the leading version of the leading revision, then the check box is disabled next to it.

      Note: Only items with BOM rows that are turned on are displayed.
    • Enter or edit comments in the Enter comments box, as needed, or select from a list of previous comments using the drop-down list.
    • Click OK. The new state is applied to the selected objects. File versions are increased by one.
Was this information helpful?