Understand the use of Autodesk Model Checker for Revit
Any referenced datasets can be downloaded from "Module downloads" in the module overview.
Exercise: Understand the Use of Autodesk Model Checker for Revit
The BIM Interoperability Tools installer includes the Equipment Data Tool, Spatial Data Tool, Standardized Data Tool, Model Checker, Model Checker Configurator, and COBie Extension for Revit.
The tools can be downloaded from manage.autodesk.com, or installed directly through the Autodesk Desktop App.
The Model Checker automatically checks Revit models and assists with verifying compliance to BIM requirements. The add-in is designed to quickly identify possible conflicts or areas of non-compliance in a model by running several standards checks, which can be viewed or exported for analytical review.
Process
While the Model Checker should not supersede the rules or recommendations put forth by any authority having jurisdiction, it does provide useful guidance for BIM compliance throughout a project's development. To best utilize the add-in, you will need to follow the steps outlines below.
SETUP -> RUN -> VIEW REPORT
- Setup: The Model Checker may not be valid for every project or for every phase of the project. Prior to running checks, the user should configure Model Checker using the Setup button on the Revit ribbon. Configuration may be skipped but the user should be aware that the default configuration with default options will be used if configuration is not completed.
- Run: Once configuration is complete, the user may proceed to checking the active model or a batch of models for compliance issues by using the Run button on the ribbon. This button will give the user the option to check the active model or to select a series of files to run in batch. All checks specified in the configuration file will be run on the selected model(s) with the values specified for the currently active model and show the user a report containing the result.
- View Report: Once a check has been run, the last report may be viewed using the View Last Report button on the Revit ribbon. This allows the last report to be viewed quickly without requiring another check to be run; the user should be aware that this also means that the report shown may be out of date if model changes have been made since the check was run.
Task 1: Configure a Check in Your Model
- To enable a configuration for your Revit model, navigate to the Model Checker panel located on the BIM Interoperability Tools ribbon tab and click Setup. If no checkset file has been selected, you will immediately be prompted to load one.

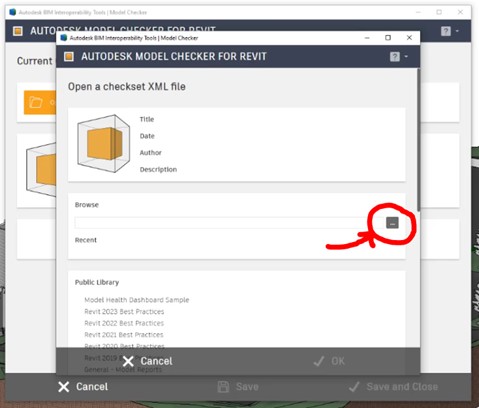
This dialog gives you the option of selecting a specific local checkset XML by clicking the ellipsis button and navigating to the file, selecting a previously loaded checkset, opening one from the web hosted "Public Library", or opening a checkset from "My Library". Your BIM manager can configure your Model Checker to locate the My Library location.
- Once a checkset file is open, you are prompted with the Current Checkset dialog. This window gives you a preview of the checkset information and a tree with the specific headings, sections, and individual checks in the currently active checkset.

- You can begin to customize the configuration check by enabling or disabling checks defined by the initial template selected. To enable or disable a check, click the "Check Box" icon(s) located in the browser at the left-hand side of the Configuration dialog box. If the icon appears grayed out, it is an indication that sub-sections exist for the particular check in question and one or more checks have been enabled.
- Once you have configured your checkset appropriately, click Save to save your settings, or Save and Close to save your settings and close the dialog box. This will associate the checkset XML file and any modifications you made to the current Revit model.
Task 2: Run Check and View Report
Run

- Once your Revit model has been configured accordingly, click the Run icon. You will be presented with various processing options that will allow you to batch-select multiple Revit project files to run the customized check on. If your Revit model contains corresponding links, you will have the option to select or deselect those files to be included or excluded from the check.

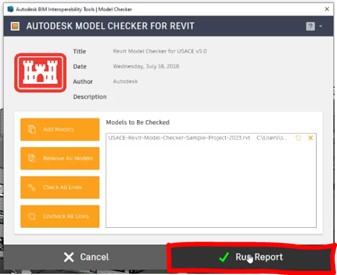
- After all appropriate files have been selected or deselected, click Run Reports in the Action Bar to continue with the processing of the model(s).
The Model Checker will begin to process and analyze all selected checks, and a progress bar will provide real-time updates on which project file is currently being analyzed (if multiple have been selected), and what the current check is.
When the analytical process has been completed, a dialog box will appear providing the overall result of the check(s). This report will provide information regarding which checks have failed within your model and a description of why the particular check failed. This information can be exported to HTML, copied to the Clipboard, or exported to Excel for analytical review and data tracking.

View Report

- After a report has been generated, you can always access the most recent report by using the View Report tool. Each time a new report is run, the prior report saved in the Revit model is overwritten.
Any referenced datasets can be downloaded from "Module downloads" in the module overview.
The Model Checker Configurator is a standalone Windows application that allows you to create and edit your own configuration files to use with the Model Checker.
Navigation Toolbar
The navigation toolbar is docked to the left side of the application. When expanded it looks like the image below, which provides the page title associated with the icon. The pages are available from the toolbar:

Check Building
There are three pages that support the creation of new checks: Advanced Check Builder, Wizard Check Builder, and Pre-Built Checks. Checks created in any of these pages can be added and organized into the checkset on Check Structure and Organization and previewed on Preview Checkset.
Advanced Check Builder
This allows you full control over every aspect of your checks. This is recommended for those who have created checks before, or if you need to modify an existing check. When editing a check, even if created with the wizard, they will open this helpful interface.

Wizard Check Builder
The Wizard will prompt you with a series of simple questions that will guide you through the creation of a check, with the appropriate configuration and filters.

Pre-Built Checks
This page contains pre-built checks that cannot be created via the Advanced Check Builder or the Wizard Check Builder. Next to each check is an “Add” button, this will let you modify some of the information about the check prior to adding it to the Unused checks.

Check Structure and Organization
This page allows for organizing the checks into different headers and sections and subsections.

Exercise: Understand the Use of the Autodesk Model Check for Revit
Task 1: Use Autodesk Model Checker for Revit
- Open the practice file USACE-Revit-Model-Checker-Sample-Project-2021.rvt (or later version).
- From the BIM Interoperability Tools tab of the ribbon, select Setup from the Model Checker panel.

- Select the ellipses button next to Browse to browse for a prebuilt checkset.

- Browse to your dataset folder and select the Revit Model Checker for USACE v5.0.xml file.
- Click OK.
- This has now loaded the prebuilt checkset for USACE. Select Save and Close.
The next step is to RUN the Autodesk Model Checker for Revit.
- From the BIM Interoperability Tools tab of the ribbon, select Run from the Model Checker panel.
- From here, simply select Run Report.

- Review the report.
- Note that you can Copy, Export to HTML, and/or Export to Excel.
Task 2: Model Checker Configurator
- Open the practice file USACE-Revit-Model-Checker-Sample-Project-2021.rvt (or later version).
- From the BIM Interoperability Tools tab of the ribbon, select Launch from the Configurator panel.

- From the General Settings tab of the Configurator, select Open.

- Under Recent (or Public Library), select the Revit Model Checker for USACE.
- Click OK.

- Select Preview Checkset from the tabs along the left side to review what is included in the pre-built USACE checkset.
- This can be edited if necessary.
Let’s create a new checkset.
- From the BIM Interoperability Tools tab of the ribbon, select Launch from the Configurator panel.
- Select New from the General Settings tab.
- Under Checkset Properties, enter the following:
- Title: TestSet
- Author: YourName
- Description: Describe as needed
- Click Save. (Save to Desktop or dataset location.)

- Switch to the Advanced tab along the left side.
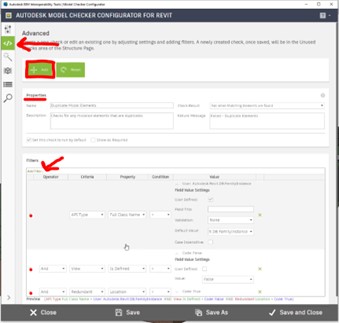
- Under Properties, enter the following:
- Name: Duplicate Model Elements
- Check Result: Fail when Matching Elements are Found
- Descriptions: Check for duplicate model elements
- Failure Message (Customizable): Failed Duplicate Elements
- Under Filters:
- Select Add Filter (repeat 3 times).
- Fill out as shown below:

- Select Add from the top left. Select OK.
- Switch to the Wizard tab along the left side. This will walk you through a simple wizard to create a check.
- Select This check will COUNT MATCHING ELEMENTS.

- Select I am checking on VIEWS in my model.
- For CATEGORIES, select:
- Sheets
- Viewports
- Views
- Select “This check only checks…”.
- Name the check “MatchingElements”.
- Give a description.
- Select Finish.

- Select Pre-Built Checks from the tabs along the left side.
- Select Add.
- Select File Size from the pre-built checks. Select Add.
- Repeat as necessary to build your set.
- The Structure tab will let you organize and customize how your report looks (no activity needed).
- Save your checkset and it is ready to run!