& Construction

Integrated BIM tools, including Revit, AutoCAD, and Civil 3D
& Manufacturing

Professional CAD/CAM tools built on Inventor and AutoCAD
Integrated BIM tools, including Revit, AutoCAD, and Civil 3D
Professional CAD/CAM tools built on Inventor and AutoCAD
Any referenced datasets can be downloaded from "Module downloads" in the module overview.
Transcript
00:01
DEEPAK MAINI: Hello, hello.
00:02
Welcome to the first objective of this course.
00:05
In this objective, we are going to talk
00:06
about how to add markups using the BIM 360 mobile app.
00:11
Now, before we jump onto the BIM 360 mobile app,
00:14
there are a few things that I want to talk about the markups.
00:17
The first one is that BIM 360 allows
00:19
us to add markups of two types.
00:22
The first one are the private markups.
00:24
These are the markups that are only
00:26
viewed by the person who's added those markups.
00:29
So if I've added the markups, I'm
00:31
the only one who can view these markups.
00:32
None of the other members of my project can view these markups.
00:36
The second type of markups are published markups.
00:39
These are meant for the rest of the team.
00:41
So the other members of the teams
00:43
who have got access to the documents or the models
00:45
on which we have added the markups
00:47
can also view these markups.
00:50
The option to define whether a markup is private or public
00:53
is available on the top left in the markups environment.
00:56
By default, these markups are private.
00:59
But if I tap on this option on the top left,
01:01
I can also chain these markups to published markups.
01:05
Once created, the markups can be accessed
01:07
from the menu on the top right.
01:10
So you can tap on the menu button,
01:11
and then you can tap on markups.
01:14
And you can view all the markups added to the current model
01:16
or document.
01:18
Let's now jump onto the BIM 360 mobile app
01:21
and have a look at all these options in detail.
01:23
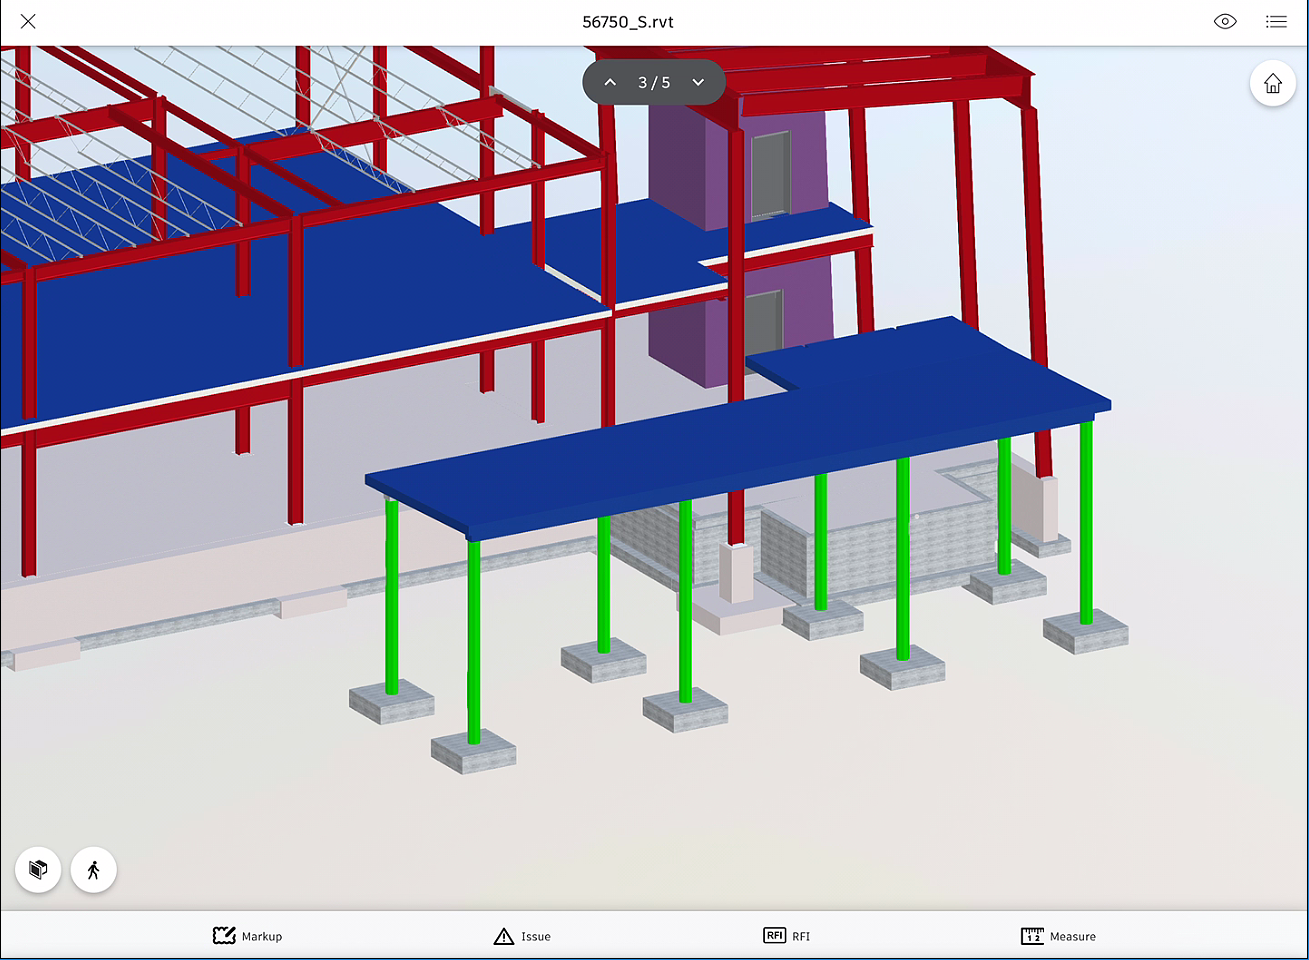
OK, so as you can see, I'm on my BIM 360 mobile app.
01:27
I'm in the project files area.
01:29
I'm going to tap on the structure folder,
01:31
and then I'm going to tap on the structure model.
01:35
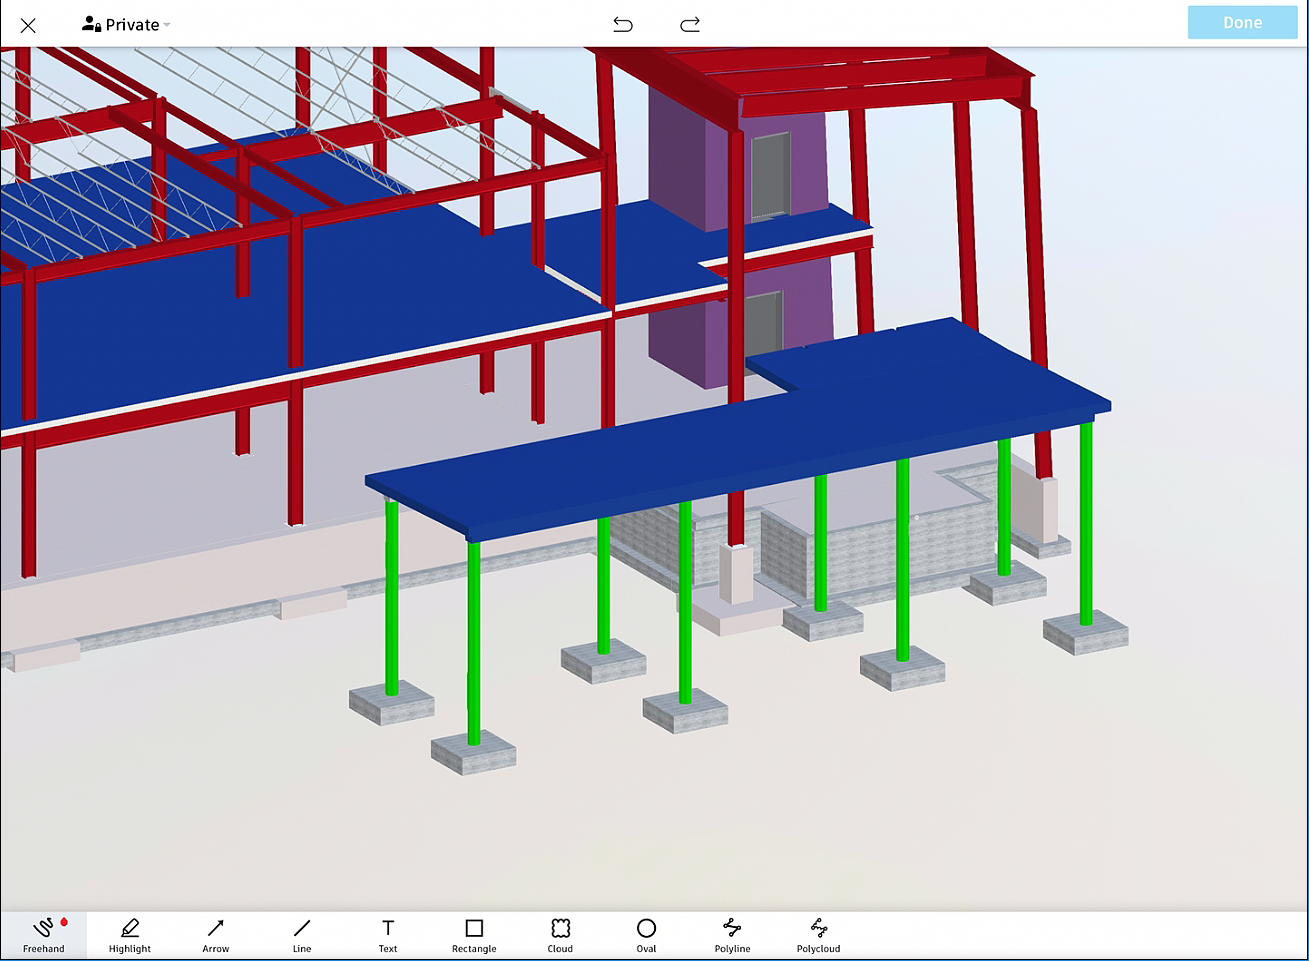
Now, on the bottom toolbar, I can see the markup option here.
01:39
As soon as I tap on the markup option,
01:41
it now takes me to the markups environment.
01:43
And now, the bottom toolbar shows
01:45
me a number of different markup tools that we've got available.
01:48
Also, on the top left, I've got the option
01:51
to define whether it is a private markup,
01:54
or it's a published markup.
01:56
I'm going to start with adding a private markup.
01:59
Now, in this view, if I try to zoom or pan, as you could see,
02:02
I'm not allowed to do anything.
02:04
That's because in the markup views, we cannot zoom or pan.
02:08
If I need to navigate to an area where I want to add the markup,
02:11
I'll have to first navigate to that area
02:13
before I enter the markups environment.
02:16
So let me navigate into this area first.
02:19
And now, I'm going to tap on the markup tool.
02:22
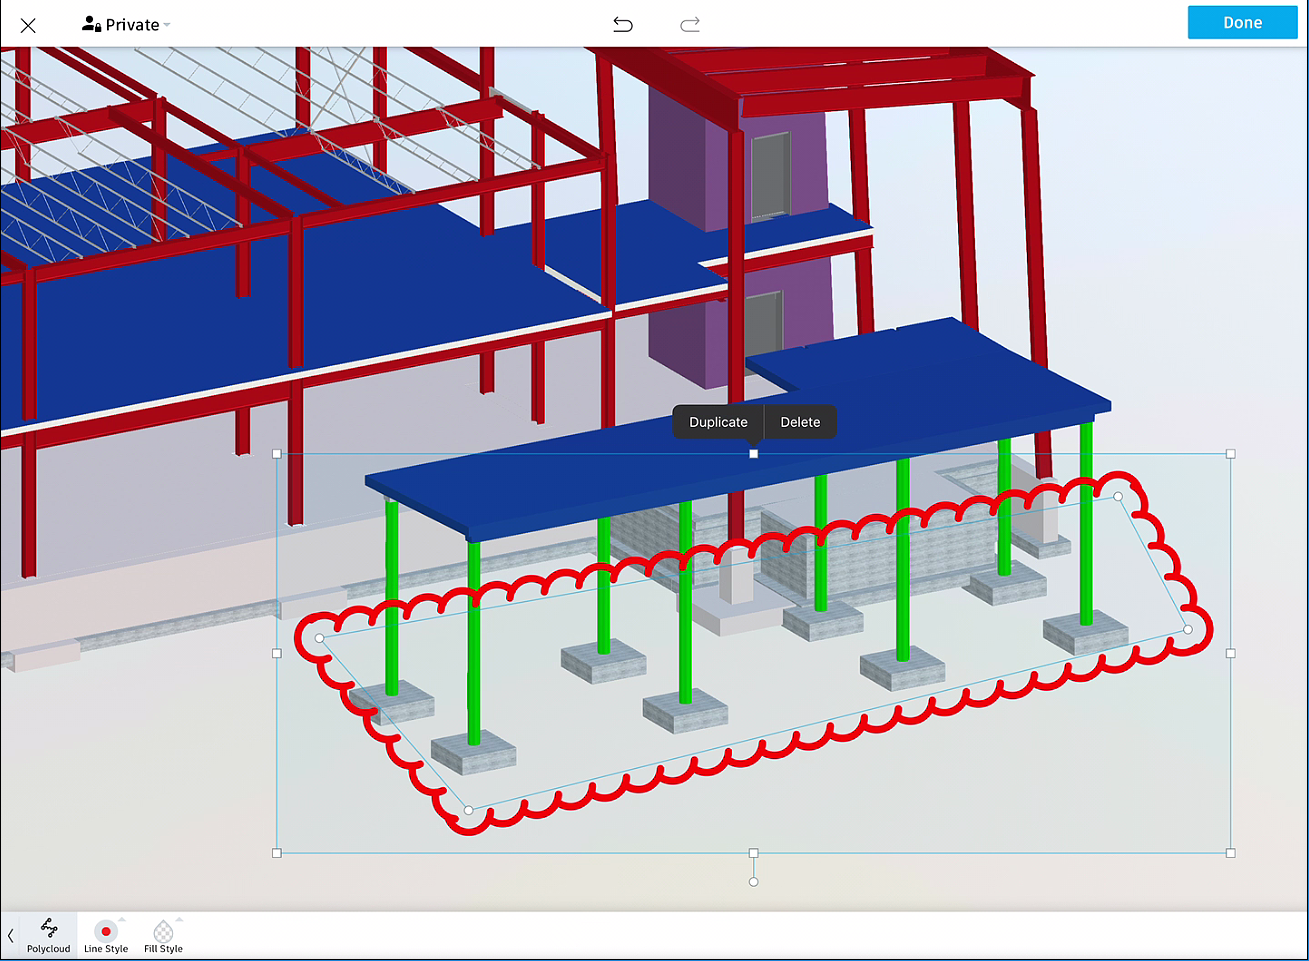
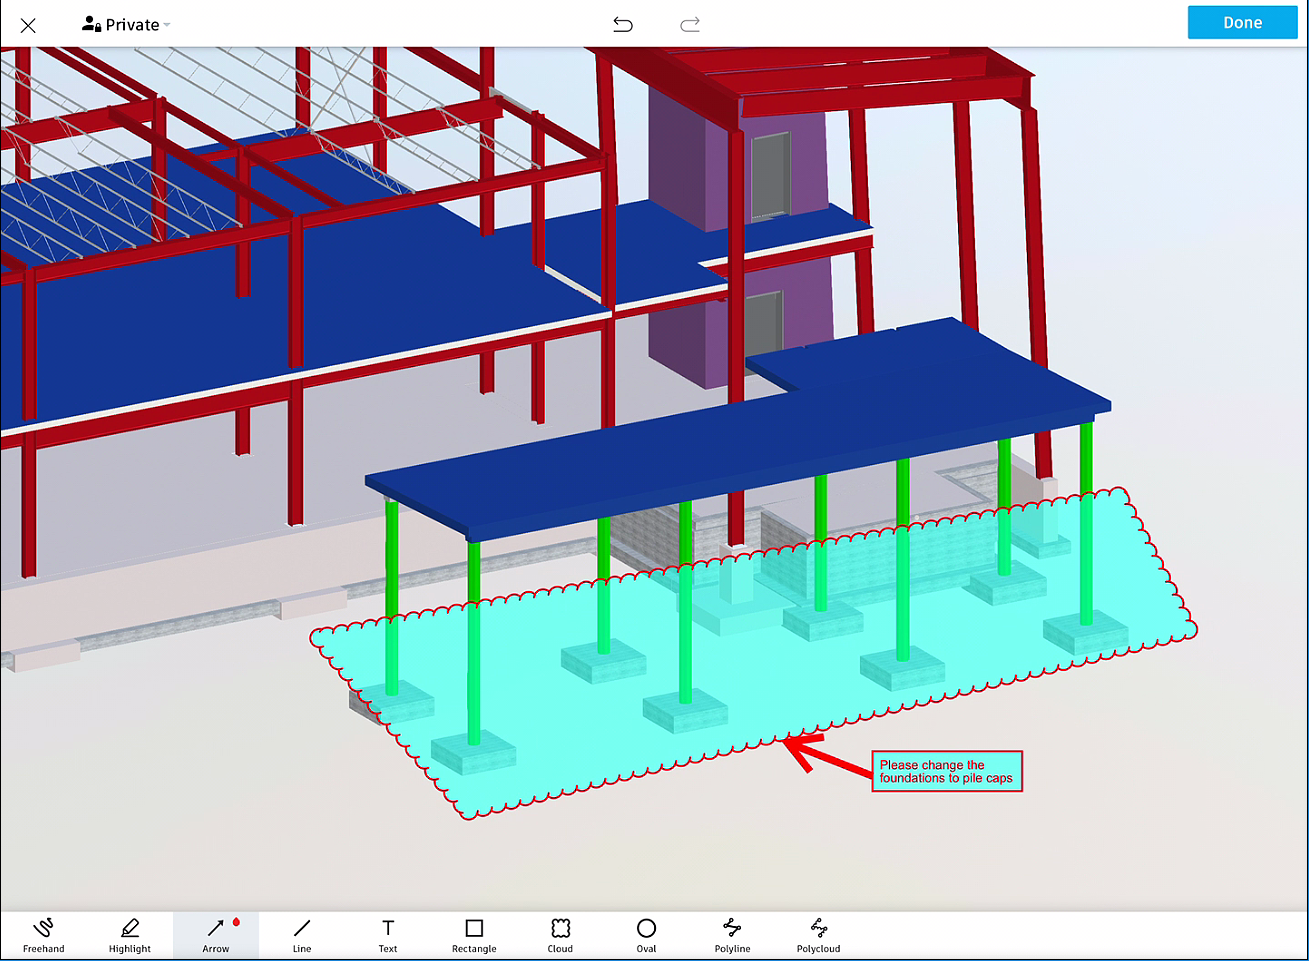
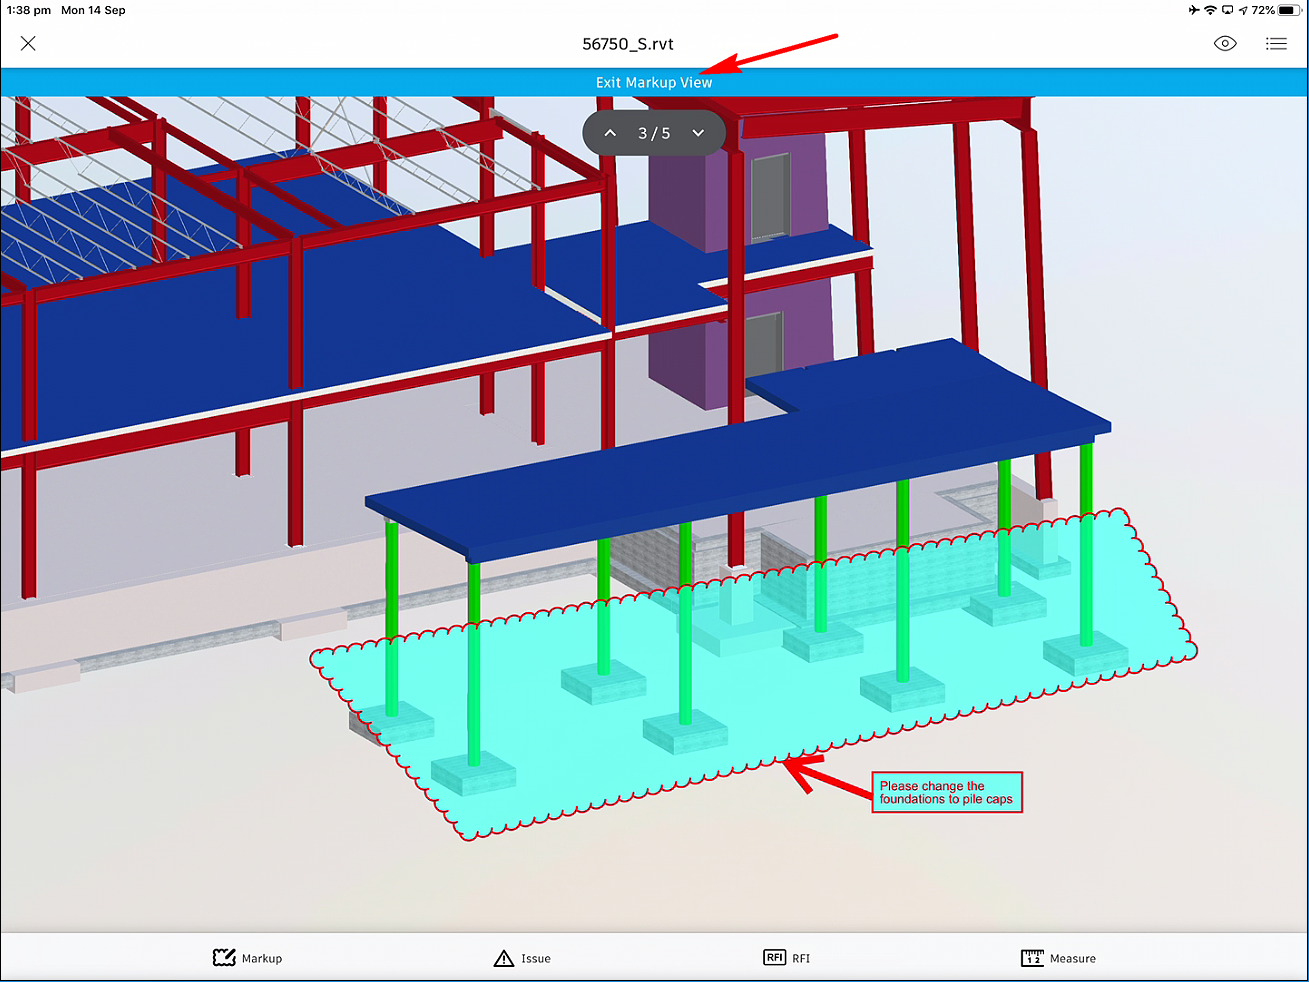
I'll start with using the polycloud tool.
02:25
This tool lets me add a multi-sided cloud markup.
02:28
So I tap on polycloud.
02:30
I now tap somewhere here.
02:32
First point, second point, third point, fourth point.
02:37
And for the fifth point, I'll tap close to my start point.
02:40
And that's my polycloud markup.
02:42
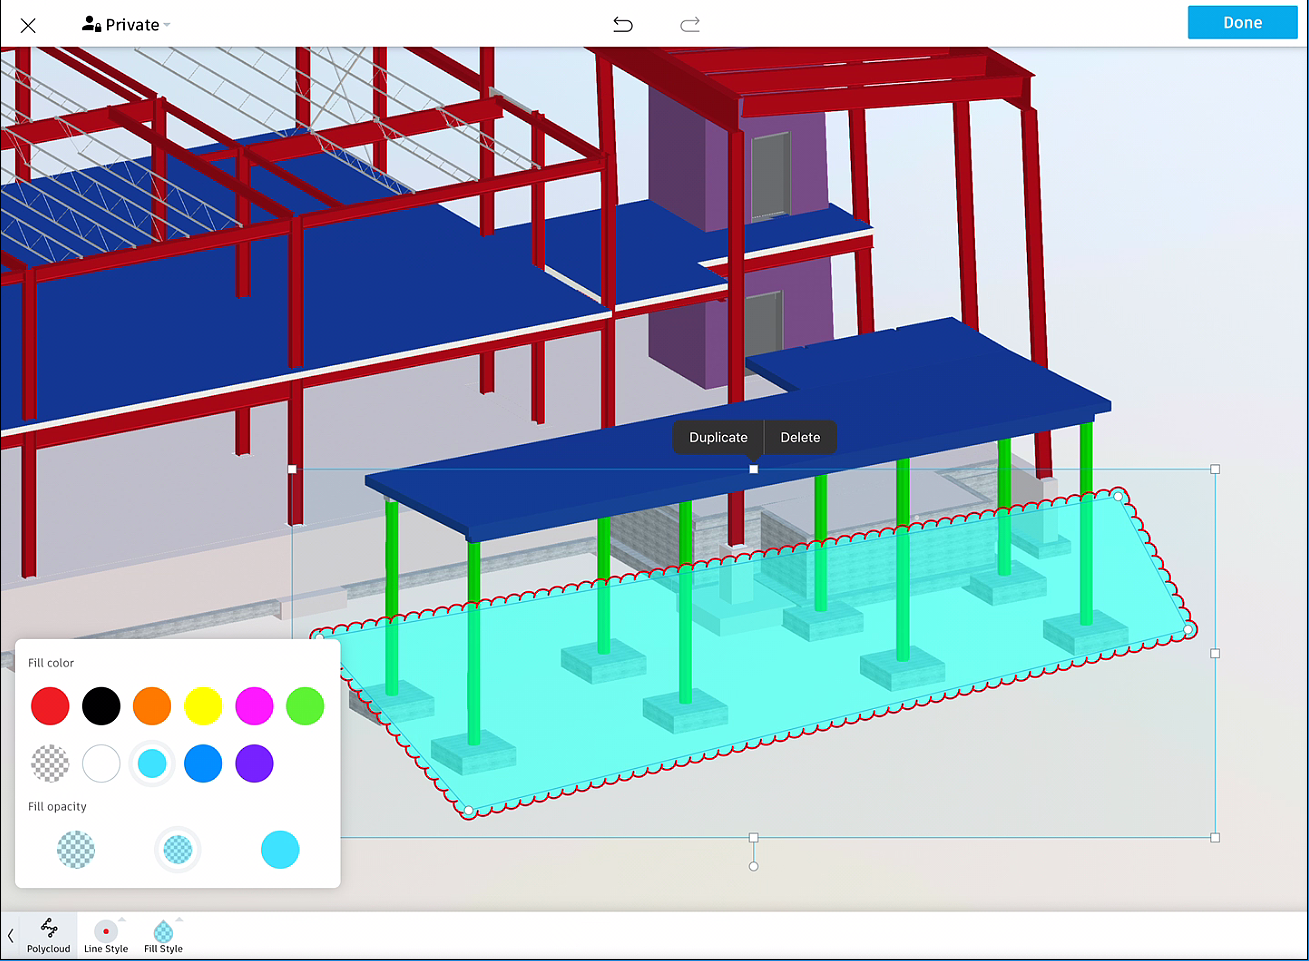
If I tap on line style, I can specify
02:45
the color of this markup, and I can specify the thickness.
02:49
I'll change it to this thickness here.
02:51
If I tap on fill style, I can also
02:53
fill this markup with a color.
02:55
So let's say I want this fill color,
02:57
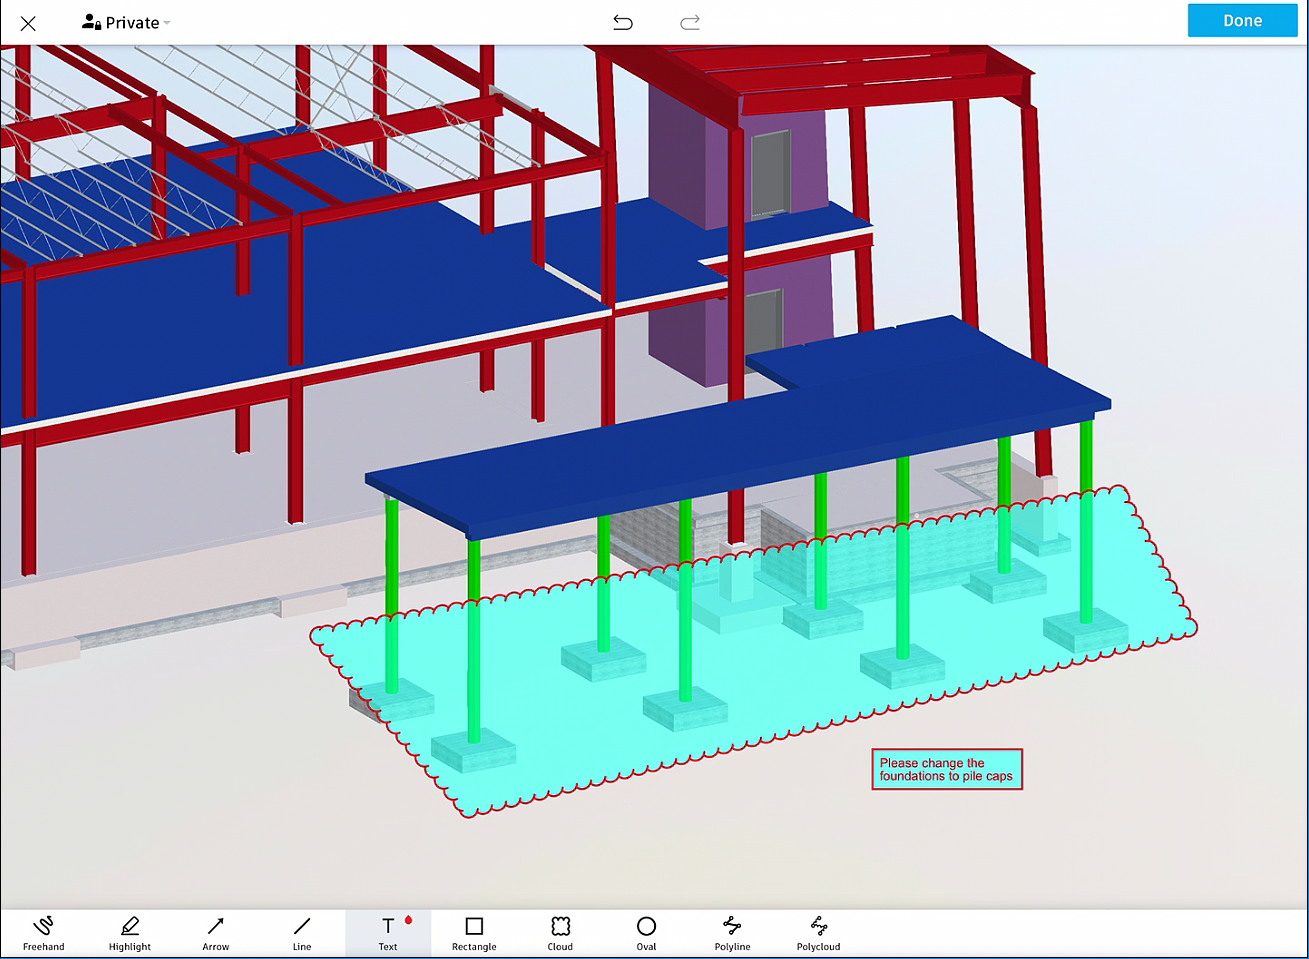
and now I'm going to add the text markup.
02:59
So I'll tap on text.
03:02
I'll tap somewhere below this cloud markup.
03:05
And now, I'm going to add some text.
03:07
To add the text, I'll tap on the default text.
03:10
It now displays this keyboard, and now I
03:13
can go and add the markup.
03:15
Please change the foundation to pile caps.
03:22
So that's the markup, and now I want to add an arrow as well.
03:25
So I will tap on the arrow markup tool.
03:28
I'll tap close to the textbox, and I can now
03:31
take it to the cloud markup.
03:34
So the end point of the arrow is where the arrowhead would be.
03:37
If I tap on the arrow tool, I can again go to line style.
03:40
I can make it a bit thicker line style.
03:42
Maybe this much, that's good enough.
03:45
I can tap on the textbox tool, and I can move it around.
03:49
I'll drop it somewhere here.
03:52
Now, that's the markup that I wanted to add.
03:54
Once I've added the markup, I'm going to tap on done.
03:59
So that's the markup added.
04:00
I'll now tap on exit markup view.
04:03
And similarly, I'll tap on markup again,
04:06
and I can go and add additional markups.
04:08
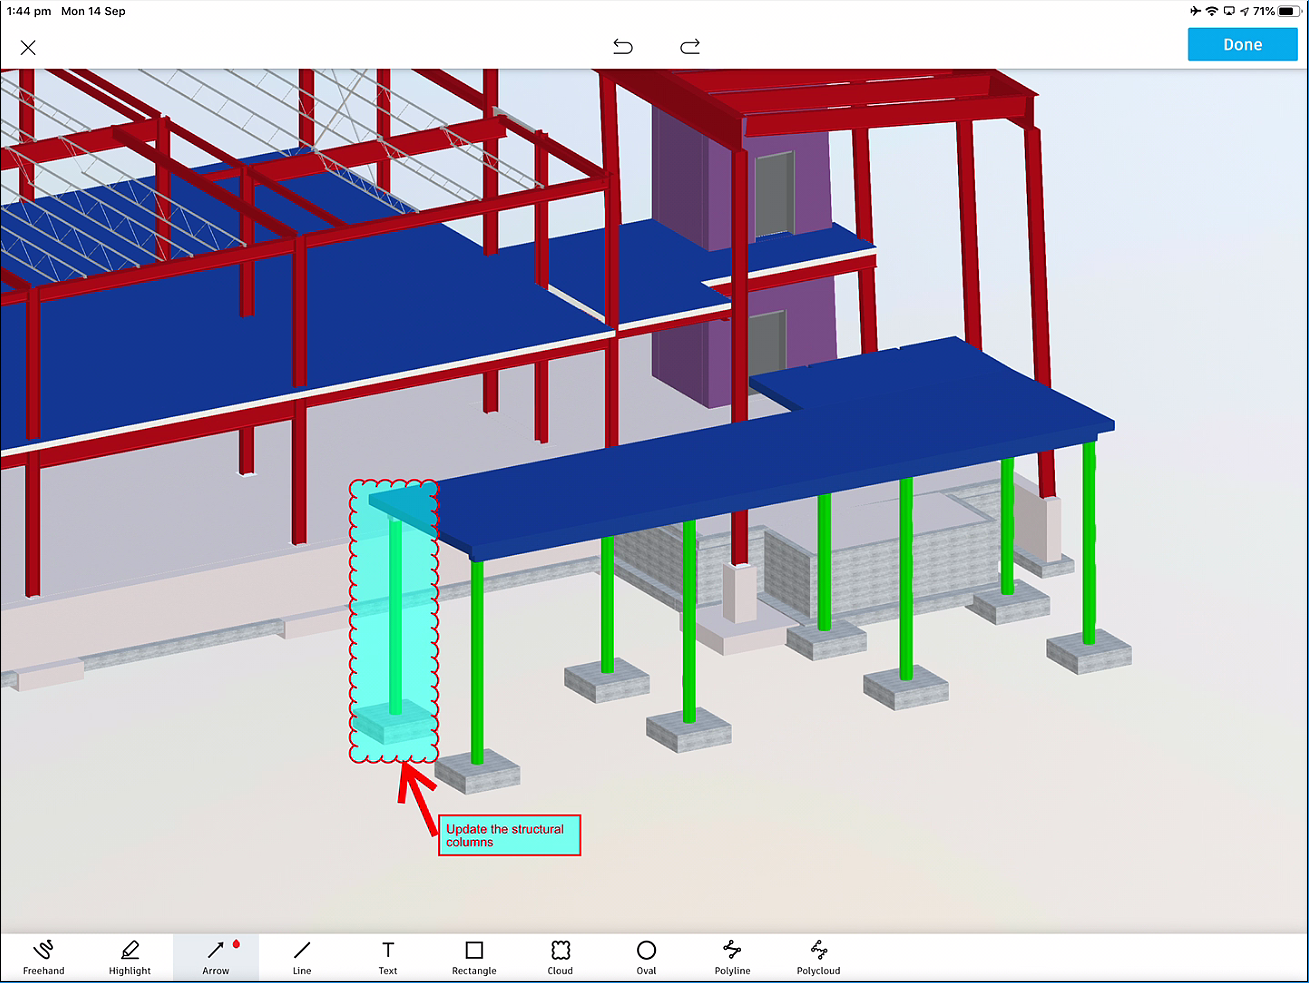
So let's say this time I want to use the cloud tool,
04:12
and I'm going to drag a cloud by specifying two opposite corners
04:16
on this structural column.
04:19
Once I've done this, I'm going to now
04:20
go and add the text as well.
04:23
Now, notice that it remembers the properties
04:25
from the previous markup.
04:26
The color fills and so on.
04:28
I'll tap on the text.
04:29
Update the structure columns.
04:32
And again, I can go and add an arrow as well.
04:37
So that's my markup.
04:38
I'm happy with this.
04:39
I'll tap done.
04:40
Once these markups are added, I'm
04:42
going to tap on exit markup view.
04:44
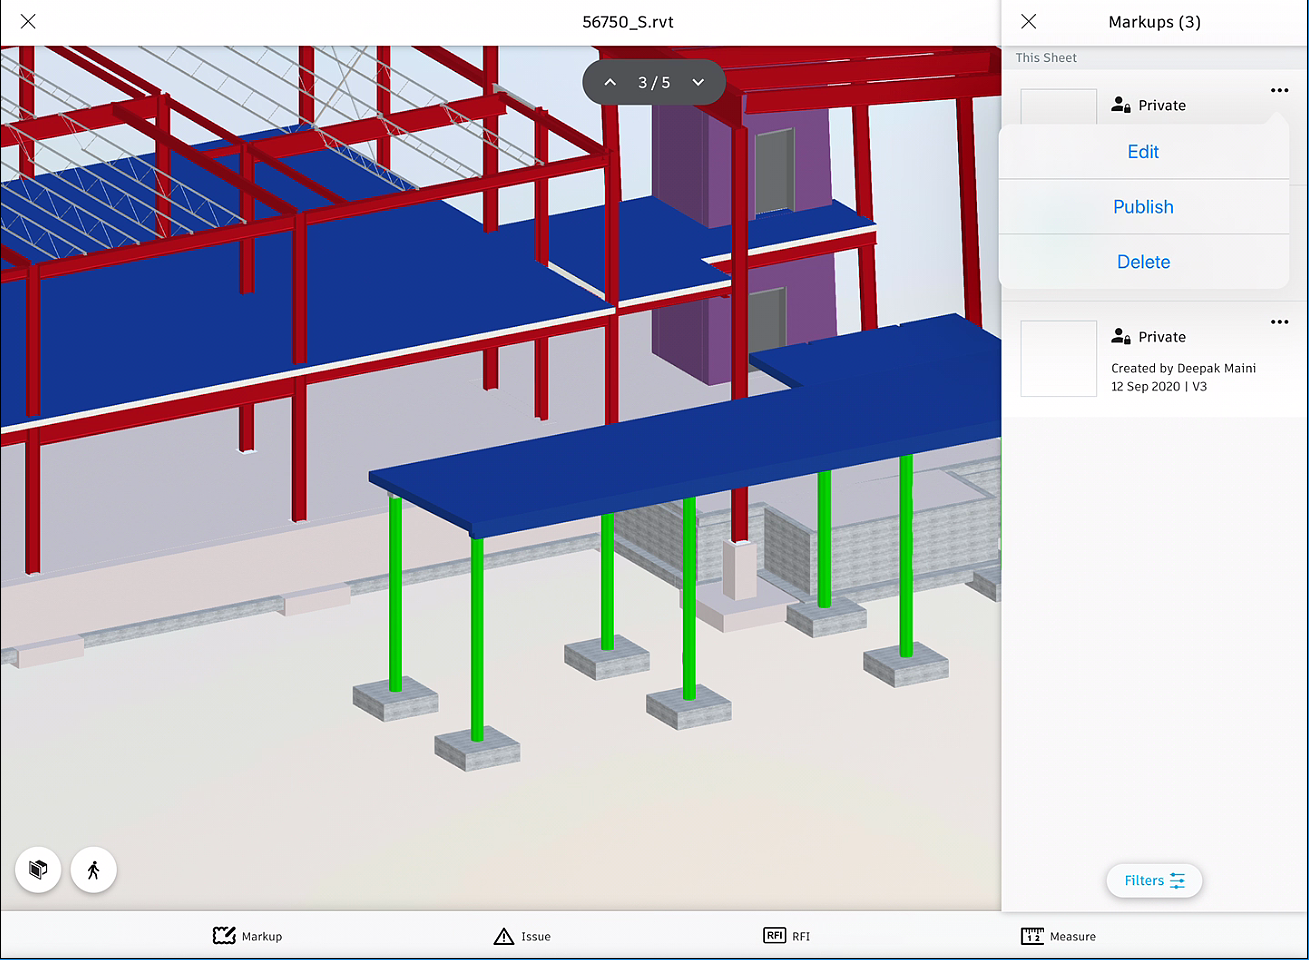
To access these markups, I can now
04:46
tap on the top right on the menu.
04:49
And I can now tap on markups.
04:52
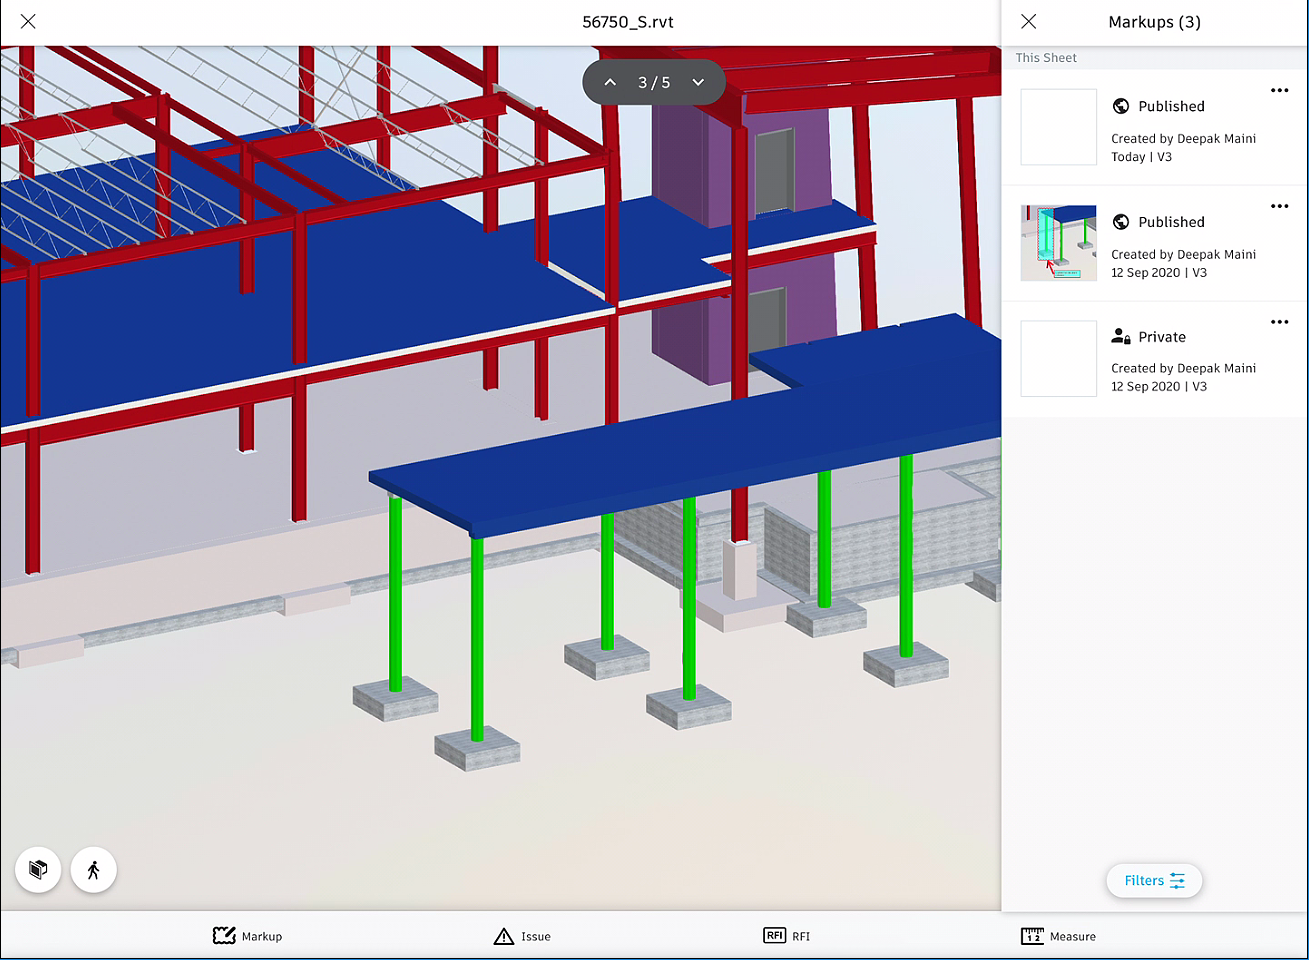
It's now telling me that there are two private markups.
04:55
If I want to make any of these markups as published markups,
04:59
I can tap on the three dots, and I can publish.
05:03
So that will change the markup from private to a published
05:06
markup.
05:08
If I cross out of this model, similarly if you're
05:12
working on 2D sheets or PDF files in the plans area,
05:15
the markups will work exactly the same.
05:18
I can navigate to the area where I want to add the markups.
05:21
I'll then tap on the markup tool,
05:23
and I can see all the same markups available here.
05:25
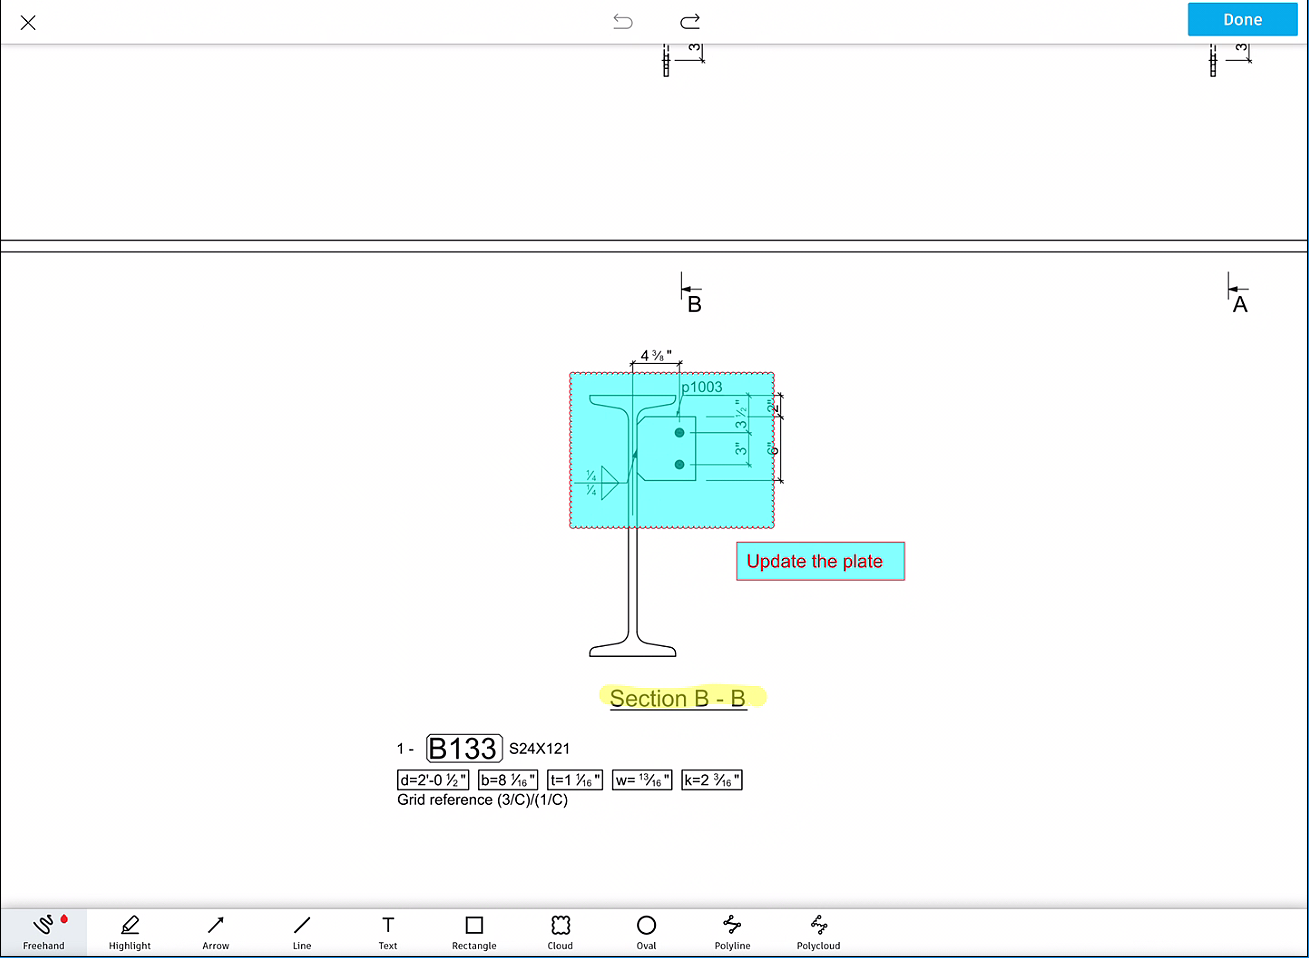
Let's say in this case, I want to start with a highlight
05:28
markup.
05:29
I'll change the highlight color to yellow.
05:32
I'll also change the line thickness.
05:34
And now, I'm going to highlight this text here.
05:39
And I can go and add additional text and markups.
05:41
That's, in this case, again, I'm going
05:43
to go and add a cloud markup.
05:49
I'll change the style to red.
05:51
Line thickness is this.
05:53
I'll define a fill style like last time,
05:56
and now I'm going to add a text.
06:02
I'll tap done, and that's the markup added.
06:07
So as you could see, this PDF file now shows the up added.
06:11
If I tap on the menu on the top right,
06:13
I can see that there's one markup.
06:15
And again, I can define whether it's a private markup
06:18
or a published markup.
06:20
Similarly, you can add markups to the other documents as well.
06:23
I would recommend you guys give this a try and see how you go.
06:27
I'll see you in the next objective.
06:29
Cheers.
Video transcript
00:01
DEEPAK MAINI: Hello, hello.
00:02
Welcome to the first objective of this course.
00:05
In this objective, we are going to talk
00:06
about how to add markups using the BIM 360 mobile app.
00:11
Now, before we jump onto the BIM 360 mobile app,
00:14
there are a few things that I want to talk about the markups.
00:17
The first one is that BIM 360 allows
00:19
us to add markups of two types.
00:22
The first one are the private markups.
00:24
These are the markups that are only
00:26
viewed by the person who's added those markups.
00:29
So if I've added the markups, I'm
00:31
the only one who can view these markups.
00:32
None of the other members of my project can view these markups.
00:36
The second type of markups are published markups.
00:39
These are meant for the rest of the team.
00:41
So the other members of the teams
00:43
who have got access to the documents or the models
00:45
on which we have added the markups
00:47
can also view these markups.
00:50
The option to define whether a markup is private or public
00:53
is available on the top left in the markups environment.
00:56
By default, these markups are private.
00:59
But if I tap on this option on the top left,
01:01
I can also chain these markups to published markups.
01:05
Once created, the markups can be accessed
01:07
from the menu on the top right.
01:10
So you can tap on the menu button,
01:11
and then you can tap on markups.
01:14
And you can view all the markups added to the current model
01:16
or document.
01:18
Let's now jump onto the BIM 360 mobile app
01:21
and have a look at all these options in detail.
01:23
OK, so as you can see, I'm on my BIM 360 mobile app.
01:27
I'm in the project files area.
01:29
I'm going to tap on the structure folder,
01:31
and then I'm going to tap on the structure model.
01:35
Now, on the bottom toolbar, I can see the markup option here.
01:39
As soon as I tap on the markup option,
01:41
it now takes me to the markups environment.
01:43
And now, the bottom toolbar shows
01:45
me a number of different markup tools that we've got available.
01:48
Also, on the top left, I've got the option
01:51
to define whether it is a private markup,
01:54
or it's a published markup.
01:56
I'm going to start with adding a private markup.
01:59
Now, in this view, if I try to zoom or pan, as you could see,
02:02
I'm not allowed to do anything.
02:04
That's because in the markup views, we cannot zoom or pan.
02:08
If I need to navigate to an area where I want to add the markup,
02:11
I'll have to first navigate to that area
02:13
before I enter the markups environment.
02:16
So let me navigate into this area first.
02:19
And now, I'm going to tap on the markup tool.
02:22
I'll start with using the polycloud tool.
02:25
This tool lets me add a multi-sided cloud markup.
02:28
So I tap on polycloud.
02:30
I now tap somewhere here.
02:32
First point, second point, third point, fourth point.
02:37
And for the fifth point, I'll tap close to my start point.
02:40
And that's my polycloud markup.
02:42
If I tap on line style, I can specify
02:45
the color of this markup, and I can specify the thickness.
02:49
I'll change it to this thickness here.
02:51
If I tap on fill style, I can also
02:53
fill this markup with a color.
02:55
So let's say I want this fill color,
02:57
and now I'm going to add the text markup.
02:59
So I'll tap on text.
03:02
I'll tap somewhere below this cloud markup.
03:05
And now, I'm going to add some text.
03:07
To add the text, I'll tap on the default text.
03:10
It now displays this keyboard, and now I
03:13
can go and add the markup.
03:15
Please change the foundation to pile caps.
03:22
So that's the markup, and now I want to add an arrow as well.
03:25
So I will tap on the arrow markup tool.
03:28
I'll tap close to the textbox, and I can now
03:31
take it to the cloud markup.
03:34
So the end point of the arrow is where the arrowhead would be.
03:37
If I tap on the arrow tool, I can again go to line style.
03:40
I can make it a bit thicker line style.
03:42
Maybe this much, that's good enough.
03:45
I can tap on the textbox tool, and I can move it around.
03:49
I'll drop it somewhere here.
03:52
Now, that's the markup that I wanted to add.
03:54
Once I've added the markup, I'm going to tap on done.
03:59
So that's the markup added.
04:00
I'll now tap on exit markup view.
04:03
And similarly, I'll tap on markup again,
04:06
and I can go and add additional markups.
04:08
So let's say this time I want to use the cloud tool,
04:12
and I'm going to drag a cloud by specifying two opposite corners
04:16
on this structural column.
04:19
Once I've done this, I'm going to now
04:20
go and add the text as well.
04:23
Now, notice that it remembers the properties
04:25
from the previous markup.
04:26
The color fills and so on.
04:28
I'll tap on the text.
04:29
Update the structure columns.
04:32
And again, I can go and add an arrow as well.
04:37
So that's my markup.
04:38
I'm happy with this.
04:39
I'll tap done.
04:40
Once these markups are added, I'm
04:42
going to tap on exit markup view.
04:44
To access these markups, I can now
04:46
tap on the top right on the menu.
04:49
And I can now tap on markups.
04:52
It's now telling me that there are two private markups.
04:55
If I want to make any of these markups as published markups,
04:59
I can tap on the three dots, and I can publish.
05:03
So that will change the markup from private to a published
05:06
markup.
05:08
If I cross out of this model, similarly if you're
05:12
working on 2D sheets or PDF files in the plans area,
05:15
the markups will work exactly the same.
05:18
I can navigate to the area where I want to add the markups.
05:21
I'll then tap on the markup tool,
05:23
and I can see all the same markups available here.
05:25
Let's say in this case, I want to start with a highlight
05:28
markup.
05:29
I'll change the highlight color to yellow.
05:32
I'll also change the line thickness.
05:34
And now, I'm going to highlight this text here.
05:39
And I can go and add additional text and markups.
05:41
That's, in this case, again, I'm going
05:43
to go and add a cloud markup.
05:49
I'll change the style to red.
05:51
Line thickness is this.
05:53
I'll define a fill style like last time,
05:56
and now I'm going to add a text.
06:02
I'll tap done, and that's the markup added.
06:07
So as you could see, this PDF file now shows the up added.
06:11
If I tap on the menu on the top right,
06:13
I can see that there's one markup.
06:15
And again, I can define whether it's a private markup
06:18
or a published markup.
06:20
Similarly, you can add markups to the other documents as well.
06:23
I would recommend you guys give this a try and see how you go.
06:27
I'll see you in the next objective.
06:29
Cheers.
Task 1: Adding a Polycloud Markup to a Revit 3D Model
From the bottom toolbar, tap on the Markup option to enter the markups environment. Notice that in this environment, there are several markup tools available on the bottom toolbar, as shown in the following figure:
3.From the top right, tap Done to finish adding the markups.
4.From the top center in the app window, tap on Exit Markup View, as shown in the following figure to exit the markups view.
3.Tap on Publish; a confirmation window is displayed asking you to confirm.
4.Tap on Publish in the confirmation window to change this markup to a published markup for the rest of your team members to view it. The following figure shows a couple of markups changed to published markups.
How to buy
Privacy | Do not sell or share my personal information | Cookie preferences | Report noncompliance | Terms of use | Legal | © 2025 Autodesk Inc. All rights reserved
Sign in to start learning
Sign in for unlimited free access to all learning content.Save your progress
Take assessments
Receive personalized recommendations
May we collect and use your data?
Learn more about the Third Party Services we use and our Privacy Statement.May we collect and use your data to tailor your experience?
Explore the benefits of a customized experience by managing your privacy settings for this site or visit our Privacy Statement to learn more about your options.