Edit the content displayed on the panel

00:01

Hi there.

00:01

In this video with tri.

00:03

And it is crucial content within the app making our roads

00:06

and highways in Malaysia look great in it for us.

00:10

This is where we are on the overall view

00:12

of the analysis and civilian Jamie learning path.

00:15

Now we have a better general understanding

00:17

of the tab advanced options.

00:19

Let's explore some more interesting

00:21

edit to become made to reflect the real environment

00:23

a simulation in that regard.

00:25

Note that the menu bar scene by default tab

00:28

is just a standard one.

00:30

But we can change it either to our simpler or more complex

00:33

one under the action is tab on the right hand side, perhaps.

00:37

Also I would like to highlight that tab is just

00:39

the tip of the iceberg compared with the advanced options that,

00:43

didn't we did this simulation actual office.

00:46

Have you seen this before.

00:48

I'm pretty sure you have realized about his detail

00:50

previously although it looks like a crash.

00:53

It is not.

00:54

But it's also reflected within the infrared simulation.

00:58

So what's going on here.

00:59

Well let's think for a second about the intersection on what

01:03

is being intersected.

01:04

We have two high speed roads here right.

01:06

And by setting up the TSA for the way we did.

01:09

We are launching vehicles from these zones traveling

01:12

with a speed of 120 kilometers per hour or 75 miles per hour.

01:17

And we are pretending to make them stop in 35 meters.

01:20

That's not going to work in the real world.

01:22

Will it therefore take a break in distance for an average car

01:26

that travels with a speed of 80 kilometers per hour

01:29

or 50 miles per hour is approximately 17 meters as you.

01:34

So we have created another proposal

01:35

called pier 1A and within tab.

01:38

I'm investigating the default lane speed

01:40

by selecting all lanes on right click

01:42

to adjust if we adjust the lanes with a speed that

01:46

allows the vehicles to safely brake

01:48

to stop in a given distance.

01:50

We will solve the issue in this case 50 kilometers per hour

01:53

required a minimal 35 meters.

01:55

Once sync if the simulation is rerun

01:58

we will observe that there are no more weird cars appearing

02:01

in the middle of the intersection.

02:03

Now this will also apply when running the simulation in

02:06

enforce based on the previous explanation.

02:10

Something important to notice is that this tool

02:12

is able to compute process irregularities the vehicle's

02:16

braking distance its

02:18

There are a couple of alternatives

02:20

to tackle these phenomenon without using tap.

02:23

The first one is quite obvious.

02:24

Create the new TSA with the demand zones

02:27

far from the intersection.

02:28

They don't sign of it is that you would then

02:31

lose your personal simulations.

02:33

The second one that will bypass the previous.

02:35

Don't say it consists in editing the limits of the existing TSA.

02:39

TSA we in this case by doing that, you will notice

02:43

that the demand zones are not being automatically reposition

02:46

at the TSA limits represented by the red dashed line.

02:50

If that's a visual issue for you.

02:52

We will see how to amend it to be a tap.

02:54

If it doesn't Pose an issue for you,

02:57

then you're done because having the demand zooms there

03:00

when the limits are further away does not affect the simulation.

03:04

No dead vehicles departing from the East zone

03:06

are still having to break distances.

03:08

That's because TSA limits cannot be push away enough that

03:12

to back in tab, we have already moved the zones,

03:15

which in the TSA limits or the end of the route you can select

03:19

the zone either by double clicking or will click it on it

03:23

to move the zones in xy plane.

03:25

Your vision needs to have more than 45 degrees with respect

03:28

to the plan.

03:29

If you are below those 45 degrees,

03:32

you will move the zones in C elevation.

03:34

Something important to note is that the end of the road

03:37

must be completely inside the zone books.

03:40

Otherwise the simulation will not run properly.

03:44

Once you think the changes will be also reflected

03:46

the name forks back backing tap.

03:49

Let's open the demand distribution.

03:52

Remember that it reflects the vehicle style distribution

03:55

shown during the simulation.

03:57

We can observe the Bears and ditches

03:59

of vehicles that will display in our simulation

04:03

in order to have another disciple change.

04:05

Let's amend the table by exaggerating the tracks

04:08

percentage.

04:12

We also need to make sure that the demand division name

04:16

division in our case is used by the active demand matrix.

04:28

Finally to have the changes made reflected in our simulation.

04:33

We need to first sync, then to make active any all

04:38

the simulation in the least.

04:41

And then make our simulation active again.

04:51

If we ran.

04:51

Did you see him.

04:52

We'll see that almost all the vehicles displayed

04:55

on the tap simulation are cracks following the percentage

04:59

of the type of vehicle.

05:00

We have input on the demand division table.

05:18

Once I think the changes will be also reflected

05:21

the name forks no dead vehicles departing from the East zone

05:26

are still having to braking distances.

05:28

That's because TSA limits cannot be push away enough to select

05:33

a pair approach option, it will find under the resolve volume

05:36

dropped on many to check the average time delay

05:39

and their queue length.

05:40

Remember that the boxes are bar.

05:41

I call it based on the US.

05:43

I was level of service description.

05:45

Having six levels of service inflexible

05:48

Cola with the bars in blue for services

05:50

that are either a bc or D And the bars will be called in red.

05:54

If the level of service falls within the category E or f.

Video transcript

00:01

Hi there.

00:01

In this video with tri.

00:03

And it is crucial content within the app making our roads

00:06

and highways in Malaysia look great in it for us.

00:10

This is where we are on the overall view

00:12

of the analysis and civilian Jamie learning path.

00:15

Now we have a better general understanding

00:17

of the tab advanced options.

00:19

Let's explore some more interesting

00:21

edit to become made to reflect the real environment

00:23

a simulation in that regard.

00:25

Note that the menu bar scene by default tab

00:28

is just a standard one.

00:30

But we can change it either to our simpler or more complex

00:33

one under the action is tab on the right hand side, perhaps.

00:37

Also I would like to highlight that tab is just

00:39

the tip of the iceberg compared with the advanced options that,

00:43

didn't we did this simulation actual office.

00:46

Have you seen this before.

00:48

I'm pretty sure you have realized about his detail

00:50

previously although it looks like a crash.

00:53

It is not.

00:54

But it's also reflected within the infrared simulation.

00:58

So what's going on here.

00:59

Well let's think for a second about the intersection on what

01:03

is being intersected.

01:04

We have two high speed roads here right.

01:06

And by setting up the TSA for the way we did.

01:09

We are launching vehicles from these zones traveling

01:12

with a speed of 120 kilometers per hour or 75 miles per hour.

01:17

And we are pretending to make them stop in 35 meters.

01:20

That's not going to work in the real world.

01:22

Will it therefore take a break in distance for an average car

01:26

that travels with a speed of 80 kilometers per hour

01:29

or 50 miles per hour is approximately 17 meters as you.

01:34

So we have created another proposal

01:35

called pier 1A and within tab.

01:38

I'm investigating the default lane speed

01:40

by selecting all lanes on right click

01:42

to adjust if we adjust the lanes with a speed that

01:46

allows the vehicles to safely brake

01:48

to stop in a given distance.

01:50

We will solve the issue in this case 50 kilometers per hour

01:53

required a minimal 35 meters.

01:55

Once sync if the simulation is rerun

01:58

we will observe that there are no more weird cars appearing

02:01

in the middle of the intersection.

02:03

Now this will also apply when running the simulation in

02:06

enforce based on the previous explanation.

02:10

Something important to notice is that this tool

02:12

is able to compute process irregularities the vehicle's

02:16

braking distance its

02:18

There are a couple of alternatives

02:20

to tackle these phenomenon without using tap.

02:23

The first one is quite obvious.

02:24

Create the new TSA with the demand zones

02:27

far from the intersection.

02:28

They don't sign of it is that you would then

02:31

lose your personal simulations.

02:33

The second one that will bypass the previous.

02:35

Don't say it consists in editing the limits of the existing TSA.

02:39

TSA we in this case by doing that, you will notice

02:43

that the demand zones are not being automatically reposition

02:46

at the TSA limits represented by the red dashed line.

02:50

If that's a visual issue for you.

02:52

We will see how to amend it to be a tap.

02:54

If it doesn't Pose an issue for you,

02:57

then you're done because having the demand zooms there

03:00

when the limits are further away does not affect the simulation.

03:04

No dead vehicles departing from the East zone

03:06

are still having to break distances.

03:08

That's because TSA limits cannot be push away enough that

03:12

to back in tab, we have already moved the zones,

03:15

which in the TSA limits or the end of the route you can select

03:19

the zone either by double clicking or will click it on it

03:23

to move the zones in xy plane.

03:25

Your vision needs to have more than 45 degrees with respect

03:28

to the plan.

03:29

If you are below those 45 degrees,

03:32

you will move the zones in C elevation.

03:34

Something important to note is that the end of the road

03:37

must be completely inside the zone books.

03:40

Otherwise the simulation will not run properly.

03:44

Once you think the changes will be also reflected

03:46

the name forks back backing tap.

03:49

Let's open the demand distribution.

03:52

Remember that it reflects the vehicle style distribution

03:55

shown during the simulation.

03:57

We can observe the Bears and ditches

03:59

of vehicles that will display in our simulation

04:03

in order to have another disciple change.

04:05

Let's amend the table by exaggerating the tracks

04:08

percentage.

04:12

We also need to make sure that the demand division name

04:16

division in our case is used by the active demand matrix.

04:28

Finally to have the changes made reflected in our simulation.

04:33

We need to first sync, then to make active any all

04:38

the simulation in the least.

04:41

And then make our simulation active again.

04:51

If we ran.

04:51

Did you see him.

04:52

We'll see that almost all the vehicles displayed

04:55

on the tap simulation are cracks following the percentage

04:59

of the type of vehicle.

05:00

We have input on the demand division table.

05:18

Once I think the changes will be also reflected

05:21

the name forks no dead vehicles departing from the East zone

05:26

are still having to braking distances.

05:28

That's because TSA limits cannot be push away enough to select

05:33

a pair approach option, it will find under the resolve volume

05:36

dropped on many to check the average time delay

05:39

and their queue length.

05:40

Remember that the boxes are bar.

05:41

I call it based on the US.

05:43

I was level of service description.

05:45

Having six levels of service inflexible

05:48

Cola with the bars in blue for services

05:50

that are either a bc or D And the bars will be called in red.

05:54

If the level of service falls within the category E or f.

Edit the content displayed on the panel - Exercise

Task 1: Change the speed limit of your intersection

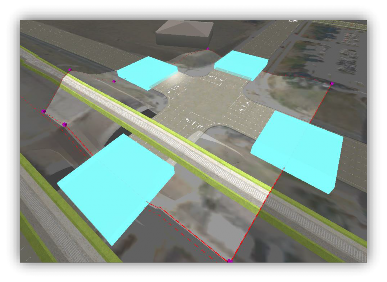
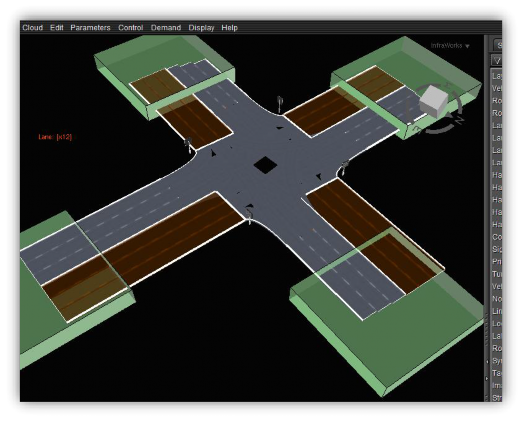
  1. Create a TSA – Traffic Study Area with limits as close as possible to the intersection (allowing the demand zones to display).

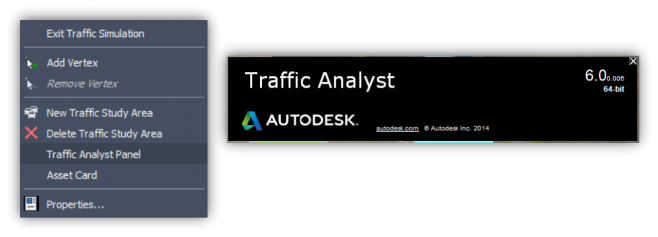
  2. Right-click on the canvas to open the Traffic Analyst Panel.

  3. Zoom and move the canvas to get a view that allows you to see all the zones as close as possible.
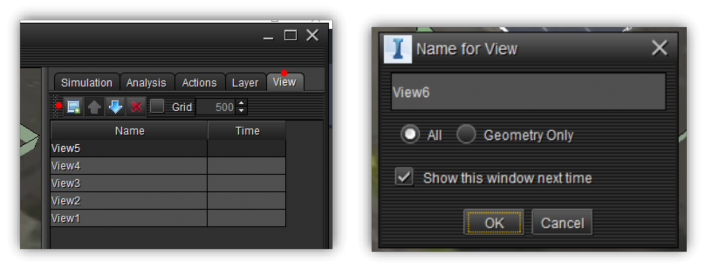
  4. Select the View tab on the righthand side menu, create new, and rename as you consider.

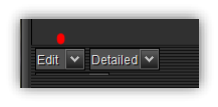
  5. Make sure you have the Edit mode selected at the bottom of the View tab.

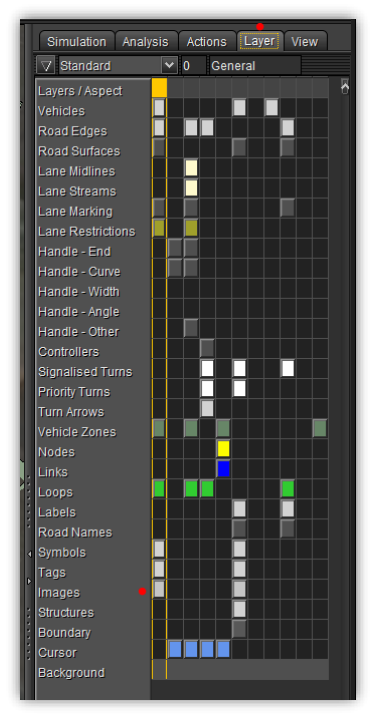
  6. Switch off the Imageslayer under the Layer tab on the righthand side menu. The Highlighter column represents the active Layer selection. Images appear as Active on the below image. The cell will be black if the layer is switched off.

  7. Select all lanes by continuously pressing Control and double-clicking over the lanes or continuously pressing Control and wheel-clicking over the lanes. Select only the lanes approaching the intersection.

  8. Right-click over any area selected and select Adjust.

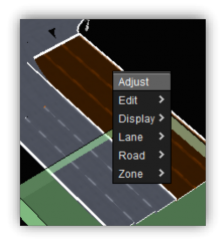
  9. On the Adjust menu, edit the whole Route Speed column to a high-speed value, i.e. 140 Kph.
  10. Click Apply and OK.
  11. Run the simulation we were working on first in TAP and then in InfraWorks.
  12. You should see clashes between vehicles or vehicles stopping in the middle of the intersection.
  13. Repeat the process by changing the speed to a low-speed value, i.e. 40 Kph, and run the simulations again.
Was this information helpful?